Lemon Garlic Marinated Grilled Chicken

Lemon Chicken

This grilled chicken recipe is a go-to for me FOR SURE.  I’ve been using it for years (ever since I found it on The Sister’s Cafe website . . . and it’s been posted there since 2011).  It’s so basic, yet SO flavorful.  The flavors are pleasing to just about any palette because they aren’t too weird, too spicy, or too strong.  I often times marinate my chicken, grill it, and then eat it as is with a nice side dish.  But, this chicken is so wonderful atop salad in almost any form (my favorite being either a beautiful Cobb salad or a spinach salad).

I highly recommend adding this to your go-to stash for easy, delicious, crowd-pleasing, and fast dinner/lunch recipes.

Lemon Garlic Marinated Grilled Chicken
Mimi’s Fit Foots
Adapted from The Sister’s Cafe

Ingredients:
3 tablespoons lemon juice (I always use freshly-squeezed)
3 tablespoons extra virgin olive oil
2 cloves minced garlic
1 teaspoon salt
1/4 teaspoon pepper
1/2 teaspoon dried oregano
1 pound chicken breasts

Directions:
Combine all ingredients, except for the chicken. Whisk to combine. Pour marinade over chicken breasts and marinate chicken for at least three hours, but it’s even better if it’s marinated for 8-12 hours.

Grill chicken breast when ready. Chicken is ready when the internal temperature (of the thickest part of the breast) registers at 165 degrees.

Serves 4.

Nutritional Information (Per Serving):
148.5 Calories | 0.2g Carbs | 4.3g Fat (1.0g = Sat) | 0g Fiber | 0g Sugar

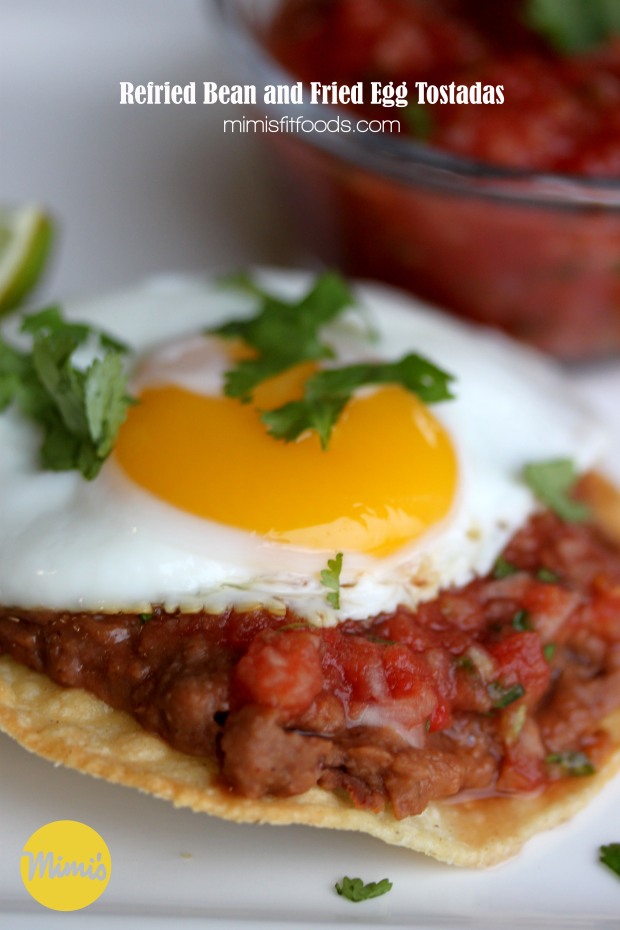
Refried Bean and Fried Egg Tostadas

Refried Bean and Fried Egg Tostadas | Mimi's Fit Foods

You want a quick, easy, meatless meal that also happens to be gluten free?  Enter in this Refried Bean and Fried Egg Tostada.  It comes together in a flash.  And, if you’re anything like me, occasionally (or more often than occasionally) you forget to thaw meat for dinner and shear panic hits with the frazzled, “What in the world am I going to make for dinner!?”  Well, never fear because this is a great solution!

This recipe is a bonus because it also fits well for lazy nights, there are not a lot dishes, and you can seriously throw it together in 20 minutes or less.  This recipe also uses that awesome Winter Salsa in the previous post.  Of course, you can use your own variation of salsa, but I’m definitely going to recommend using the Winter Salsa so you can really cash in on the authentic taste.

The best bonus . . . these tostadas taste awesome!  They are satisfying and taste very authentic.  My hubby made the comment that he thought this tasted like something we had eaten on vacation in South America (Nicaragua to be specific).

So, take advantage of all these bonuses and throw it in your wheelhouse because if you don’t have a night when all the aforementioned bonuses are in need . . . . well, you’re super human and you better start teaching me your tricks!

Refried Bean and Fried Egg Tostadas
Mimi’s Fit Foods

Ingredients:
2 Mission Thin corn tortillas
nonstick cooking spray
4 tablespoons fat free refried beans (I used Rosarita brand)
2-4 tablespoons Winter Salsa, see post for link (or salsa of your choice)
2 eggs
chopped cilantro for garnish, optional

Directions:
Preheat oven to 375 degrees. Spray corn tortillas (both sides) with nonstick cooking spray and place on a baking sheet. Bake tortillas for about 12-15 minutes, or until desired doneness/browning/crispness is reached.

While tortillas are baking warm refried beans in a saucepan on stovetop over low-medium heat. Cook until heated through.

Meanwhile, prepare to cook your egg. Heat a skillet over medium heat. Spray with nonstick cooking spray. Break your egg gently in to the pan and lower your heat to low. Cook the egg until the whites and yolk reach the desired consistency (usually this means that the whites are firm and the yolk is thick but not firm . . . offering that runny consistency). Repeat with second egg (unless your pan is big enough to cook both at the same time).

Assemble your tostadas. Put 2 tablespoons refried beans on each tostada, followed by 1-2 tablespoons of Winter Salsa, an egg, and garnish with cilantro.
Enjoy!

Serves 1 (2 Tostadas Per Serving).

Nutritional Information (Per Serving = 2 Tostadas):
284 Calories | 17.9g Protein | 27.3g Carbohydrates | 10.6g (3.2g = Sat) Fat | 5.1g Fiber | 3.8g Sugar

FIt Mexican Stack

Fit Mexican Stack || Mimi's Fit Foods

OMG!  I seriously cannot believe that I haven’t blogged this yet.   I mean, I kind of can.  Mostly because whenever I make it we NEVER want to wait for me to snap photos of it before we eat.  Lucky for you all, the hubby and the baby were outside when this came out of the oven so I hurried as fast as I could to snap some photos before we gobbled it up.

Fit Mexican Stack | Mimi's Fit Foods

I’ve been making it for years.  It’s a family favorite.  It’s got all those classic Mexican flavors, but it’s oh-so-fun with the way it is layered and the layers definitely add some great texture.  I adapted the recipe from America’s Test Kitchen. That should already sell you on the deliciousness, but let me just give you a few highlights.  Pretoasting the tortillas makes this dish a winner.  When they’ve been crisped up, they not only taste great, but they provide the necessary structure for the stack.  The toasted tortillas also help us to avoid that raw flavor and gummy texture that soggy tortillas can leave behind  So, the toasted tortillas are definitely a huge highlight.  Another huge highlight is the great amount of  filling you find between layers.  You will NOT feel short-changed here, folks. And, if I can, I must also highlight the mashed black beans.  I simply love them!

Fit Mexican Stack - Mimi's Fit Foods

So, what I’m saying here is that you should really make this because I’m pretty sure you’re going to find that it will become one of your family favorites too.  It’s a winner, hands down!

Fit Mexican Stack
Mimi’s Fit Foods
Adapted from The America’s Test Kitchen Healthy Family Cookbook

Ingredients:
2 teaspoons canola oil
1 cup frozen corn, thawed
8 ounces plum tomatoes (2 to 3), cored and chopped medium
4 green onions, sliced thin
1 teaspoon fresh lime juice
2 tablespoons minced fresh cilantro
salt and pepper
1 onion, minced
3 garlic cloves, minced
1 jalapeño pepper, stemmed, seeded, and minced
1 teaspoon ground cumin
1 (15-ounce) can black beans, rinsed
3/4 cup low-sodium chicken broth
12 ounces cooked and shredded chicken breast
4 (10-inch) whole-wheat flour tortillas
vegetable oil spray
3/4 cup shredded 50% light cheddar cheese (about 3 ounces)

Directions:
Heat 1 teaspoon of the oil in a 12-inch nonstick skillet over medium-high heat until shimmering. Add the corn and cook until golden, about 4 minutes. Transfer the corn to a large bowl, stir in the tomatoes, green onions, lime juice, and 1 tablespoon of the cilantro and season with salt and pepper to taste.

Wipe the skillet clean with paper towels, add the remaining teaspoon of oil, and heat over medium heat until shimmering. Add the onion and cook until softened, 3 to 5 minutes. Stir in the garlic, jalapeño, and cumin and cook until fragrant, about 30 seconds.

Stir in the black beans and the chicken broth and cook until the liquid has nearly evaporated, 4 to 6 minutes. Transfer the mixture to a large bowl and mash the beans with a potato masher until no beans are left whole. Season with salt and pepper to taste.

Meanwhile, heat the oven to 400 degrees. Lightly spray both sides of half the tortillas with vegetable oil spray and lay on a baking sheet.

Bake the tortillas until lightly browned on both sides, 8 to 10 minutes, flipping them half-way through the baking. Remove the tortillas from the oven and repeat with the remaining tortillas.

Line a rimless or inverted baking sheet with parchment paper. Place one of the toasted tortillas on the prepared baking sheet. Spread one-quarter of the mashed beans over the top, leaving a 1/2-inch border at the edge. Sprinkle with one-quarter of the corn mixture, one-quarter of the chicken, and 3 tablespoons cheddar. Repeat with the remaining tortillas, beans, corn, chicken, and cheddar and stack the topped tortillas to make a layered stack.

Bake the Mexican Stack until the cheese is melted and slightly brown, 20-25 minutes. Let the stack cool on the baking sheet for 5 minutes, then slide it onto a cutting board using the parchment. Remove the parchment and sprinkle with the remaining tablespoon cilantro. Cut into 8 wedges and serve hot.

Serves 8.

Nutritional Information (Per Serving = 1 Slice):
210.7 Calories | 21.1g Protein | 25.6g Carbs | 6g (1.6g = Sat.) Fat | 10.2g Fiber | 2.3g Sugars

Rosemary, Garlic and Lemon Chicken Kabobs

Rosemary, Garlic and Lemon Chicken Kabobs | Mimi's Fit Foods

Grilling season is in full swing and these kabobs were one of the very first things we threw on the grill this summer.  They are so, so, SO good.  The flavors are summery fresh and they all meld together incredibly well.  We’re talking rosemary, garlic and lemon!  Amazing!  There’s plenty of each of these ingredients in the marinade, so there is no lack of flavor whatsoever.

And, if that isn’t convincing enough, the chicken is incredibly moist (so long as you don’t over cook).  The base for the marinade is buttermilk and while it provides nice tang, it also makes that chicken nice and juicy!

We like to add bell peppers and red onion to our kabobs.  There are various opinions on whether you should grill your veggies separate from your meat.  The main argument for this is so that you can cook each to the level of doneness you prefer since they rarely get done at the exact same time.  I am not picky with the level of doneness on my veggies (I find that they’re slightly still crisp once the chicken is done . . . and I love them like that anyways), so I combine my meat and veggies on the same skewer.  Plus, I think it looks prettier.  However, if you’re one that likes your veggies cooked to a perfect doneness (per your opinion), then put your meat and veggies on separate skewers.

You seriously gotta make these this summer.  Probably more than once!  Again, they are so, so, SO good!

Rosemary, Garlic and Lemon Chicken Kabobs
Mimi’s Fit Foods
Adapted from America’s Test Kitchen

Ingredients:
1 1/2 pounds boneless, skinless chicken breasts, trimmed and cut into 1 1/4-inch pieces
3/4 cup lowfat buttermilk
2 tablespoons minced fresh rosemary
1 tablespoon extra virgin olive oil
3 garlic cloves, minced
1 1/2 teaspoons grated lemon zest, plus
1 tablespoon fresh lemon juice
1 teaspoon salt
1/2 teaspoon pepper
2 red, yellow, or orange bell peppers, stemmed, seeded, and cut into 1-inch pinches
1 large red onion, cut into 1-inch squares
lemon wedges (for serving)

Directions:
Pepare marinade by combining buttermilk, rosemary, olive oil, minced garlic, lemon zest, lemon juice, salt, and pepper in a small-medium bowl. Whisk to combine.

Combine the chicken and marinade in a large zipper-lock bag, press out the air, and seal the bag tightly. Toss to coat the meat and let marinate in the refrigerator for at least 1 hour or up to 6 hours, flipping the bag occasionally.

Thread the marinated chicken, peppers, and onion onto 12 skewers in an alternating pattern, then brush with leftover marinade.

Prepare grill. IF USING A GAS GRILL: Turn all the burners to high, cover, and heat the grill until hot. Turn all the burners to medium-high. IF USING A CHARCOAL GRILL: Open the bottom grill vents completely. Light a large chimney starter three-quarters full with charcoal briquettes. When the coals are hot, pour them in an even layer over the grill.

Set the cooking grate in place, cover, and heat the grill until hot.

Clean and oil the cooking grate. Place the kabobs on the grill and cook, turning as needed, until the chicken and vegetables are lightly charred on all sides and the chicken registers 160 to 165 degrees on an instant-read thermometer (or until juices run clear), 8-12 minutes.

Transfer the kabobs to a platter, tent loosely with aluminum foil, and let rest for 5 minutes. Serve with lemon wedges.

Serves 6.

Nutritional Information Per Serving (2 Kabobs):
147.5 Calories | 24.9g Protein | 7.1g Carbs | 3.9g Fat (0.5g = Sat.) | 1g Fiber | 3.1g Sugars

Fit Homemade Spaghetti Sauce

Fit Homemade Spaghetti Sauce | Mimi's Fit Foods

I’ve said it before, but my hubby is not the biggest fan of traditional Spaghetti (thus this and this), but I am.  We had a lengthy discussion about this and what it came down to was the sauce.  He’s just not a fan of the bottled/canned sauces that are available to purchase on the grocery isle.  So, I set out to make us a homemade sauce that would make all of our tummies smile.  Here’s what did the trick!

The secret to most GREAT sauces is the opportunity to let them simmer for a nice amount of time.  While this sauce takes only a few minutes to prepare, it does require a nice 45-minute simmer.  So, plan ahead.  The simmering is where all the magic happens, so don’t be messing with that step if you mess with anything.

I love the balance of textures found in the sauce.  I used a combination of diced tomatoes and crushed tomatoes and I think it yielded some fabulous texture.

The spice combination is pretty perfect too!  If I wasn’t feeding a 2-year-old, I may have added a bit more crushed red pepper . . . but what I have in the recipe is definitely enough to give is a slight punch without really even noticing it’s there. And, you’ll find all your traditional Italian spices in there too.

Fit Homemade Spaghetti Sauce - Mimi's Fit Foods

I must note that I used no added sugars.  Sugars are typically added to most spaghetti sauces.  I was hoping that this sauce would taste well without it, and I am happy to report that it’s not even missed . . . not one bit!

You can easily use lean ground beef in the recipe.  I chose to use ground turkey to save a little on calories and fat, but they can be interchangeable.

This recipe makes a lot of sauce.  I like it that way because then I can freeze it and use it for later (without having to do any of the work).  It freezes beautifully.

I like to serve this sauce on top of whole wheat noodles of any kind.  It would also be delicious served over spaghetti squash.  Seriously  . . . I’m so glad to have this recipe because now we can have spaghetti a little more often with smiles all-around!  Homemade is always better, isn’t it!?

Fit Homemade Spaghetti Sauce
Mimi’s Fit Foods
Adapted from Tastes of Lizzy T

Ingredients:
2 pounds ground turkey
1 medium yellow onion, chopped
4 cloves garlic, minced
1 (15-ounce) can crushed tomatoes
2 (14.5-ounces each) cans Italian diced tomatoes, with juice
1 (6-ounce) can tomato paste
1 cup water
2 teaspoons salt
2 teaspoons lemon juice
2 tablespoons extra virgin olive oil
2 teaspoons dried oregano
2 teaspoons dried basil
1 teaspoon dried thyme
1/2 teaspoon crushed red pepper

Directions:
In a large saucepan, brown the ground turkey along with the chopped onion. Drain, if necessary.

Add in the rest of the ingredients and bring to a low boil, stirring often. Once the sauce is heated through and at a low boil, reduce the burner temperature to low and simmer uncovered for 45 minutes, stirring occasionally.

Yields Approximately 13 Cups.

Nutritional Information (Per 1/2 Cup):
77 Calories | 7.9g Protein | 4.1g Carbs | 3.6g Fat (0.9g = Sat.) | 0.6g Fiber | 2.5g Sugars

Lighter Grilled Ham and Double Cheese

Lighter Grilled Ham and Double Cheese | Mimi's Fit Foods

Ham and cheese . . . one of those combinations that are just meant to go together on a sandwich.  Here is a version that comes in with much less calories and fat than a typical grilled Ham and Cheese sandwich.  I used a thick slice of lean ham, and then I used Sargento’s Ultra Thin sliced cheeses.  You can play around with the cheese flavors, but I used my two favorites that I love with ham . . . Swiss and Sharp Cheddar.

I added Dijon mustard to my sandwich because I love the grown-up taste that it offers to the sandwich.  You get a nice tang and I think it compliments the ham beautifully.  That being said, it can totally be optional.  If you’re not a mustard fan, or if you’re making sammies for little kiddos, feel free to leave it off.

I just grilled mine in a nonstick sauté pan with a lid on it (to trap in the heat so that the cheese would melt and the ham would warm through).  There are a couple of other easy ways to grill/toast your sandwich and if I was going to make several sandwiches at once, I would probably use another method.  You can quickly toast both sides of your sandwiches on the stovetop in a nonstick skillet and then put them on a baking tray, throw them in a 350-degree oven and let them warm through in there (about 5 minutes).  Another option would be to use a toaster oven if you have one.  And lastly, you can use a George Foreman grill or a panini grill to get the job done.

Any way you look this, the sandwiches come together in just a few minutes and they taste great, are nice and gooey, and you get the satisfaction of having a classic comfort food without all the extra calories and fat!

Lighter Grilled Ham and Double Cheese
Mimi’s Fit Foods

Ingredients:
2 slices whole-wheat bread (I used Orowheat’s 100% whole-wheat bread/90 calories per slice)
2 ounces lean ham
2 slices Sargento Ultra Thin slices cheese (I used Swiss and Sharp Cheddar)
1 teaspoon Dijon mustard, optional
butter-flavoried nonstick cooking spray

Directions:
Heat a nonstick saute pan over heat.

Meanwhile, assemble your sandwich by starting with laying 2 slices of bread on a work surface. Place 1 slice of cheese on one slice of the bread, lay the ham on top of the cheese, and then place the last cheese slice on top of the ham. Spread the mustard, if using, on the remaining slice of bread. Place that slice of bread, mustard side down, on top of the cheese.

Away from the stove, spray the sauté pan with cooking spray. Spray both sides of the sandwich with cooking spray, and place the sandwich in the pan. Cover with a lid. Brown each side of the sandwich, about 5-8 minutes per side.

Serves 1.

Nutritional Information Per Sandwich:
334.6 Calories | 23.3g Protein | 36.7g Carbs | 10.8g Fat (5g = Sat.) | 6g Fiber | 9g Sugars

Chicken and Tabouli Gyros

Chicken and Tabouli Gyros | Mimi's Fit Foods

As promised . . . here’s a yummy and healthy idea of ways to use that delicious Whole Wheat Flatbread!  These Gyros are sooooooo easy and they taste great.  All you do is make the Quinoa Tabouli, whip up some Whole Wheat Flatbread, throw in some shredded chicken, and you’ve got yourself a delicious Gyro!

Like I’ve mentioned several times before, I love cooking up a big batch of shredded chicken in my slow cooker so I can assemble meals at the drop-of-a-hat.  That’s what I had done here.  I had made the Quinoa Tabouli the day before, I already had shredded chicken sitting in my fridge, so really all I had to do for dinner was make the flatbread.

These taste super fresh and they’re very filling.  The only thing I think that would make these even better would be to add Tzatziki (you can make your own or buy it).  If you can spare a few extra calories, add it in!  It would take these from delicious to super delicious!

Chicken and Tabouli Gryos

1 Whole Wheat Flatbread
1/4 cup Quinoa Tabouli
3 ounces cooked and shredded chicken breast
Tzatziki, optional

To assemble place shredded chicken down the center of the flatbread.  Evenly top with Quinoa Tabouli.  If desired, top Tabouli with Tzatziki.  You can either fold in the sides of the flatbread and roll it up.  Or, you can fold it half like a taco.  Enjoy!

Serves 1 (but can easily be multiplied).

Nutritional Information per Gyro
Calories:  279.3
Protein:  25g
Carbs:  32.7g
Fat:  6.8g
Fiber:  4.6g
Sugars:  3.2g

Slow Cooker Balsamic Chicken and Pears

Slow Cooker Balsamic Chicken and Pears|Mimi's Fit Foods

Ok.  Ok.  I know this is not the most glamorous looking dish.  However, it is so darn easy, so darn healthy, and so darn good.  I just have to share!

The balsamic vinegar yields a nice tang, while the pears balance that out with a hint of sweetness.  You’ll also find that by cooking the chicken in the slow cooker you get some natural chicken broth that mixes with the balsamic vinegar and this gives the perfect low-calorie sauce.  We ate this dish with Baked Brown Rice and the sauce poured over the top was deeeeeelish!

Oh, and the slow cooker does all the work?  Awesome!

Slow Cooker Balsamic Chicken and Pears
Adapted from Laa Loosh

1 1/2 pounds skinless, boneless chicken breasts
2 medium sized pears, cored and sliced thick
3/4 cup balsamic vinegar
1 tsp salt
1/2 tsp black pepper

Place all ingredients in the slow cooker and let cook for about 4-6 hours on low, or until chicken falls apart easily.

Serves 6.

Nutritional Information (Per Serving – Approx. 4 oz.)
Calories:  146.8
Protein:  23.2g
Carbs:  11g
Fat:  1.1g (0.0g = Sat.)
Fiber:  1.4g
Sugars:  8.6g (mostly from pears)

Roasted Asparagus and Chicken Pasta with Balsamic Butter

Roasted Asparagus and Chicken Pasta with Balsamic Butter|Mimi's Fit Foods

How about a pasta dish that is under 300 calories per serving?  Yes, please!

We love, love, LOVE this pasta dish!  When fresh asparagus hits the stores, this recipe immediately goes in our line-up!  The asparagus adds that great freshness to the overall taste, while the balsamic butter coats everything with a sweet tanginess.  And, fresh Parmesan?  The perfect way to top it all off!

The funny thing about this recipe is that it screams spring-time . . . thanks to that asparagus.  But, the balsamic butter also gives the recipe a bit of comfort.  In the fall/winter months when asparagus isn’t at it’s best, just sub in some steamed broccoli and you’ve got a dish that you can add to your favorites year-round!

Roasted Asparagus and Chicken Pasta with Balsamic Butter
Adapted from Mel’s Kitchen Cafe

1 pound fresh asparagus spears
1/2 tablespoon extra virgin olive oil
3/4 teaspoon salt
1/2 teaspoon freshly ground black pepper
3/4 cup balsamic vinegar
1 teaspoon light or dark brown sugar
8 ounces whole wheat/grain penne pasta, dry
2 tablespoons light butter, cut into pieces (I used Smart Balance)
1 pound chicken breast, cooked and shredded
1/3 cup freshly grated Parmesan cheese, plus more for serving

Heat the oven to 400 degrees. Snap the tough ends off the asparagus and discard them. Cut the asparagus spears into 1-inch pieces. Put the asparagus on a rimmed baking sheet and toss with the oil and 1/4 teaspoon of the salt and 1/4 of the pepper. Roast until tender, about 10 minutes. Remove from the oven and set aside.

While the asparagus roasts, put the vinegar in a small saucepan. Simmer over medium heat until the vinegar is reduced to about 5 tablespoons, about 5-10 minutes. Stir in the brown sugar and the remaining 1/4 teaspoon pepper. Remove from the heat and stir in butter until melted.

Cook the penne in a large pot of boiling salted water until just done, 11-13 minutes. Drain the pasta and return to the pot. Stir in the balsamic butter mixture. Toss to combine well. Add in the asparagus, chicken, Parmesan, and the remaining 1/2 teaspoon salt. Serve immediately with additional Parmesan cheese for serving.

Serves 6.

Nutritional Information (Per Serving)
Calories:  298.5
Protein:  25.1g
Carbs:  36.3g
Fat:  7.3g (2.3g = Sat.)
Fiber:  5.6g
Sugars:  1.3g

Chicken Salad Sandwiches With Avocado (Mayo-Less)

Chicken Salad With Avocado | Mimi's Fit Foods

It’s St. Patrick’s Day, so I just had to post another something green.  While this is great for St. Patrick’s Day, it’s really great for any day so you need to add it to your lists right now.  🙂

This is great because it is a chicken salad sandwich, but it’s using avocado instead of mayo.  Brilliant!  We get all the healthy benefits from using an avocado and we’re getting those good fats instead of the bad ones.  The avocado also offers a nice creamy texture and loads on the flavor (thanks to those good, healthy fats).  The egg also helps to boast the flavor while the dried cranberries balance things out with a hint of sweetness.  If desired, you can totally add chopped cashews to your sandwich to catch that traditional crunch you get from chicken salad.  I decided to omit them to save calories, but I’m sure they would be super delicious!

For someone who loves chicken salad sandwiches, I’m pretty darn happy with this version!

Chicken Salad Sandwiches With Avocado (Mayo-Less)
Adapted from The Skinny Fork

5 ounces chicken breast, cooked & shredded
1 medium hass avocado, mashed
1 large egg, hardboiled and diced
1 tablespoon dried cranberries
salt & pepper to taste
whole wheat bread (100 calories, per slice)

Combine all ingredients in a small bowl and fold gently to combine.  Divide in half and make two sandwiches.  (I make half sandwiches, using only one slice of bread.  And, in my case, I actually make three sandwiches out of this recipe.  Two bigger ones for me and the hubby, and a small one for the babe.)

Serves 2 (Generously).

Nutritional Information (Per Sandwich using 100 calories for bread)
Calories:  383
Protein:  24.9g
Carbs:  26.1g
Fat:  19.2g (1.3g = Sat.)
Fiber:  5.6g
Sugars:  8g