Winter Salsa

Winter Salsa | Mimi's Fit Foods

Well folks!  I’m finally returning back to my blog.  Adjusting to life with two children was a little more challenging for me than I thought it would be.  So, the blog just never made it on the to-do list.  I’m feeling much more adjusted to life now days and am creating/trying new recipes again.  Yay!  So . . . without further ado, let’s get back into it with salsa!  Salsa that tastes fresh, even in the winter months.

I love salsa!  That’s no secret if you peruse the blog here.  I definitely prefer fresh salsa over the store-bought stuff.  Sometimes that just gets tricky in the winter months since the tomatoes are just not in season and lacking in flavor.  I mean, let’s be honest . . . we only get the good garden-fresh tomatoes a few months out of the year.  So, what can we do the other nine?

Surprisingly, I whip up this salsa from canned tomatoes and jalapeños.  I pair the canned stuff with fresh cilantro and onions.  The salsa is AMAZING and full of rich tomato flavor.  My husband tells me that it tastes just like the salsas found in authentic Mexican restaurants.  You know . . . when you get served the chips and salsa when you are seated.

Perhaps that is all you need to know.  But, more importantly, you can still make salsa during the winter months or when you just don’t have fresh tomatoes handy.  This salsa is good year round.

Enjoy!

Winter Salsa
Mimi’s Fit Foods

Ingredients:
2 (15-ounce) cans diced tomatoes
1 tablespoon canned jalapeños
1 onion, roughly diced
1/4 – 1/2 cup cilantro (depending on your taste preference), roughly torn
juice of 1 lime
salt & pepper to taste (I do about 1/2 tsp. salt, 1/4 tsp. pepper)

Directions:
Put all ingredients in a food processor. Pulse until salsa is “chopped” up to desired consistency (anywhere from 5-10 pulses).

Nutritional Information (Per Serving = 2 Tablespoons)
5.9 Calories | 0.2g Protein | 1.4g Carbs | 0g Fat | 0.4g Fiber | 0.6g Sugar

Advertisement

Greek Yogurt Ranch Dressing

Greek Yogurt Ranch Dressing || Mimi's Fit Foods

This is for all of you Ranch Dressing lovers!  I recently made this to go on our taco salads.  I usually make my Ranch Dressing with cottage cheese (you can check that out here), but this is a good alternative . . . especially if you’re looking for more of the “right” consistency.

I throw everything in a Mason Jar and shake it up.  It turns out beautifully!  Make sure you use the Ranch Dressing packet (not the Dip packet).

This is a GREAT alternative to making the typical Ranch Dressing with full-fat sour cream and buttermilk.  It can be used for everything you love to use Ranch Dressing with (salad, veggies, snacks, etc.).

Greek Yogurt Ranch Dressing | Mimi's Fit Foods

Greek Yogurt Ranch Dressing
Mimi’s Fit Foods
Adapted from No Thanks To Cake

Ingredients:
1 cup non-fat plain Greek yogurt
1/2 cup low fat milk (I used 1%)
1 packet of Ranch dressing mix

Directions:
Put all ingredients in a pint jar. Tighten lid on jar and shake until everything is well combined. (You could also put all the ingredients in a bowl and whisk until combined.)

Serves 12.

Nutritional Information (Per Serving = 2 Tablespoons):
16.3 Calories | 2.3g Protein | 1.3g Carbs | 0.1g Fat (0.1g = Sat.) | 0g Fiber | 1.3g Sugars


Fresh Herb Sweet Potato and Zucchini Baked Fritters

Fresh Herb Sweet Potato and Zucchini Baked Fritters

I haven’t shared one zucchini recipe with you this year.  That is kind of ridiculous considering it’s a staple at our house starting mid-summer.  We still have zucchini growing like crazy and, unlike many others, we are STILL loving it.  For those of you who are looking for another creative and delicious way to use zucchini I must share one of my new favorite ways to use to use it.  These fritters make such a delicious side dish and go with just about any main course.  And, they look pretty fancy to boot!

They are seriously easy to prepare, especially if you have a food processor.  I like using the food processor to shred my sweet potatoes and zucchini for two reasons.  1 – It’s fast.  2 – Everything turns out to be the same size.  However, if you don’t have a food processor you can totally use a hand grater and your fritters will turn out just fine.

Shredded Sweet Potatoes & Zucchini | Mimi's Fit Foods

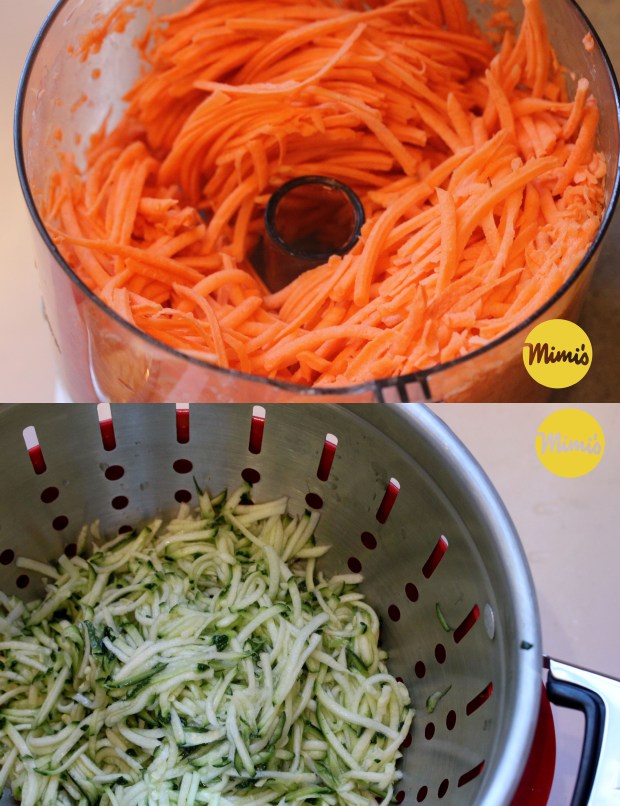
I looked at several fritter recipes and, based on previous experience/knowledge of zucchini, I found it pretty essential to get as much liquid out of the zucchini as I could before cooking up my fritters.  There are several ways to do this, but the easiest and most mess-free way of accomplishing this task is to place your shredded zucchini in a colander, salt the zucchini, and then let it sit for about 30 minutes (you’ll want to place the colander over a bowl or simply in a sink to catch the liquid).  This magically pulls the liquid out of the zucchini and all you have to do is gently press it with a spoon to get any extra liquid out.  (Another popular method is to squeeze the zucchini with a towel, paper towels, or cheese cloth.  While this works, I still find it hard to get as much liquid out of the zucchini and then I have a dirty, wet, green towel to deal with.)

Also, if you’re a bit salt-sensitive, then I recommend rinsing your zucchini after the 30 minutes.  This will take some of the salt off the zucchini.  I slightly rinsed mine and then just used a wooden spoon to gently squeeze the zucchini against the colander to remove any excess water.

You’ll find that I used a combination of fresh Thyme and fresh Basil.  You can really use just about any combination of fresh herbs you desire.  I found these to be delicious and well-balanced and . . . I happened to grow them in my little herb garden this year.  The herbs really help elevate the freshness of these fritters.  Soooo yummy!

Most fritters are typically fried, however that’s not really a great option when looking for healthy ways to prepare foods.  So, I went with a baked option and we loved the way these turned out.

You seriously should add these to your zucchini recipe files.  These fritters are a keeper and we totally love them at our house.  Plus, having one more way to mix up the zucchini is a huge bonus when we practically eat it every day.

Fresh Herb Sweet Potato and Zucchini Baked Fritters
Mimi’s Fit Foods
Adapted from Averie Cooks

Ingredients:
2 cups shredded zucchini (1 large or 2 small zucchini)
1 1/2 teaspoons kosher salt
3 cups shredded sweet potato (1 medium to large sweet potato, peeled)
2 tablespoons light butter (I used Smart Balance Light)
1 large egg
1 large egg white
1/2 teaspoon black pepper
2 tablespoons all-purpose flour
2 tablespoons fresh thyme, coarsely chopped
2 tablespoons fresh basil, coarsely chopped

Directions:
Place shredded zucchini in a colander (place colander over a bowl to eventually collect liquid from zucchini) and sprinkle salt over zucchini. Gently toss the zucchini and salt. Let zucchini sit for approximately 30 minutes. This will remove excess liquid from zucchini. Gently push zucchini with a wooden spoon against sides of colander to squeeze any additional liquid from zucchini.

Remove zucchini from colander and place in a medium-large sized mixing bowl. Add the shredded sweet potato to zucchini and set aside.

Meanwhile, preheat oven to 375 degrees and line a baking tray with Silpat, parchment paper, or aluminum foil and spray with cooking spray; set aside.
In a medium microwave-safe bowl, melt the butter (about 1 minute on 50% power). To the melted butter add the egg and egg white and beat with a fork to combine. Add the black pepper, the flour and herbs to the butter/egg mixture and stir to combine. Pour this mixture over the sweet potato and zucchini and toss to combine. The mixture will be loose and a bit soggy.

Using a 1/2-cup measure, form fritters by transferring one packed half-cup of vegetable mixture from mixing bowl directly to baking tray.

Bake fritters for 10 minutes at 375 degrees. You’ll find that the fritters will “leak” additional liquid (either from the zucchini releasing additional water or from the butter/egg mixture) and this is okay.

Lower the oven temperature to 350 degrees and bake for 15 minutes. Carefully flip fritters over (they will be soft and delicate, so be careful not to break them) and bake for 15-20 more minutes, or until browned. Fritters will be browned and soft upon removal from the oven. Serve hot/warm.

Serves 8.

Nutritional Information Per Fritter:
87.3 Calories | 2.5g Protein | 14.7g Carbs | 2g Fat (0.6g = Sat.) | 2g Fiber | 0.1g Sugars

Honey-Glazed Carrots

Honey-Glazed Carrots || Mimi's Fit Foods

Here is a tasty vegetable side dish that goes well with SO many main dishes!  When I was growing up, my mom would sometimes make cooked carrots that simmered in brown sugar and butter.  Oh, they were soooo good!  I mean, no wonder!  Sugar and butter?  Yeah . . . that explains it all.

Needless to say, they definitely weren’t the healthiest, despite that they were a vegetable side dish.  Well, this recipe brought those childhood memories to life.  While this is a much healthier way to prepare the carrots, you’ll find that the sweetness of the carrots is intensified and boring carrots are made exciting.  We gobbled these up when I made them and I plan to put them in the vegetable rotation.  After all, my sweet toddler does have carrots at the top of her favorite food list.  And, now we do too!

Honey-Glazed Carrots
Mimi’s Fit Foods
Adapted from America’s Test Kitchen

Ingredients:
1 pound baby carrots, sliced in half
1/3 cup low-sodium chicken broth
slat and pepper
1 1/2 tablespoons honey
2 teaspoons light butter (I used Land of Lakes)

Directions:
Bring the carrots, broth, and 1/4 teaspoon salt to a simmer in a 12-inch nonstick skillet over medium-high heat. Cover, reduce the heat to medium, and cook until the carrots are almost tender, about 5 minutes.

Uncover, increase the heat to medium-high, and simmer rapidly until the liquid measures about 2 tablespoons, 2 to 3 minutes. Stir in the honey and butter and continue to cook, stirring often, until the carrots are completely tender and the sauce has reduced to a light golden glaze, about 4 minutes.

Off the heat, season with salt and pepper to taste, and serve.

Serves 4.

Nutritional Information (Per Serving = 1/4 the Recipe):
80 Calories | 1.6g Protein | 17.4g Carbs | 1g Fat (0g = Sat.) | 2.7g Fiber | 13.1g Sugars

Roasted Cabbage Slices

Roasted Cabbage Slices | Mimi's Fit Foods

St. Patrick’s Day is in a matter of days and I know several of us are on the lookout for recipes, so I decided to share another one for you to consider.  There are LOTS of fun recipes out there for this lovely green-inspired holiday, and of all the recipes, I decide to share with you Roasted Sliced Cabbage.  Stay with me, here!  Stay with me!

While this may not appear “fun,” I promise I would not share this with you if I didn’t absolutely love it!  This is seriously crazy yummy when it comes to the cabbage world.  Roasting the cabbage helps to bring out a level of sweetness you don’t get otherwise, and it offers a bit of crunch on the edges (my favorite part).  Seriously!  If you’re not a fan of cabbage, this could certainly be one of the cabbage dishes that could possibly sway you!

Besides that cabbage seems to be popular in Irish-inspired St. Patrick’s Day dishes (for example . . . Corned Beef and Cabbage), it’s also green!  Why not make this a side dish at an all-green dinner?  It’s a great way to make sure you get something healthy, it’s green, and it’s deeeeelish!

Roasted Cabbage Slices - Mimi's Fit Foods

Roasted Cabbage Slices
Adapted from Wellness Mama

1/2 head of medium-sized cabbage
1 tablespoon extra virgin olive oil
kosher salt and pepper to taste

Preheat the oven to 400 degrees.

Slice the cabbage in 1/4-1/2 inch slices.

Spray a baking sheet with cooking spray, or use a Silpat liner.  Place the cabbage on the baking sheet and drizzle with olive oil. If desired, evenly brush drizzled oil over cabbage.

Sprinkle with salt and pepper.

Roast for 30-35 minutes or until tender in the middle and sides are just starting to turn golden brown. Remove and serve.

Serves 4.

Nutritional Information (Per Serving)
Calories:  58.4
Protein:  1.6g
Carbs:  6.2g
Fat:  3.8g (0.5g = Sat.)
Fiber:  2.6g
Sugars:  0g

Roasted and Crispy Parmesan-Cauliflower Poppers

Cauliflower Poppers | Mimi's Fit Foods

These are a “fun” way to eat your veggies!

I love roasted cauliflower, but I thought this would be a fun and different way to make it as well.  My little munchkin loves to “dip” her food, so I figured she would fall in love with these little “Cauliflower Nuggets” without even thinking twice.  I was totally right!

The panko gives these a nice crispy crunch.  I toasted the panko beforehand because it’s not super awesome to brown itself in the oven.   And, well . . . I think the parmesan cheese is definitely a no-brainer when it comes to cauliflower.  I used egg whites to get the panko to stick and that worked like a charm . . . plus it added a nice protein factor to the end result.

You can serve these with a variety of sauces/dips.  I recommend Simple MarinaraFit Ranch DipSpicy Chipotle White Bean Hummus, or Fresh Garden Salsa.

When you create your “breading station” you’ll find that there will be a little bit of leftover ingredients with each step (flour, eggs, breadcrumbs).  I prefer it this way so that I’m not struggling to get everything coated.  That being said, the nutritional information is based on what I actually used (not what the recipe suggests).

We had these for a snack the other afternoon and we ate them all!  My babe couldn’t even wait for me to finish taking pictures before she started dipping.  Now . . . go surprise yourself and/or your kiddos with these addictive, yes addictive, Cauliflower Poppers!

Eat Cauliflower Poppers | Mimi's Fit Foods

Roasted and Crispy Parmesan-Cauliflower Poppers

12 oz bag cauliflower florets, cut into small, bite-size “popper” pieces
1 cup panko breadcrumbs
1/2 cup grated parmesan cheese
pinch paprika
pinch salt
pinch black pepper
1/4 cup whole wheat flour
3 egg whites
cooking spray, optional

Preheat oven to 425 degrees.  Prepare baking sheet by lightly spraying with cooking spray, or by placing a silicone mat on sheet.

Toast your panko breadcrumbs by heating a medium-sized skillet over medium heat.  Constantly stir breadcrumbs until they start to brown (approximately 3-7 minutes).  Place toasted breadcrumbs in a gallon-sized ziplock bag and add the parmesan, paprika, pepper, and salt.  Set aside.

Continue to set up your breading station by adding the flour to another gallon-sized sip lock bag.  Set aside.  Beat the egg whites in a large bowl and set aside.

To bread, lightly spray cauliflower pieces with cooking spray (this may not be necessary if your pieces are still a little wet from washing).  Add cauliflower pieces to the bag with flour and very gently shake to coat the pieces well.  Next, add the floured pieces to the bowl with the beaten eggs and toss the pieces to coat with egg.  Next, add the pieced to the bag with the panko/parmesan mixture, and again, gently shake to coat the pieces well (I added my egg-coated cauliflower in two phases).  Take the coated pieces out and place on prepared baking sheet in a single layer (no over-lapping).

Place cauliflower in heated oven and roast for 20-25 minutes, or until cauliflower is tender (I roasted mine for 23ish minutes).

Remove from oven and serve with dipping sauce of your choice.  (I recommend Simple Marinara, Fit Ranch Dip, Spicy Chipotle White Bean Hummus, or Fresh Garden Salsa).

Serves 4.

Nutritional Information (Per Serving)
Calories:  123.8
Protein:  8.4g
Carbs:  18.2g
Fat:  2.6g (1.4g = Sat.)
Fiber:  3.4g
Sugars:  0.1g

Quinoa, Cranberry and Almond Stuffed Acorn Squash

Quinoa, Cranberry and Almond Stuffed Acorn Squash - Mimi's Fit Foods

I LOVED the freshness and comfort of this meal!  I love roasted squash and filling it with a delicious quinoa salad is just plain fabulous!  The roasted squash offered the “comfort” and the quinoa salad offered the “freshness.”  And, even better . . . they go SO WELL together!  The textures are amazing with the softness of the squash and quinoa being combined with the crunch of the almonds and spinach and then topped off with the chewiness of the dried cranberries.  And, probably without even having to say it, the flavors all meld well together.

This is a beautiful meatless meal.  I had a couple of acorn squash that were begging to get used so this is what came of them.  We had it for lunch and loved it.

Quinoa-Cranberry-Almond Stuffed Acorn Squash - Mimi's Fit Foods

Quinoa, Cranberry and Almond Stuffed Acorn Squash
Adapted by The Spicy RD Blog

2 acorn squash
2 teaspoons extra virgin olive oil, plus additional for drizzling on squash
salt and fresh ground pepper to taste
1/2 cup uncooked quinoa, rinsed
1 cup water
1 cup finely chopped yellow onion
1/2 cup sliced almonds
1/4 cup dried cranberries, chopped
2-3 cups baby spinach, chopped
1 tablespoon fresh oregano, chopped

Pre-heat oven to 350 degrees F. Meanwhile, cut acorn squash in half, vertically, and remove the seeds. Drizzle olive oil over the flesh of both pieces of squash, then sprinkle with salt and fresh ground pepper. Place squash, flesh side down on a foil lined sheet, and bake for 30 minutes.

While squash is baking, combine quinoa and water in a medium pan. Bring to a boil, then lower heat, and cook until water is absorbed, and quinoa is nice and fluffy.

While quinoa is cooking, heat olive oil in pan, then add onions and cook until translucent. Push onions to the side of the pan, and add almonds, stirring constantly for a couple of minutes to toast. Remove pan from heat, and set aside.

When quinoa is done cooking, pour it in to a medium bowl, then stir in onion/almond mixture, cranberries, spinach, and oregano. Season with salt and pepper to taste.

When squash is cooked, remove from oven and place each piece on a plate. Scoop 1 cup of quinoa pilaf mixture in to each squash half and serve.

Serves 4.

Nutritional Information (Per Serving = 1 half squash filled)
Calories:  327
Protein:  8.8g
Carbs:  51.1g
Fat:  12.6g (0.6g = Sat.)
Fiber:  .6g
Sugars:  7.3g

Triple Berry and Carrot Juice Detox and Antioxidant Smoothie

Triple Berry and Carrot Juice Detox and Antioxidant Smoothie - Mimi's Fit Foods

We caught some of the nasty winter germs that have been going around and have been down with colds in our house.  Ugh!  In order to help boost our immune systems we’ve been trying hard to get in as many fruits and veggies as possible.  

This little smoothie has become our breakfast drink for the past week.  The berries are LOADED with antioxidants and I love sneaking veggies in the smoothie without anyone even noticing they’re there . . . thus, the addition of carrot juice.  Fruits and veggies will help us to naturally detox and cleanse our bodies too, so this smoothie is great for any of us who may have indulged a little over the holidays.  

If you’re wondering, I buy my triple berry mix from Costco.  I also found the carrot juice at Costco and have noticed that I can get the three bottles at Costco for almost the same price it costs for 1 bottle in the grocery store.  Since we won’t be drinking ALL that carrot juice before it goes bad, I’ve decided to freeze it until I need it.

If you’re in need of a handy-dandy way to get in your fruits and veggies, here’s a great solution.  Your kids will love it too.  My little babe sees it mixing in the blender and starts chanting, “num, num, num.”  Smoothies just seem to be a special treat!

Triple Berry and Carrot Juice Detox and Antioxidant Smoothie
Mimi’s Fit Foods

1 cup frozen mixed berries (blueberries, blackberries, raspberries)
1/2 cup carrot juice
1/2 cup cold water
1 tablespoon honey
1/2 scoop vanilla protein powder
1/8-1/4 teaspoon cinnamon (depending on taste)
crushed ice, optional

Put all ingredients in a blender and blend until smooth (about 30 seconds).

Serves 2.

Nutritional Information Per Serving (Per Smoothie)
Calories:  110.2
Protein:  4.8g
Carbs:  22.6g
Fat:  0.4g (0.1g = Sat.)
Fiber:  2.7g
Sugars:  18.4g (mostly all natural from the berries)

Roasted Beets

Roasted Beets - Mimi's Fit Foods

Beets.  You should all know that beets are SO good for you.  They contain so many good vitamins and minerals (just to name a few . . . potassium, magnesium, fiber, phosphorus, iron; vitamins A, B & C; beta-carotene, beta-cyanine; folic acid).  They are good for all of us, including pregnant women as the vitamin B, iron, and folic acid are good for both mommy and baby.  Among many other health benefits, beets are also a natural cleanser of the blood.

With that all being said, I know beets may not be the MOST popular vegetable found at the dinner table.  Perhaps its the taste or perhaps its just the problem of not really knowing how to to prepare them.  I am one who actually loves beets, but have never prepared my own (I’ve always eaten bottled beets or beets that someone else prepared for me).  Some beets made their appearance in a mixed produce box I ordered and I was determined to find the best way to prepare them.

The crazy thing is, after doing all my research, the very best way to prepare the beets is to roast them.  Roasting them brings out the flavor much better than boiling or steaming them.  And, even crazier, roasting them is SUPER easy and pretty mess-free.  I REALLY cannot believe that I haven’t been roasting my own beets for years.  I think I might just be planting beets in my garden this upcoming summer.

Roasted Beets
Adapted from Bobby Flay

4 medium beets, scrubbed, leaves trimmed (red or gold)
cooking spray

Preheat oven to 375 degrees.  Spray sheets of aluminum foil lightly with cooking spray.  Wrap beets in aluminum foil (like you would a baked potato).  Place wrapped beets on a baking sheet and roast in oven until cooked through, approximately 45-60 minutes (I find that they take closer to 60 minutes).

Remove from the oven, let cool for 10 minutes.  Peel and slice into 1/4-inch slices.  (I peel the beets under warm, running water as this avoids staining on my hands and countertop.  They peel very easily.)

Serves 4.

Nutritional Information (Per Serving = 1 Beet)
Calories:  22
Protein:  1g
Carbs:  5g
Fat:  0g
Fiber:  1g
Sugars:  4g

Fresh Green Bean Salad With Balsamic Dressing

Fresh Green Bean Salad with Balsamic Dressing - Mimi's Fit Foods

Okay.  Let’s get back to fall.  In reality, this dish is perfect year-round, but I’m sharing it this week because I think it would make a fabulous side dish at Thanksgiving.  I’m always looking for healthy side dishes for the holidays and since green beans seem to make an appearance at most Thanksgiving dinner tables, I thought I would share a very YUMMY (and healthy) way to make them this year.

This green bean salad is to-die-for.  Yes, I’m serious.  You’re probably thinking that there’s no way that green beans would ever be considered to-die-for, but guess what!?  You’re totally wrong because I found this recipe and it completely qualifies!  I made a fancy dinner to go alongside these babies and the green beans totally won my hubby over.  Hands down, he said this salad was the best part of the meal.  And, he doesn’t even really like green beans!  So, that’s saying something HUGE!

The green beans are cooked so they are crisp-tender, then placed in an ice bath to stop them from cooking (which also keeps their color a nice, vibrant green) and cools them down.  They are mixed with the grape tomatoes and then drizzled with a simple balsamic dressing.  Just before serving, feta cheese is mixed throughout.  The result . . . delicious, crisp-tender green beans that want you going back for more and more and more and . . . well, you get the idea!  It’s just so good and fresh and flavorful!

Besides being down-right delicious, the salad is pretty too!  I think it is totally worthy for holiday meals and it’s also WAY easy to throw together for any weeknight meal too.  Thus, it’s a recipe to keep in your back pocket.  Right!?

A couple of tips for the beans.  I bought mine at Costco and they were of the best quality.  You can usually find them in your local grocery store (produce section) too.  When cooking the beans, you want to cook them to the tenderness you prefer.  However, you don’t want to let them over-cook or they’ll be mushy and not so awesome.  I prefer mine slightly on the crisp side, so I cooked mine for about 7 minutes.  I wouldn’t cook yours longer than 10.  And, don’t forget to have your ice bath ready because you’ll need to transfer them right to the ice bath after cooking.

Now start planning to make the best green bean recipe you’ve tried in years (or in forever!).

Fresh Green Bean Salad with Balsamic Dressing2 - Mimi's Fit Foods

Fresh Green Bean Salad With Balsamic Dressing
Adapted from Mel’s Kitchen Cafe

1 pound fresh green beans, ends trimmed if desired
1 cup cherry or grape tomatoes, halved
2 tablespoons olive oil
1 1/2 teaspoons freshly squeezed lemon juice
2 tablespoons balsamic vinegar
1/8 teaspoon salt
1/8 teaspoon garlic powder
pepper, to taste
2 ounces reduced fat feta cheese

Bring a medium pot of water to a boil.  Add 1/2 teaspoon salt.  Cook green beans until tender, 5-10 minutes.

While they cook, prepare a large bowl with an ice water bath.  Immediately drain the beans into a colander and place the drained beans in the ice water for a few minutes to stop the cooking.  (This will keep them bright green and perfectly tender.)

Drain the beans and pat them dry.  Toss them in a bowl with the tomatoes.

For the dressing, whisk together the olive oil, lemon juice, vinegar, salt, garlic powder, and pepper.  Pour the mixture over the green beans and toss to coat.  Cover the bowl and chill for at least an hour or up to 3 hours before ready to serve.

Stir in the feta cheese right before serving.  Serve chilled or at room temperature.

Serves 4.

Nutritional Information (Per Serving = 1/4 the Recipe)
Calories:  135.6
Protein:  2.5g
Carbs:  4g
Fat:  8.8g (2g = Sat.)
Fiber:  4g
Sugars:  2.8g