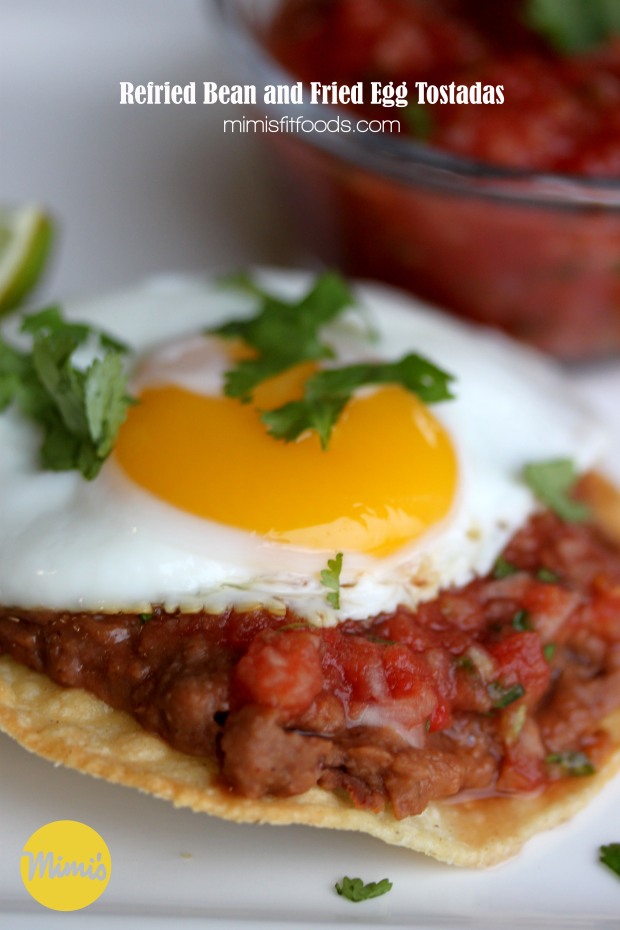
Refried Bean and Fried Egg Tostadas

Refried Bean and Fried Egg Tostadas | Mimi's Fit Foods

You want a quick, easy, meatless meal that also happens to be gluten free?  Enter in this Refried Bean and Fried Egg Tostada.  It comes together in a flash.  And, if you’re anything like me, occasionally (or more often than occasionally) you forget to thaw meat for dinner and shear panic hits with the frazzled, “What in the world am I going to make for dinner!?”  Well, never fear because this is a great solution!

This recipe is a bonus because it also fits well for lazy nights, there are not a lot dishes, and you can seriously throw it together in 20 minutes or less.  This recipe also uses that awesome Winter Salsa in the previous post.  Of course, you can use your own variation of salsa, but I’m definitely going to recommend using the Winter Salsa so you can really cash in on the authentic taste.

The best bonus . . . these tostadas taste awesome!  They are satisfying and taste very authentic.  My hubby made the comment that he thought this tasted like something we had eaten on vacation in South America (Nicaragua to be specific).

So, take advantage of all these bonuses and throw it in your wheelhouse because if you don’t have a night when all the aforementioned bonuses are in need . . . . well, you’re super human and you better start teaching me your tricks!

Refried Bean and Fried Egg Tostadas
Mimi’s Fit Foods

Ingredients:
2 Mission Thin corn tortillas
nonstick cooking spray
4 tablespoons fat free refried beans (I used Rosarita brand)
2-4 tablespoons Winter Salsa, see post for link (or salsa of your choice)
2 eggs
chopped cilantro for garnish, optional

Directions:
Preheat oven to 375 degrees. Spray corn tortillas (both sides) with nonstick cooking spray and place on a baking sheet. Bake tortillas for about 12-15 minutes, or until desired doneness/browning/crispness is reached.

While tortillas are baking warm refried beans in a saucepan on stovetop over low-medium heat. Cook until heated through.

Meanwhile, prepare to cook your egg. Heat a skillet over medium heat. Spray with nonstick cooking spray. Break your egg gently in to the pan and lower your heat to low. Cook the egg until the whites and yolk reach the desired consistency (usually this means that the whites are firm and the yolk is thick but not firm . . . offering that runny consistency). Repeat with second egg (unless your pan is big enough to cook both at the same time).

Assemble your tostadas. Put 2 tablespoons refried beans on each tostada, followed by 1-2 tablespoons of Winter Salsa, an egg, and garnish with cilantro.
Enjoy!

Serves 1 (2 Tostadas Per Serving).

Nutritional Information (Per Serving = 2 Tostadas):
284 Calories | 17.9g Protein | 27.3g Carbohydrates | 10.6g (3.2g = Sat) Fat | 5.1g Fiber | 3.8g Sugar
Fit Veggie Omelet Cups

Fit Veggie Omelet Cups | Mimi's Fit Foods

First things first!  Posting has been happening a tad-bit slower than usual.  There is a VERY GOOD reason for this.  I’m updating the website.  Wahoooo!  I’ve been wanting to do this for a VERY LONG time, and it’s finally happening.  Thus, I’ve been running into a few time bumps due to IT/Computer/Domain/Website stuff that I cannot entirely avoid.  BUT, it’s gonna be worth it.  It’s gonna be worth it.  The new site is going to be so pretty and so easy to navigate.  I’m quite certain you’ll love it.  So, get ready for the new look coming oh-so-soon.  Yay!

Now on to these delicious babies.  I’m really not sure why I haven’t shared this great idea with you sooner.  It’s soooo awesome and soooo good.  If you love a good veggie omelet, you’re going to love these Fit Omelet Cups.  And, they’re so super fit that they only contain eggs and veggies (and a smidge of milk).  The veggies are pretty much free calories, so you’re looking at a high-protein, low calorie breakfast option.  We’re talking 23 calories per omelet cup.  Awesome!

Really, to make these, you can choose any veggies your heart desires.  I will list the ones I chose in the recipe here, but feel free to add/delete whatever ones you’re craving at the moment.  The base for these consists of an equal amount of whole eggs and then egg whites (you’ll see that I used a total of 10 eggs, but I only used the whites in 5 of them).  It cuts fat and calories, but still is huge on flavor.  You’ll note that I didn’t put a lick of cheese in these.  I think they are super tasty without it.

These come out of the oven with a fluffy texture (think the perfect omelet texture) and they taste so incredibly fresh thanks to all of those fresh veggies found within.  As an added bonus, these stay good for 2-3 days in the refrigerator and they reheat fabulously.  So, for those of you who need a quick and healthy breakfast fast . . . make the entire batch and simply reheat in the morning before you head out the door.  I also love eating these for snacks.

Give ’em a try.  They are seriously so super awesome!

Fit Veggie Omelet Cups

5 whole eggs
5 eggs, whites only
1/2 cup low fat milk (I used 1% Organic)
salt and pepper, to taste
2 green onions, chopped
1/2 cup fresh spinach, chopped
1/2 red bell pepper, chopped
1/2 – 3/4 cup mushrooms, chopped

Preheat oven to 350 degrees.

Combine all 10 eggs in a medium-sized bowl with milk, salt and pepper (I used about 1/2 teaspoon salt, 1/4 teaspoon pepper).  Whisk until combined and eggs are broken up and slightly beaten.  Set aside.

Lightly spray a 12-cup muffin pan with cooking spray.  Fill each muffin cup approximately half to three-quarters full with various chopped veggies.  Then, taking your egg mixture, pour it in each muffin cup, leaving a tiny amount of space at the top of each one (the omelet cups will rise a little in baking).

Bake for 18-20 minutes.  Enjoy!

Serves 12.  (I usually eat 3 of these to get the serving of protein I want/need.  But, I’ll break it out per Omelet Cup, so you can eat as many as you personally need/want.)

Nutritional Information (Per Omelet Cup)
Calories:  23.3
Protein:  3.6g
Carbs:  1.6g
Fat:  0.2g (0.1g = Sat.)
Fiber:  0.4g
Sugars:  1.2g

Spinach, Sun-Dried Tomato and Feta Egg Wrap

Spinach, Sun-Dried Tomato and Feta Egg Wrap1 - Mimi's Fit Foods

Here is a fabulous breakfast option for you!  While I don’t mind a boring egg burrito, I certainly won’t turn down one that isn’t boring!  If you don’t know by now, I really L.O.V.E. sun-dried tomato.  It’s packed with so much flavor and I love how it adds a little sweetness to whatever it gets put with.  This little egg wrap is amped up with flavor thanks to those tasty sun-dried tomatoes and the spinach and feta cheese really round it out.  I love the nutritional benefits of all components.  Plus, it really only took me five minutes to make.  This is becoming a “regular” around here.

I wrote the recipe for one wrap, but this can EASILY be doubled or tripled or quadrupled (you get the idea).

Spinach, Sun-Dried Tomato and Feta Egg Wrap
Inspired by Starbucks and Shape Magazine

1/2 cup raw spinach, roughly chopped
2 tablespoons sun-dried tomatoes, chopped
1 tablespoon milk, 1% low fat
1 whole egg
1 egg white
salt and pepper, to taste
1 tablespoon reduced fat feta cheese
1 (100-calorie) whole wheat wrap, such as Flat-Out

Heat a small skillet over medium heat.  Spray with non-fat cooking spray (I use canola).  Add chopped spinach and sun-dried tomatoes to skillet and sauté until spinach is slightly wilted.  Remove from skillet and place on wrap.

Meanwhile whisk milk, egg and additional egg white together in a small bowl.  Once spinach and sun-dried tomatoes have been removed from the skillet, add eggs.  Cook and stir until eggs are completely set.

Place scrambled eggs on wrap (over your spinach and sun-dried tomatoes), top with feta cheese.  Fold bottom and sides of wrap over filling and roll.  Serve immediately.

Serves 1.

Nutritional Information (Per Wrap)
Calories:  231
Protein:  22.3g
Carbs:  22.7g
Fat:  8.9g (2.3g = Sat.)
Fiber:  9.2g
Sugars:  4.8g

Avocado and Egg Over Toast

Avocado and Egg Over Toast - Mimi's Fit Foods

This is hardly a recipe, but I always have people asking me for easy and quick meal ideas.  Well, this is VERY easy and VERY quick and it’s been my favorite breakfast as of late, so I thought I would share it with you all.

All I do is toast a piece of whole wheat bread, smash 1/4 of an avocado over the toast, put a little salsa over the avocado, and then top it with a fried egg.  It’s seriously so good and I love how fast and easy it is.  I also love the health benefits of getting a healthy complex carbohydrate (bread), a good amount of healthy fats (avocado and egg), a little veggie from the salsa, and then I get protein from the egg.  I simply love it and perhaps you’ll love it too for the same reasons too!

Avocado and Egg Over Toast

1 slice whole wheat bread, toasted  (100 Calories)
1/4 of an avocado
1 tablespoon salsa
1 egg, cooked any style (I prefer a fried egg cooked over-medium)

Smash and spread avocado over toast.  Top with salsa and egg.

Serves 1.

Nutritional Information:
Calories:  247.5
Protein:  11.8g
Carbs:  21.8g
Fat:  13.5g (3g = Sat.)
Fiber:  6.5g
Sugars:  4.5g

Eggs In a [Love] Shape

Eggs In a Shape-Mimi's Fit Foods

Well, today’s post isn’t really a recipe, but it does offer a fun idea for Valentine’s Day!  Valentine’s Day doesn’t have to totally revolve around candy and chocolate.  I think this is a fun and simple way to start off the morning for anyone you love.  It makes the every-day toast and eggs seem special.  In fact, I made these for Beau before he went to work and when he walked in the kitchen and saw his breakfast he couldn’t help but smile.  Love does that to you, you know!

Really, all you do is take a heart cookie cutter (or you can just cut the bread with a knife), and cut the shape out of the center of a slice of whole wheat bread.  You heat your nonstick skillet over low-medium heat, spray a little cooking spray in there, and put your bread in the skillet.  I like to toast one side before I add the egg.  So, I toast one side, flip it over, and then add my egg to the hole in the center.  As you can see, this particular egg was done sunny side up.  However, you can cook your egg in any style  you prefer.  I made Beau’s with a sunny side up egg and I made mine with scrambled.  It’s easy-peasy.  If you do scrambled (or over-medium, etc.), then you’ll want to flip your toast back over to cook the other side a little bit.  But, I generally let the egg cook almost all the way through on the one side and when I flip it, it only has to cook for a smidge longer.

If you’re a perfectionist (kind of like I am at times), then here’s a fancy trick to make sure that your yolk ends up in the middle of your shape (because you know that when you crack an egg in the pan sometimes that yolk just slides all the way over to one side).  Separate the yolk from the whites, scramble the whites just a little bit, then add the amount of whites you prefer, and then drop your yolk right in the middle.

You are free to season as you wish . . . salt, pepper, hot sauce, salsa, etc.  It might even be fun to throw a smidge of reduced fat, shredded cheese to a scrambled variation.  Hmmmm……

There you have it.  A “lovely” way to start off the morning without sacrificing calories or nutrition!  If you use one slice of whole wheat bread (approximately 100 calories) with one egg, you’re looking at only 175 calories.  I think I’ll have two then!

Happy Valentine’s Day!

Eggs In a Shape1-Mimi's Fit Foods

Quinoa Cakes Topped With Eggs

Quinoa Cakes Topped with Eggs - Mimi's Fit Foods

Holy smokes!  These are sooooooo deeeelish!  If you want to create an easy, delicious, and seems-so-fancy dish . . . this is it!  The flavors of the green onions, shallots, garlic, and parmesan cheese REALLY take the quinoa to an unthinkable flavor.  Oh, and then top it with a runny-yolk egg . . . extreme awesomeness!  I have a pretty good handle on being able to read a recipe and imagine the end flavor (thus, I rarely make a recipe that I don’t love).  I have had this recipe bookmarked for a while because I knew it was going to be good.  That being said, I had underestimated the power of flavor and  I was honestly surprised by the intensity of the end result.

If you really want to kick up the fanciness, go to the original recipe source.  I scaled it back a smidge using ingredients that most of us tend to have on hand (green onions instead of chives, shredded Parmesan instead of shaved, etc.).  I also resorted to making our eggs over-medium or over-easy (instead of poached) because that’s the way I like them.  However, if you want to get fancy then feel free to poach your eggs.

Enjoy this unique find.  It has recently turned in to one of our family favorites.

Quinoa Cakes Topped With Eggs
Adapted from Annie’s Eats

2 cups cooked quinoa, at room temperature
2 large eggs, beaten
1/2 teaspoon coarse salt
1/3 cup minced fresh green onions
2 large shallots, finely chopped
1/3 cup grated Parmesan cheese
3 cloves garlic, minced
1/2 cup whole grain bread crumbs, plus more if needed
Olive oil, for frying patties
(for serving) 6 tablespoons shredded Parmesan
(for serving) 6 eggs, fried (any style) or poached (one for each patty)
(for serving) Salt and pepper

In a medium bowl, combine the quinoa, eggs, salt, green onions, shallots, Parmesan, and garlic.  Stir to blend.  Mix in the bread crumbs and stir gently until evenly incorporated.  Form the mixture into six evenly sized patties, about 3-4 inches in diameter (they end up being about 1/3 cup and I found it easiest to scoop the mixture out with a measuring cup and then form into patties).

Heat a bit of olive oil in a large sauté pan set over medium-high heat and swirl to coat.  Add the patties to the pan so that they are not touching.  Let cook about 4 minutes or until the first side is lightly browned.  Carefully flip the patties with a spatula and let the second side cook until golden brown, about 4 minutes more.  Repeat with the remaining patties, using additional olive oil if needed.  Top each patty with a 1 tablespoon of shredded Parmesan, a fried or poached egg, and season with salt and pepper to taste.  Serve immediately.

Serves 6.

Nutritional Information (Per Serving = 1 Patty & Egg)
Calories:  258
Protein:  16.2g
Carbs:  23.8g
Fat:  11g (3.7g)
Fiber:  1.9g
Sugars:  0.6g

Sweet Potato & Turkey Breakfast Hash

Here’s another use for those turkey leftovers!  It may seem kind of weird at first, but you gotta trust me that it’s SO good!  It makes more of a savory breakfast, and I loved it.  The onions get caramelized, the addition of thyme makes it so fresh and savory, and the turkey and sweet potatoes are a major hit.  Of course, it’s that runny egg that REALLY tops the dish off!  And, while we enjoyed it for breakfast . . . I can honestly say that we would enjoy it for lunch or dinner too.

I used cooked sweet potatoes, but if you don’t have sweet potatoes that are already cooked/baked, you can use raw ones.  If you do use raw ones, add them to the pan first to allow them to soften (this may take about 6-8 minutes, stirring them often).  Afterwards you’ll want to add the onions and follow the recipe as written.

As usual, it doubles and triples like a charm!  Enjoy!!

Sweet Potato & Turkey Breakfast Hash
Adapted from The Chew 

2 teaspoons extra virgin olive oil
1 teaspoon butter
1/2 cup yellow onion, chopped
1/4 teaspoon dried thyme
1 medium cooked sweet potato, chopped in 1/2-inch cubes
4 oz. leftover turkey, chopped in 1/2-inch cubes
2 eggs
salt and pepper, to taste

In a large sauté pan heat the olive oil and butter over medium heat.  Add onion and thyme, season with salt as desired, and sauté until onions are soft and translucent.  About 6-8 minutes.  Add sweet potato and turkey to pan.  Cook just until sweet potato and turkey is warmed through.  Remove from heat and divide between two plates.

Heat a separate non-stick pan over medium heat.  If desired , spray with cooking spray.  Fry eggs until the whites are cooked and yolks are soft and slightly warm to the touch, about 3-4 minutes.  Flip once, continue to cook for 30 seconds, and then remove from heat.

Immediately top each portion of breakfast hash with an egg.  Season with salt and pepper to taste

Serves 2.

Nutritional Information (Per Serving = 1/2 the Recipe)

Calories:  270.6
Protein:  17.8g
Carbs:  20.5g
Fat:  13.2g (3.4g = Sat.)
Fiber:  2.7g
Sugars:  2.8g

Breakfast Fried Rice

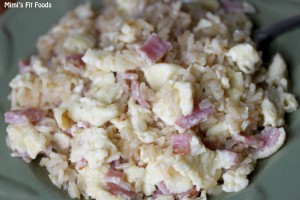
Eggs, Brown Rice, Canadian Bacon, Syrup

I’ve probably told you before, but I really, REALLY love rice.  I’ve always said I would make a good latin or polynesian person because I can really eat rice for every meal and be just fine.  So, one day when I had leftover brown rice in the fridge and I was contemplating on what to have for breakfast, I guess it’s no surprise that I wanted to eat that rice.  I just had to figure out a good way to prepare it so that it seemed more like breakfast than dinner.

This is how I came up with Breakfast Fried Rice.  I love eggs, Canadian bacon, and I knew I would like a hint of maple all over everything.  So, I gave this a whirl and I seriously fell in love with it.  It tasted just like breakfast, but was definitely something different than my typical oatmeal.  It’s delicious.  I promise.

Breakfast Fried Rice
Mimi’s Original

1 egg
1 egg white
2 slices Canadian bacon, diced
1/2 cup cold, cooked, brown rice
1 tablespoon sugar free maple syrup
nonstick cooking spray

Heat a small nonstick skillet over medium heat and lightly coat with nonstick cooking spray.

Place egg, egg white, and Canadian bacon in a small bowl and lightly whisk.  Add mixture to skillet and cook, gently pushing, lifting, and folding them from one side of the pan to the other, until large, shiny, wet curds form, about 2 minutes (in other words…scramble them).   Remove eggs from skillet.

Increase heat to medium-high and lightly coat with nonstick cooking spray.  Add cold rice to skillet and spread the rice out evenly over the pan and let cook without stirring, until you hear the rice grains sizzle, about 1 to 2 minutes.  Toss the rice a bit with your spatula, and again spread it out over the cooking surface.

Drizzle the maple syrup all over the rice, and toss again.  Add eggs to the pan and toss to combine all the ingredients well with the rice.  Let everything heat back up again until the rice grains are sizzling again.  Add additional maple syrup to taste, if needed.  Serve.

Serves 1.

Nutritional Information
Calories:  244
Protein:  18.1g
Carbs:  24.8g
Fat:  8g (2.4g = Sat.)
Fiber:  1.8g
Sugars:  0g

Pizza Egg Bake

Pizza for Breakfast

Pizza for breakfast?  I know . . . some of you LOVE it and some of you HATE it.  Guess what!  I’m one who loves it.  So, if you’re with me on this one, then you’ll love this recipe!  This seriously tastes a lot like pizza!

I love pizza and so I loved the idea of trying this recipe and it did not disappoint me in the least.  (Psshh . . . has Rocco ever let me down with a healthy recipe yet?  NO!)  I ended up putting my Pizza Egg Bake right on top of my toasted bread.  The toasted bread acted like a crust and I thought it was deeeelish!

*Note:  You can save some calories by using liquid eggs, eliminating the cheese, and/or eliminating the bread.  This is also SUPER easy to double . . . just use a larger skillet (10 or 12-inch).

Pizza Egg Bake
Adapted from Rocco Dispirito’s “Now Eat This! Diet”

2 whole eggs
2 egg whites
1/8 tsp. garlic salt
1/2 cup drained canned, diced tomatoes
1/2 teaspoon oregano
1/2 teaspoon basil
salt
freshly ground black pepper
nonstick cooking spray
1/3 cup part-skim shredded mozzarella
2 slices whole wheat bread (about 100 calories each)

Preheat the oven to 475 degrees.  Adjust the rack to the top third of the oven.

Heat a small nonstick ovenproof skillet over medium-high heat.

In a medium bowl, combine the eggs, egg whites, garlic, tomatoes, oregano, basil, and salt and pepper to taste.  Mix well with a fork.

Away from the heat, spray the pan with cooking spray.  Pour the egg mixture into the pan.  With a heat-resistant rubber spatula, stir the egg mixture in the sauté pan.  Continue to stir as the eggs begin to solidify.  When there are large curds but the mixture is still wet, scatter the cheese over the eggs, and then transfer the pan to the oven.

Bake the eggs for 5 to 6 minutes, or until the eggs are completely set and the cheese is brown and bubbly.

Meanwhile, toast the bread in the toaster oven, serve with the baked eggs.

Serves 2.

Nutritional Information (Per Serving = 1/2 the Pan)
Calories:  242.3
Protein:  21.3g
Carbs:  20.7g
Fat:  9.3g (3.8g = Sat.)
Fiber:  5.5g
Sugars:  3.5g

Deviled Eggs – Made Angelic

What in the world do people do with all those leftover Easter eggs?  Make Deviled Eggs, right!?  Well, they are usually filled with fat (thanks to all the mayo) which truly makes them devilish when trying to eat healthy!  So, I decided to do a little research to see how we could make a Deviled Egg a bit healthier, but still have good taste.  I think I found a solution that works.

These Deviled Eggs are made with nonfat Greek yogurt instead of Mayo and the result is fabulous.  The Dijon mustard gives them a nice zing of flavor.  Now, I must truly admit . . . I don’t like Deviled Eggs much because I don’t love egg yolk.  So, in order for me to bring these Deviled Eggs up to par for me I have to add extra stuff.  Once I add sweet relish and a dab of hot sauce, I am VERY pleased.  In fact, I’ve been eating them for snacks this week and enjoying every bite.

That being said . . . my husband LOVES yolks and loves Deviled Eggs so I asked him for his opinion on the “plain” version and he said they were great!  So, I think we have a winner . . . whether you eat them plain or add a few extras (like sweet relish, pickles, hot sauce, chopped green onion or celery).  However you decide to enjoy them, I think we’ve made our Deviled Eggs a bit more angelic.

Deviled Eggs – Made Angelic
Adapted from fannetasticfood

6 hard-cooked eggs, peeled and cut lengthwise
1/4 C nonfat plain Greek yogurt
2 tsp Dijon mustard
1/4 tsp pepper
1/8 tsp salt
paprika to garnish

Place the whites on a plate and the yolks in a bowl, discarding yolks from 2 eggs.  Mash remaining 4 yolks with a fork.  Add the remaining ingredients (except for the paprika) to the yolks in the bowl, and mash it all together until you have a creamy consistency.

You can then take the mixture and smoosh it back into the empty egg whites.  I like to put my mixture in a small plastic bag, snip one of the corners and then pipe the mixture into the eggs (this seems much cleaner to me and it makes the eggs look nicer too).  Top with a sprinkle of paprika, and enjoy!

*If desired, for a little more flavor pizzazz, you can add other things to your egg yolk mixture such as sweet relish, pickles, chopped green onion, chopped celery, or hot sauce.  My favorite things to add to my deviled eggs are sweet relish and hot sauce.

Serves 4.

Nutritional Information (Per Serving = 3 Deviled Eggs/or 3 Egg Halves)
Calories:  94.3
Protein:  10.8g
Carbs:  1.6g
Fat:  5.3g (1.6g = Sat.)
Fiber:  0g
Sugars:  1g