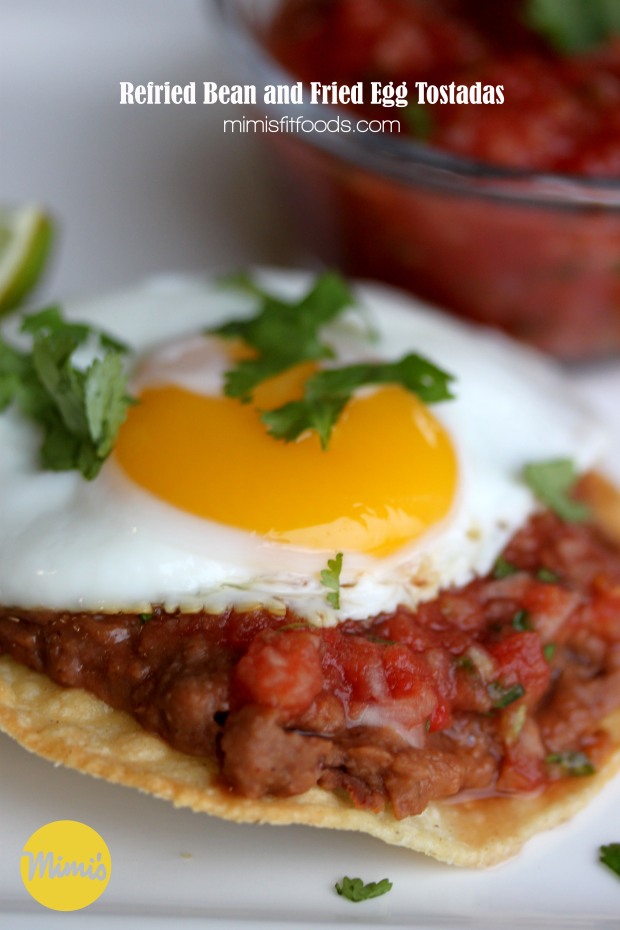
Refried Bean and Fried Egg Tostadas

Refried Bean and Fried Egg Tostadas | Mimi's Fit Foods

You want a quick, easy, meatless meal that also happens to be gluten free?  Enter in this Refried Bean and Fried Egg Tostada.  It comes together in a flash.  And, if you’re anything like me, occasionally (or more often than occasionally) you forget to thaw meat for dinner and shear panic hits with the frazzled, “What in the world am I going to make for dinner!?”  Well, never fear because this is a great solution!

This recipe is a bonus because it also fits well for lazy nights, there are not a lot dishes, and you can seriously throw it together in 20 minutes or less.  This recipe also uses that awesome Winter Salsa in the previous post.  Of course, you can use your own variation of salsa, but I’m definitely going to recommend using the Winter Salsa so you can really cash in on the authentic taste.

The best bonus . . . these tostadas taste awesome!  They are satisfying and taste very authentic.  My hubby made the comment that he thought this tasted like something we had eaten on vacation in South America (Nicaragua to be specific).

So, take advantage of all these bonuses and throw it in your wheelhouse because if you don’t have a night when all the aforementioned bonuses are in need . . . . well, you’re super human and you better start teaching me your tricks!

Refried Bean and Fried Egg Tostadas
Mimi’s Fit Foods

Ingredients:
2 Mission Thin corn tortillas
nonstick cooking spray
4 tablespoons fat free refried beans (I used Rosarita brand)
2-4 tablespoons Winter Salsa, see post for link (or salsa of your choice)
2 eggs
chopped cilantro for garnish, optional

Directions:
Preheat oven to 375 degrees. Spray corn tortillas (both sides) with nonstick cooking spray and place on a baking sheet. Bake tortillas for about 12-15 minutes, or until desired doneness/browning/crispness is reached.

While tortillas are baking warm refried beans in a saucepan on stovetop over low-medium heat. Cook until heated through.

Meanwhile, prepare to cook your egg. Heat a skillet over medium heat. Spray with nonstick cooking spray. Break your egg gently in to the pan and lower your heat to low. Cook the egg until the whites and yolk reach the desired consistency (usually this means that the whites are firm and the yolk is thick but not firm . . . offering that runny consistency). Repeat with second egg (unless your pan is big enough to cook both at the same time).

Assemble your tostadas. Put 2 tablespoons refried beans on each tostada, followed by 1-2 tablespoons of Winter Salsa, an egg, and garnish with cilantro.
Enjoy!

Serves 1 (2 Tostadas Per Serving).

Nutritional Information (Per Serving = 2 Tostadas):
284 Calories | 17.9g Protein | 27.3g Carbohydrates | 10.6g (3.2g = Sat) Fat | 5.1g Fiber | 3.8g Sugar
Winter Salsa

Winter Salsa | Mimi's Fit Foods

Well folks!  I’m finally returning back to my blog.  Adjusting to life with two children was a little more challenging for me than I thought it would be.  So, the blog just never made it on the to-do list.  I’m feeling much more adjusted to life now days and am creating/trying new recipes again.  Yay!  So . . . without further ado, let’s get back into it with salsa!  Salsa that tastes fresh, even in the winter months.

I love salsa!  That’s no secret if you peruse the blog here.  I definitely prefer fresh salsa over the store-bought stuff.  Sometimes that just gets tricky in the winter months since the tomatoes are just not in season and lacking in flavor.  I mean, let’s be honest . . . we only get the good garden-fresh tomatoes a few months out of the year.  So, what can we do the other nine?

Surprisingly, I whip up this salsa from canned tomatoes and jalapeños.  I pair the canned stuff with fresh cilantro and onions.  The salsa is AMAZING and full of rich tomato flavor.  My husband tells me that it tastes just like the salsas found in authentic Mexican restaurants.  You know . . . when you get served the chips and salsa when you are seated.

Perhaps that is all you need to know.  But, more importantly, you can still make salsa during the winter months or when you just don’t have fresh tomatoes handy.  This salsa is good year round.

Enjoy!

Winter Salsa
Mimi’s Fit Foods

Ingredients:
2 (15-ounce) cans diced tomatoes
1 tablespoon canned jalapeños
1 onion, roughly diced
1/4 – 1/2 cup cilantro (depending on your taste preference), roughly torn
juice of 1 lime
salt & pepper to taste (I do about 1/2 tsp. salt, 1/4 tsp. pepper)

Directions:
Put all ingredients in a food processor. Pulse until salsa is “chopped” up to desired consistency (anywhere from 5-10 pulses).

Nutritional Information (Per Serving = 2 Tablespoons)
5.9 Calories | 0.2g Protein | 1.4g Carbs | 0g Fat | 0.4g Fiber | 0.6g Sugar

Fresh Herb Sweet Potato and Zucchini Baked Fritters

Fresh Herb Sweet Potato and Zucchini Baked Fritters

I haven’t shared one zucchini recipe with you this year.  That is kind of ridiculous considering it’s a staple at our house starting mid-summer.  We still have zucchini growing like crazy and, unlike many others, we are STILL loving it.  For those of you who are looking for another creative and delicious way to use zucchini I must share one of my new favorite ways to use to use it.  These fritters make such a delicious side dish and go with just about any main course.  And, they look pretty fancy to boot!

They are seriously easy to prepare, especially if you have a food processor.  I like using the food processor to shred my sweet potatoes and zucchini for two reasons.  1 – It’s fast.  2 – Everything turns out to be the same size.  However, if you don’t have a food processor you can totally use a hand grater and your fritters will turn out just fine.

Shredded Sweet Potatoes & Zucchini | Mimi's Fit Foods

I looked at several fritter recipes and, based on previous experience/knowledge of zucchini, I found it pretty essential to get as much liquid out of the zucchini as I could before cooking up my fritters.  There are several ways to do this, but the easiest and most mess-free way of accomplishing this task is to place your shredded zucchini in a colander, salt the zucchini, and then let it sit for about 30 minutes (you’ll want to place the colander over a bowl or simply in a sink to catch the liquid).  This magically pulls the liquid out of the zucchini and all you have to do is gently press it with a spoon to get any extra liquid out.  (Another popular method is to squeeze the zucchini with a towel, paper towels, or cheese cloth.  While this works, I still find it hard to get as much liquid out of the zucchini and then I have a dirty, wet, green towel to deal with.)

Also, if you’re a bit salt-sensitive, then I recommend rinsing your zucchini after the 30 minutes.  This will take some of the salt off the zucchini.  I slightly rinsed mine and then just used a wooden spoon to gently squeeze the zucchini against the colander to remove any excess water.

You’ll find that I used a combination of fresh Thyme and fresh Basil.  You can really use just about any combination of fresh herbs you desire.  I found these to be delicious and well-balanced and . . . I happened to grow them in my little herb garden this year.  The herbs really help elevate the freshness of these fritters.  Soooo yummy!

Most fritters are typically fried, however that’s not really a great option when looking for healthy ways to prepare foods.  So, I went with a baked option and we loved the way these turned out.

You seriously should add these to your zucchini recipe files.  These fritters are a keeper and we totally love them at our house.  Plus, having one more way to mix up the zucchini is a huge bonus when we practically eat it every day.

Fresh Herb Sweet Potato and Zucchini Baked Fritters
Mimi’s Fit Foods
Adapted from Averie Cooks

Ingredients:
2 cups shredded zucchini (1 large or 2 small zucchini)
1 1/2 teaspoons kosher salt
3 cups shredded sweet potato (1 medium to large sweet potato, peeled)
2 tablespoons light butter (I used Smart Balance Light)
1 large egg
1 large egg white
1/2 teaspoon black pepper
2 tablespoons all-purpose flour
2 tablespoons fresh thyme, coarsely chopped
2 tablespoons fresh basil, coarsely chopped

Directions:
Place shredded zucchini in a colander (place colander over a bowl to eventually collect liquid from zucchini) and sprinkle salt over zucchini. Gently toss the zucchini and salt. Let zucchini sit for approximately 30 minutes. This will remove excess liquid from zucchini. Gently push zucchini with a wooden spoon against sides of colander to squeeze any additional liquid from zucchini.

Remove zucchini from colander and place in a medium-large sized mixing bowl. Add the shredded sweet potato to zucchini and set aside.

Meanwhile, preheat oven to 375 degrees and line a baking tray with Silpat, parchment paper, or aluminum foil and spray with cooking spray; set aside.
In a medium microwave-safe bowl, melt the butter (about 1 minute on 50% power). To the melted butter add the egg and egg white and beat with a fork to combine. Add the black pepper, the flour and herbs to the butter/egg mixture and stir to combine. Pour this mixture over the sweet potato and zucchini and toss to combine. The mixture will be loose and a bit soggy.

Using a 1/2-cup measure, form fritters by transferring one packed half-cup of vegetable mixture from mixing bowl directly to baking tray.

Bake fritters for 10 minutes at 375 degrees. You’ll find that the fritters will “leak” additional liquid (either from the zucchini releasing additional water or from the butter/egg mixture) and this is okay.

Lower the oven temperature to 350 degrees and bake for 15 minutes. Carefully flip fritters over (they will be soft and delicate, so be careful not to break them) and bake for 15-20 more minutes, or until browned. Fritters will be browned and soft upon removal from the oven. Serve hot/warm.

Serves 8.

Nutritional Information Per Fritter:
87.3 Calories | 2.5g Protein | 14.7g Carbs | 2g Fat (0.6g = Sat.) | 2g Fiber | 0.1g Sugars

FIt Mexican Stack

Fit Mexican Stack || Mimi's Fit Foods

OMG!  I seriously cannot believe that I haven’t blogged this yet.   I mean, I kind of can.  Mostly because whenever I make it we NEVER want to wait for me to snap photos of it before we eat.  Lucky for you all, the hubby and the baby were outside when this came out of the oven so I hurried as fast as I could to snap some photos before we gobbled it up.

Fit Mexican Stack | Mimi's Fit Foods

I’ve been making it for years.  It’s a family favorite.  It’s got all those classic Mexican flavors, but it’s oh-so-fun with the way it is layered and the layers definitely add some great texture.  I adapted the recipe from America’s Test Kitchen. That should already sell you on the deliciousness, but let me just give you a few highlights.  Pretoasting the tortillas makes this dish a winner.  When they’ve been crisped up, they not only taste great, but they provide the necessary structure for the stack.  The toasted tortillas also help us to avoid that raw flavor and gummy texture that soggy tortillas can leave behind  So, the toasted tortillas are definitely a huge highlight.  Another huge highlight is the great amount of  filling you find between layers.  You will NOT feel short-changed here, folks. And, if I can, I must also highlight the mashed black beans.  I simply love them!

Fit Mexican Stack - Mimi's Fit Foods

So, what I’m saying here is that you should really make this because I’m pretty sure you’re going to find that it will become one of your family favorites too.  It’s a winner, hands down!

Fit Mexican Stack
Mimi’s Fit Foods
Adapted from The America’s Test Kitchen Healthy Family Cookbook

Ingredients:
2 teaspoons canola oil
1 cup frozen corn, thawed
8 ounces plum tomatoes (2 to 3), cored and chopped medium
4 green onions, sliced thin
1 teaspoon fresh lime juice
2 tablespoons minced fresh cilantro
salt and pepper
1 onion, minced
3 garlic cloves, minced
1 jalapeño pepper, stemmed, seeded, and minced
1 teaspoon ground cumin
1 (15-ounce) can black beans, rinsed
3/4 cup low-sodium chicken broth
12 ounces cooked and shredded chicken breast
4 (10-inch) whole-wheat flour tortillas
vegetable oil spray
3/4 cup shredded 50% light cheddar cheese (about 3 ounces)

Directions:
Heat 1 teaspoon of the oil in a 12-inch nonstick skillet over medium-high heat until shimmering. Add the corn and cook until golden, about 4 minutes. Transfer the corn to a large bowl, stir in the tomatoes, green onions, lime juice, and 1 tablespoon of the cilantro and season with salt and pepper to taste.

Wipe the skillet clean with paper towels, add the remaining teaspoon of oil, and heat over medium heat until shimmering. Add the onion and cook until softened, 3 to 5 minutes. Stir in the garlic, jalapeño, and cumin and cook until fragrant, about 30 seconds.

Stir in the black beans and the chicken broth and cook until the liquid has nearly evaporated, 4 to 6 minutes. Transfer the mixture to a large bowl and mash the beans with a potato masher until no beans are left whole. Season with salt and pepper to taste.

Meanwhile, heat the oven to 400 degrees. Lightly spray both sides of half the tortillas with vegetable oil spray and lay on a baking sheet.

Bake the tortillas until lightly browned on both sides, 8 to 10 minutes, flipping them half-way through the baking. Remove the tortillas from the oven and repeat with the remaining tortillas.

Line a rimless or inverted baking sheet with parchment paper. Place one of the toasted tortillas on the prepared baking sheet. Spread one-quarter of the mashed beans over the top, leaving a 1/2-inch border at the edge. Sprinkle with one-quarter of the corn mixture, one-quarter of the chicken, and 3 tablespoons cheddar. Repeat with the remaining tortillas, beans, corn, chicken, and cheddar and stack the topped tortillas to make a layered stack.

Bake the Mexican Stack until the cheese is melted and slightly brown, 20-25 minutes. Let the stack cool on the baking sheet for 5 minutes, then slide it onto a cutting board using the parchment. Remove the parchment and sprinkle with the remaining tablespoon cilantro. Cut into 8 wedges and serve hot.

Serves 8.

Nutritional Information (Per Serving = 1 Slice):
210.7 Calories | 21.1g Protein | 25.6g Carbs | 6g (1.6g = Sat.) Fat | 10.2g Fiber | 2.3g Sugars

Cherry-Coconut Greek Frozen Yogurt


Cherry-Coconut Greek Frozen Yogurt | Mimi's Fit FoodsI love sweet cherries.  When the fresh, sweet cherries start to make an appearance in summer I always find something delicious to make with them (in addition to just snacking on them).  This summer I went for frozen yogurt!  I followed a recipe from Cookin’ Canuck, a healthy food blog that I love to follow (you just might want to check her stuff out too!).

Now, I know cherries aren’t everyone’s favorite.  And truthfully, the only reason I know this is because my hubby isn’t the biggest fan.  Before I married him, I couldn’t imagine anyone disliking sweet cherries.  I still kind of think he’s tricking me and that he secretly loves them.  Ha, ha!  After all, he did like this frozen yogurt.  I’m sure the coconut milk had something to do with it.

This recipe only has four easy ingredients.  Cherries, light coconut milk, Greek yogurt, and honey.  You mix it all together, throw it in your ice cream maker, and within no time you have fresh and creamy frozen yogurt.  The blend of the cherries and coconut milk is AWESOME and I love that it’s sweetened with a little bit of honey.

I made this for a family function and cherry lovers and non-cherry lovers all ate their given portions.  Hmmmmm…..A definite win!  I must add that this version of frozen yogurt is extra yummy with Dark Chocolate Magic Shell drizzled over the top.  I mean, cherries and chocolate are one of those pairs that were meant to go together.  Just sayin’!

The hardest part . . . waiting the 25 minutes it took to “freeze” before we could eat it.  Just ask these two cutie pies!

Hard to Wait for Frozen Yogurt | Mimi's Fit Foods

Cherry-Coconut Greek Frozen Yogurt
Mimi’s Fit Foods
Adapted from Cookin’ Canuck

Ingredients:
1 (14 oz) can light coconut milk
1 1/2 cups non-fat plain Greek yogurt
1/4 cup + 3 tbsp honey
3/4 lb. fresh cherries, pitted

Directions:
In a large bowl or measuring pitcher (for easy pouring), whisk together the coconut milk, Greek yogurt and honey. Cover and refrigerate for 1 hour.

Place 3/4 of the pitted cherries in a blender or food processor and blend until almost smooth. Stir the pureed mixture into the yogurt mixture.

Pour the yogurt mixture into an ice cream maker and process according to the manufacturer’s instructions.

Chop the remaining cherries. When the frozen yogurt is almost finished processing, add the chopped cherries to the mixture and finish processing.

Serve immediately or place in the freezer in an airtight container. If you freeze the mixture, warm it at room temperature for about 1 hour before serving.

Serves 8.

Nutritional Information (Per 1/2 Cup Serving):
126.3 Calories | 5g Protein | 19.9g Carbs | 3.3g Fat (3.3g = Sat.) | 0.3g Fiber | 10g Sugars

Dark Chocolate Covered Frozen Banana Bites

Dark Chocolate Covered Frozen Banana Bites | Mimi's Fit Foods

As promised, I’m brining you some delicious and pretty healthy summer treat options using that delicious Homemade Dark Chocolate Magic Shell!  These are seriously so amazingly delicious!  Frozen banana offers such a creamy texture, if blind folded, I wonder if you would honestly think you were eating ice cream.  So, to have it covered in chocolate . . . . yeah, pretty awesome!

These are a cinch to throw together.  All you do is cut up your bananas, freeze them for a bit and then dip them in the Magic Shell.  Since that Magic Shell takes all of about 2 minutes to complete, you can have you a delicious summer treat in no time.

I gotta tell you. . . sometimes I fear dipping stuff in chocolate because it seems like every time I do, it’s a disaster.  The chocolate never sticks, and if it does, it looks like my two-year-old did it.  I was THRILLED when I simply dipped my bananas, pulled them out, and found that they looked absolutely beautiful.

After dipping you can sprinkle them with other toppings if you want.  My little babe is loving sprinkles as of late, so we did some with sprinkles just for fun.  Think of how fun it would be to use sprinkles that are centered around a particular holiday (like red, white and blue for Independence day).  Oh . . . so cute!

While I think these make for a perfect summer treat or snack, don’t be thinking that they wouldn’t be good year-round.  Oh, I’ll be making these quite often . . . regardless of the season.  I’ve been using these babies for a quick fix when I’ve wanted a treat.  You know . . . instead of running out for a triple sundae, or sneaking a full size candy bar, I’ve just popped one of these Banana Bites in my mouth and my treat fix has been cured.  My banana bites are slowly disappearing, but I’m happy to report that my waist size isn’t growing.  LOL!

Go!  Make you some Frozen Banana Bites!  You’ll be glad you did.

Dark Chocolate Frozen Banana Bites
Mimi’s Fit Foods
Adapted From Gimme Some Oven

Ingredients:
3 medium ripe (but not soggy) bananas
1 batch Homemade Dark Chocolate Magic Shell (follow link in blog post)
popsicle sticks
sprinkles, optional

Directions:
Cut the bananas into six equal bite-sized pieces. Place on a foil- or parchment-covered baking sheet. Then poke them with the popsicle sticks. Freeze for at least 2 hours or until frozen.

Remove and dip each banana in the magic shell until covered. (I used a tall jar . . . the one pictured in the Magic Shell post . . . so that it would be easier to dip.) Sprinkle with sprinkles, if desired, and place back on cold baking sheet until dried.

Serve immediately or re-freeze.

Yields 18.

Nutritional Information (Per Banana Bite):
92.6 Calories | 0.2g Protein | 12.4g Carbs | 5.5g Fat (4g = Sat.) | 1.5g Fiber | 8.6g Sugars

Homemade Dark Chocolate Magic Shell

Homemade Dark Chocolate Magic Shell | Mimi's Fit Foods

Here’s a sweet, little indulgence you may want to add to your recipe box.  It’s made with dark chocolate chips (and we’ve all heard how healthy dark chocolate is, right!?) and coconut oil.  That’s it.  It’s dangerously easy to make and it adds just a little special touch to your frozen treats (you know . . . frozen yogurt or frozen fruit).

When my parents bought Magic Shell when I was a kid, I thought it was the cat’s meow!  I was so fascinated with how it would harden up when poured over my ice cream.  I loved the stuff.  This homemade version does EXACTLY that, but it tastes WAY better.  I also love that I was able to make it with dark chocolate.

Stay tuned . . . I have a couple “healthy” summer treats headed your way where I’ll put this Homemade Dark Chocolate Magic Shell to good use.

Homemade Dark Chocolate Magic Shell
Mimi’s Fit Foods
Adapted from Gimme Some Oven

Ingredients:
1 cup dark chocolate chips (mine were 63% cacao – brand was E Guittard)
2 tablespoons virgin organic coconut oil

Directions:
Stir together chocolate chips and coconut oil in a large microwave-safe bowl. Place in microwave and cook on high for 30 seconds. Remove and stir. Continue microwaving and stirring in 15 second intervals until all of the chocolate is melted. Remove and let sit until the chocolate reaches room temperature.
Serve with ice cream or fruit. Can be covered and stored at room temperature (not in a refrigerator) for up to 1 month.

Serves 11.

Nutritional Information (Per Serving = 1 Tablespoon):
123 Calories | 0g Protein | 13g Carbs | 9g Fat (6.6g = Sat.) | 1.5g Fiber | 10.2g Sugar

Lime Kissed Fruit Salad

Lime Kissed Fruit Sald | Mimi's Fit Foods

With it being summer and having all this lovely fruit in season, fruit salads are all the craze!  I absolutely love eating fresh fruit in the summer and find that it makes a delicious, light, and beautiful side dish to almost any meal.  That being said, this has become my most favorite way to serve it as of late!

This fruit salad is oh-so-simple, takes very little time, and seriously takes that fresh fruit up a gazillion notches to SUPER awesome!  I’ve been toting this fruit salad to family and friend BBQ’s all summer long and every. single. time. I am asked how to make it because everyone is drooling over every bite.

I’ve found that the fruit options are endless.  I typically make it with whatever fruit I have on hand or with whatever fruit I am in the mood for.  Being summer . . . there is usually melon and strawberries in it for sure.  Then, I add others.  You can change things up to your liking.

One little note that I must mention is that you should not “dress” this salad until it is time to eat it.  It only lasts a couple of hours before going “mushy” and gets all juicy.  (I mean, the mushy and juicy fruit is still to-die-for, but you know . . . not the most optimal to serve.)

All I’m saying is that if you want to be praised for your little-to-no-effort salad, this is it folks!  Make it for your next BBQ.  Or, if you don’t have a BBQ, make it for yourself.  You’ll be in heaven!  And, keep it in mind for the fall/winter months too because it’s even delicious with canned fruit.  No kidding!

Lime Kissed Fruit Salad
Mimi’s Fit Foods
Adapted from Mel’s Kitchen Cafe

Ingredients:
3 cups watermelon, cubed
2 cups strawberries, quarters
1 cup grapes, halved (red or green)
1 (11 ounce) can mandarin oranges, drained well
1 banana sliced
zest from one lime
2 tablespoons honey

Directions:
Combine the fruit in a medium-large serving bowl. Add the lime zest and gently toss.
Drizzle the honey over the fruit and again, gently mix until the fruit is evenly coated with the honey. Serve.

Nutritional Information (Per Serving = 1/2 Cup):
43.3 Calories | 0.4g Protein | 11g Carbs | 0.1g (0g = Sat.) Fat | 0.9g Fiber | 8.8g Sugars

Orange-Infused French Toast

Orange-Infused French Toast | Mimi's Fit Foods
We LOVED this French toast!  I mean, we already love French toast, but add some tang and sweetness from an orange and we’re ALL in.

This takes typical French toast up a notch and gives it that wow-factor. You start with the usual French toast batter (milk and eggs), but sub milk for evaporated milk.  This gives it a hint of richness without sacrificing calories/fat.  Then, you’ll end up adding orange zest to that batter.  And, to really make this French toast even more awesome, it gets topped with an orange-maple syrup.  We are seriously in love over here with this breakfast.  While there’s only three of us to feed, I made the entire batch, threw the leftovers in the fridge, and we’ll be warming them up in the toaster for breakfast for the next couple days.  Love, Love, Love!!

Orange-Infused French Toast
Mimi’s Fit Foods
Adapted from Rocco Dispirito’s “Now Eat This! Diet”

Ingredients:
1 large navel orange (zest included)
1/2 cup sugar-free pancake syrup
1 cup liquid egg substitute
1 (12-ounce) can evaporated skim milk
2 teaspoons vanilla extract
3/4 teaspoon ground cinnamon
10 pieces stale or sturdy whole-wheat bread (I used Jack Spratt)
nonstick cooking spray

Directions:
Using a rasp or grater, remove zest of the orange and set aside for the bread. Cut off the top and bottom of the orange. Position the orange so that the flat bottom end is resting on the cutting board. Using a sharp paring knife, cut the skin and white pith off in a downward curving motion. Continue cutting around the orange so that it is no longer surrounded by the skin and pith. Cut the orange crosswise into 1/4-inch slices, and then cut the slices into quarters.

Transfer the orange quarters to a small sauce pan over low heat. Add the pancake syrup, and stir to combine. Simmer for 5 minutes, and then turn off the heat and set aside.

In a large, shallow pan (I use a deep pie plate), add the egg substitute, evaporated milk, vanilla, cinnamon, and orange zest. Stir with a whisk or fork until well combined. Dip the bread slices into the egg mixture; turn to coat both sides and allow mixture to soak bread.

Head a griddle or large nonstick sauté pan over medium heat. When hot, coat it with cooking spray. Add the bread slices and cook, about 2 minutes each side. Repeat with remaining slices.

Serve with the orange syrup.

Serves 5.

Nutritional Information (Per Serving = 2 Slices):
276.6 Calories | 17.3g Protein | 51.3g Carbs | 1.2g (0.1g Sat) Fat | 10.9g Sugars

Greek Yogurt & Mixed Berry Parfait

Greek Yogurt and Mixed Berry Parfait | Mimi's Fit FoodsGreek Yogurt and Mixed Berry Parfait | Mimi's Fit FoodsGreek Yogurt and Mixed Berry Parfait | Mimi's Fit Foods

Thank you for being patient with the new site conversion.  I know it has some bugs, and I’m working on getting those fixed.  I’m also still learning how to navigate and use the new site.  Thus . . . the continued slow down of posting.  But, I’m getting MUCH closer to getting this under control, and then you’ll get some more consistent posts.  Yay!

Today I’m bringing you a delicious breakfast idea for Mother’s Day.  Of course you can make this for any day, but I also think it would be so great for Mother’s Day.  It seems like we’re always looking for great breakfast/brunch ideas for this sweet day, and I decided that a parfait is at the top of my list this year.  Not only do I love me a good parfait, but this definitely reminds me of my sweet mom.  My momma loves her some good granola stirred right into her yogurt.  While a parfait is pretty much that idea, it sure looks a lot prettier.  And, don’t you think your moms deserve “pretty” on Mother’s Day?  I certainly do.

These parfaits come together in a flash. All you do is layer your favorite non-fat Greek yogurt, Fit Granola, and chopped berries.  Easy, delicious, and oh-so-yummy!  As you can see, I made my own granola so that I could watch the calories here.  (Granola is a tricky food that sometimes makes us feel like we’re eating healthy, when really we’re eating oats covered in sugars.  If you click over to my Fit Granola, you’ll see a lighter version that is much better for you than most varieties you’ll find at the store.)

Being a mom myself, I might just throw in a Mother’s Day request to my hubby for this parfait.  He’ll be glad I want something so easy for my Mother’s Day breakfast.

Greek Yogurt & Mixed Berry Parfait
Mimi’s Fit Foods

Ingredients:
5.3 to 6-ounce container of non-fat Greek Yogurt (I used Yoplait’s Strawberry/Raspberry)
1/3 cup Fit Granola
1/2 cup mixed berries, chopped (I used strawberries and blackberries)

Directions:
Using a clear drinking glass (or ice cream dish, or other container of your choice), put 1/3 of the Greek yogurt in the bottom, layer with 1/3 of the granola, and then 1/3 of the chopped berries. Repeat these layers two additional times.

Serves 1.

Nutritional Information:
306 Calories | 14.4g Protein | 45.3g Carbs | 8.1g Fat | 5.1g Fiber | 28.8g Sugars
Greek Yogurt and Mixed Berry Parfait | Mimi's Fit Foods