Mango Quinoa Salad with Black Beans

Mango Quinoa Salad with Black Beans - Mimi's Fit Foods

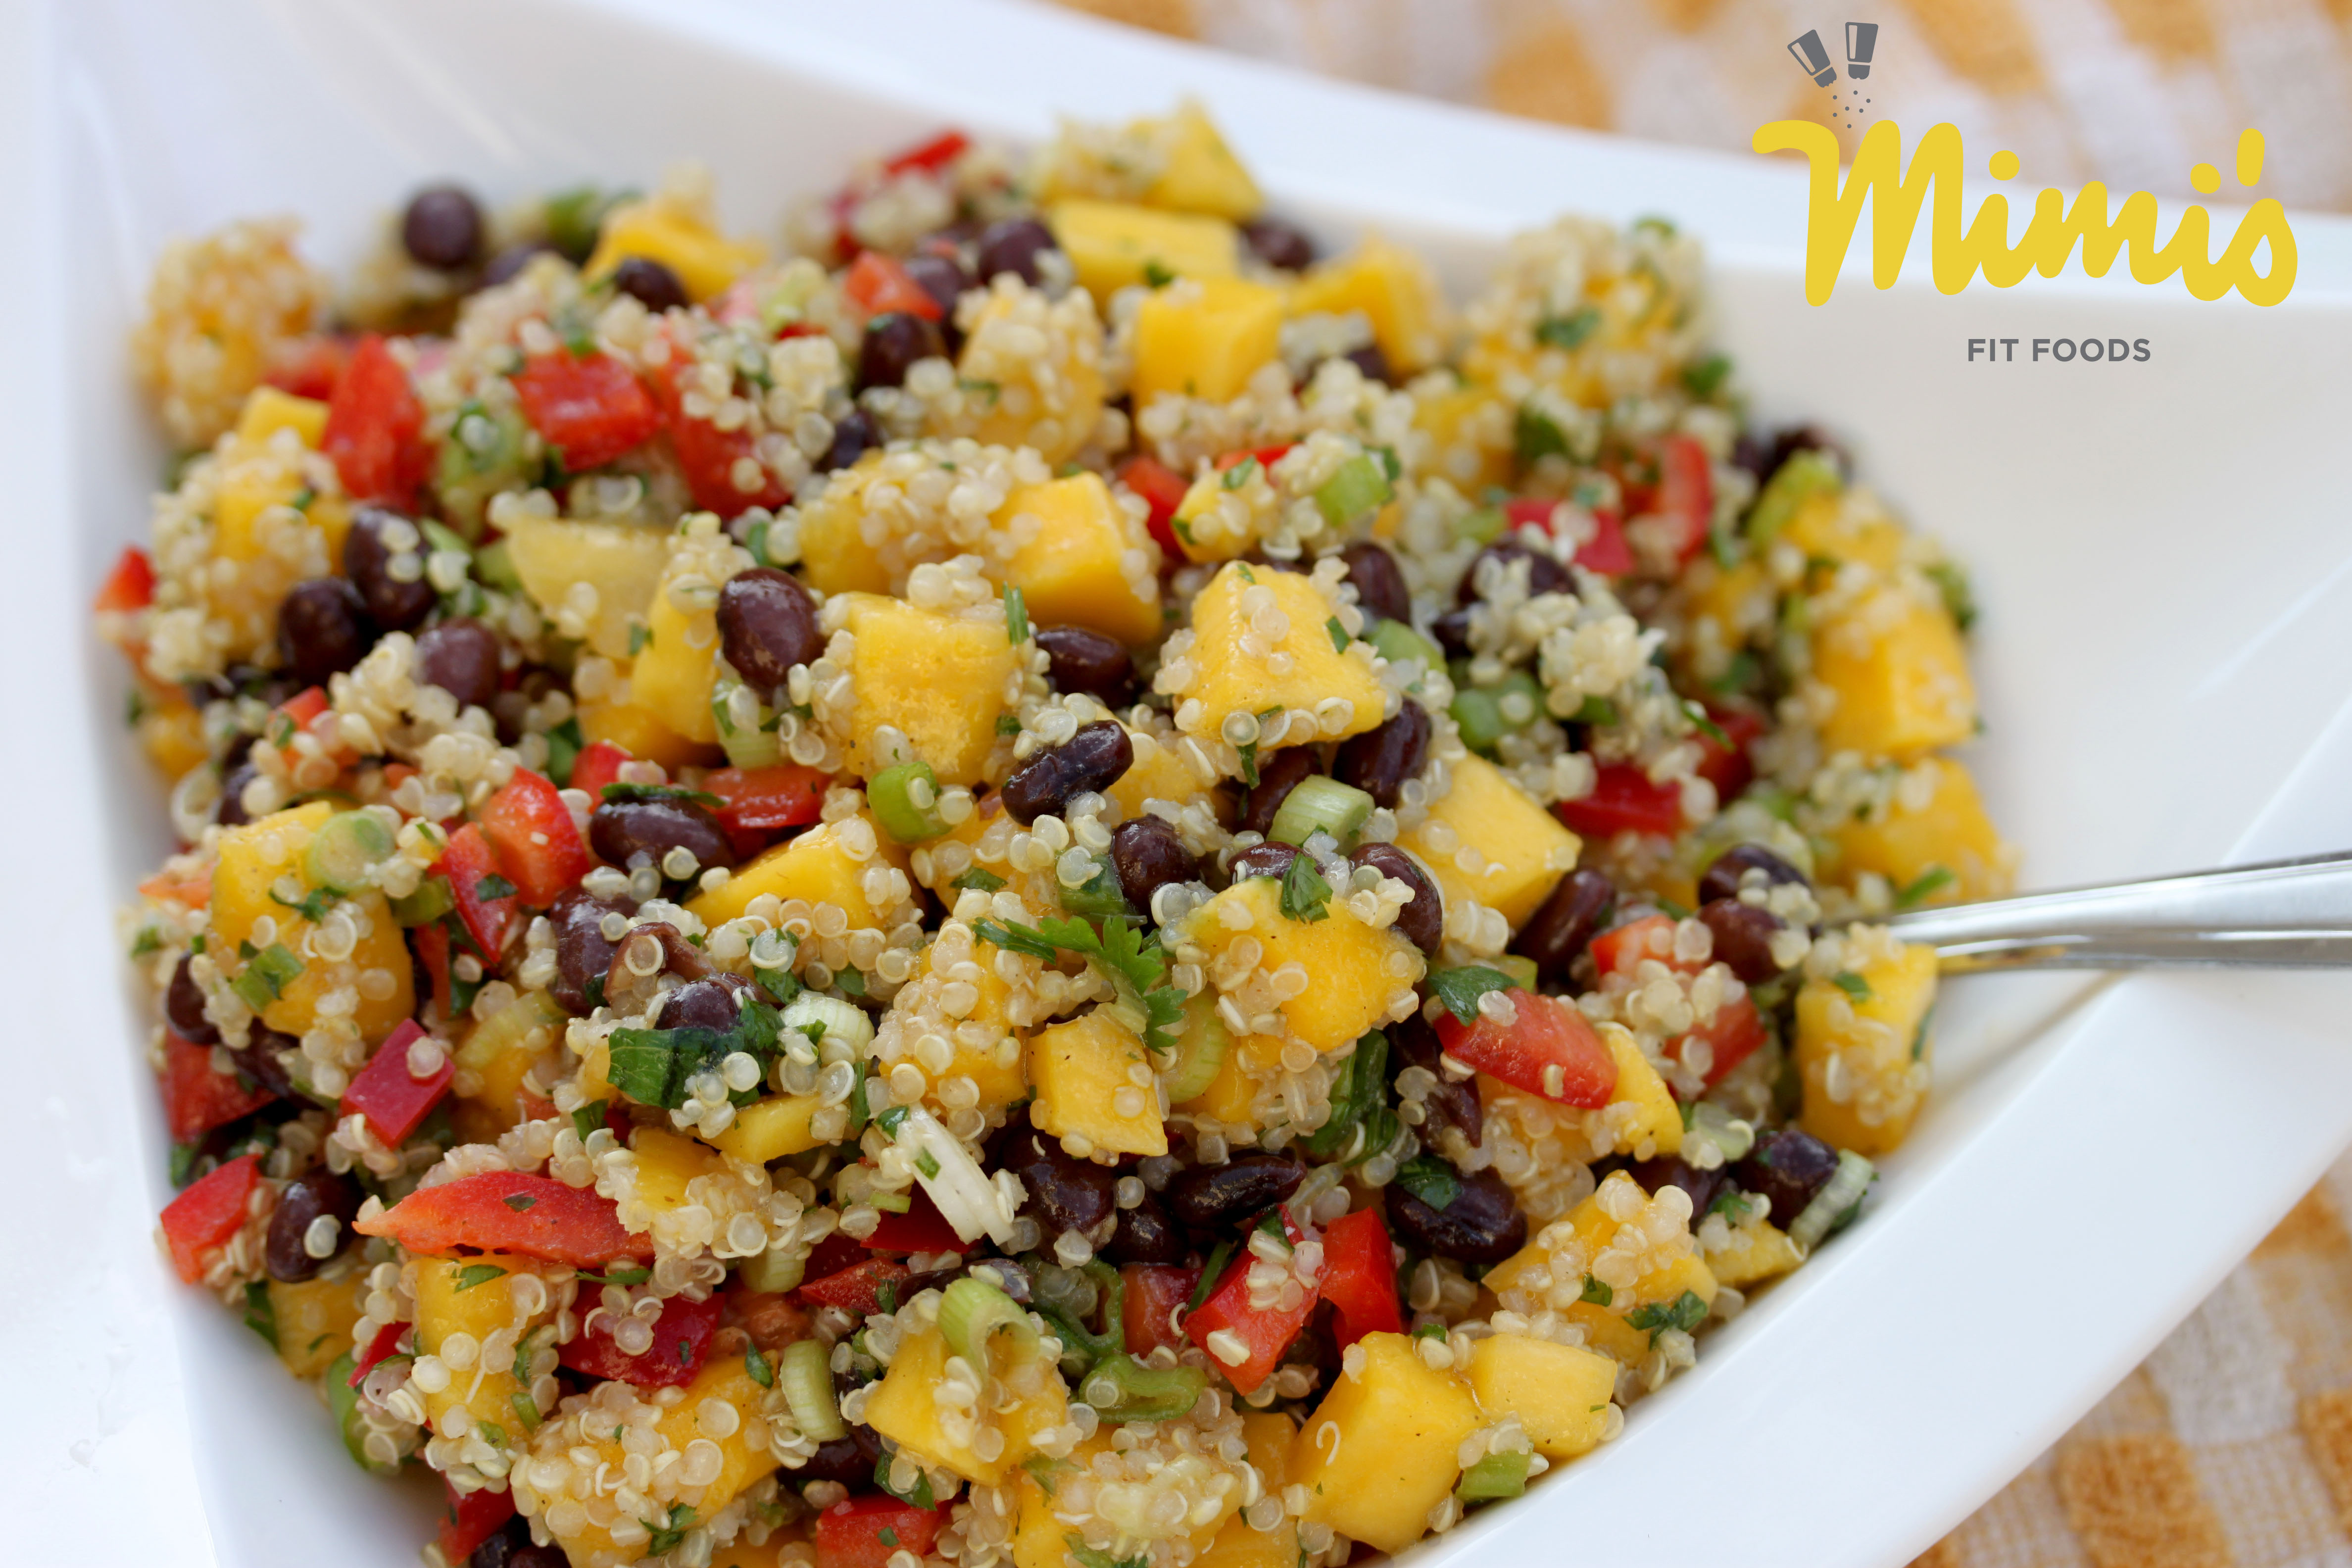
I’m already starting to get a little sad that summer is on the tail-end.  With that being said, I’m trying to soak in as much summer cooking as I can before we truly have to say goodbye.  I’ve had this salad on my list for a while now and it’s one of those recipes that I wanted to be sure to make before summer’s end.  My, oh my!  It’s so yummy and full of summer.  I’ve been seeing  a lot of Quinoa-Mango recipes floating around and knew I was going to fall in love.  That mango is so sweet and delicious next to the quinoa.  I love having all the Tex-Mex flavors mixed in as well.  We’re talking peppers, green onions, black beans, and fresh cilantro.  The dressing tops it off with a nice tang.  Fabulous, right?

Seriously!  You can’t go wrong with this dish.  Even if you’re not a quinoa fan (what!?), you’re going to like this. The quinoa is so subtle, yet you get all the health benefits from it.  Meanwhile, you’ll be enjoying the texture from the crunchy, fresh veggies and you’ll also be hunting for that sweet mango.  I mean, it’s a “win” all around!

This recipe calls for cooked quinoa.  I cooked about 2/3 cup dry quinoa and had almost exactly what I needed for the full 2 cups.

Mango Quinoa Salad with Black Beans
Adapted Slightly From Mel’s Kitchen Cafe

2 cups cooked quinoa (cooked in vegetable or chicken broth), at room temperature
1 cup black beans, drained and rinsed
1 medium mango, peeled and diced
1 red bell pepper, diced
4 green onions, white and green parts thinly sliced
1/2 cup chopped fresh cilantro
4 tablespoons red wine vinegar
3 tablespoons extra virgin olive oil
2 tablespoons fresh lime juice
1/2 teaspoon kosher salt
1/4 teaspoon black pepper

Place the cooked quinoa in a large bowl.  Add mango, red pepper, green onion, black beans, and cilantro.

In a small bowl combine vinegar, olive oil, lime juice, salt, and pepper.  Whisk until the dressing is smooth and pour on top of salad.  Toss to combine.  Chill the salad for at least one hour before serving.

Serves Approximately 12.

Nutritional Information (Per Serving = Approx. 1/2 Cup)
Calories:  102.7
Protein:  2.9g
Carbs:  14.4g
Fat:  4.3g (0.5g = Sat.)
Fiber:  2.5g
Sugars:  0.7g

Grilled Chicken With Sweet and Spicy Cherry Sauce

Grilled Chicken With Sweet and Spicy Cherry Sauce - Mimi's Fit Foods

I love sweet cherries.  My heart seriously skips a beat when I start seeing sweet cherries in the grocery stores and fresh fruit stands.  I can just sit and snack on them all day.  I decided to hit Pinterest up for some different uses of this awesome fruit and I found this gem.  Since sweet cherries are usually found in sweet recipes, I thought it would be worth a try to use them in a savory type of way.  Besides, I’m also always looking for more low-calorie ways to dress up chicken.

I was NOT disappointed with the outcome of this recipe at all!  This took a boring piece of grilled chicken to an exciting piece of chicken that bursts with flavor.  The sauce is slightly spicy, but also leaves a trace of sweetness behind.  Besides the fact that it’s yummy, isn’t it pretty?  I would totally serve this to guests on a summer evening.  It would be so perfect.

Grilled Chicken With Sweet and Spicy Cherry Sauce
Recipe Adapted From  Health.com

cooking spray
1 cup chopped & pitted sweet cherries
1/4 cup red cooking wine (I used Sherry)
1 garlic clove, minced
1/8 teaspoon cumin
1/8 teaspoon kosher salt
1/8 teaspoon black pepper
1/8 teaspoon crushed red pepper
1 tablespoon fruit preserves (I used Strawberry)
4 (4-ounce) skinless, boneless chicken breast halves

Prepare your grill to a medium heat.  Then lightly spray the grill rack with cooking spray (sometimes this creates flames, so I often times take a paper towel sprayed with cooking spray and wipe it on the grill rack).

Lightly crush cherries in a small saucepan.  Add the cooking wine and the next 6 ingredients (through preserves).  Bring the mixture to a boil; reduce heat, and simmer, stirring occasionally, 10 minutes.

Grill chicken, covered, for 4 minutes on each side or until it is cooked through (if you have a thermometer, I cook mine until the temperature reaches 165 degrees).  Serve topped with cherry sauce.

Serves 4.

Nutritional Information (Per Serving)
Calories:  189
Protein:  27g
Carbs:  9g
Fat:  3g (1g = Sat.)
Fiber:  1g

Healthy & Low Calorie (Jicama) Fries

Jicama Fries - Mimi's Fit Foods

I have a slight love for Jicama.  However, it seems as if the Jicama Root is not very well known.  But, it should be because it’s ultra healthy and very good for you.  It’s a vegetable in the bean family and has a crisp and crunchy texture.  It has a mild taste, but tastes slightly sweet.  The beauty of this awesome vegetable is that it tastes great, but is also very high in dietary fiber.  That’s where most of the carbohydrate calories come from.  Not bad, eh?  I actually really love Jicama in my salads and get a little excited when I see it on salad bars.  (If you want to know more about Jicama, you can go here.  There is also a picture of Jicama, just in case you’re not sure what it looks like.)

So, I saw this idea to make fries out of Jicama and I thought it was genius.  Knowing Jicama , I was quite confident that the fries would turn out fabulous.  And, indeed I was right.  We all loved these things and I am so excited to have a fry recipe I can rely on for times when we’re having burgers or kabobs or I just have a crazy craving for fries.  I wouldn’t feel all that guilty about snacking on these!!

You can totally season these with whatever suits your fancy.  This particular time I used a blend of garlic, parsley, salt, and pepper.  I think they would also be great with chili powder and smoked paprika.  Yum, yum!

Jicama Fries2 - Mimi's Fit Foods

Healthy & Low Calorie Jicama Fries
Slightly Adapted from BuiltLean

1 Jicama root
1 tablespoon of seasonings of choice (garlic, chili powder, paprika, etc.)
sprinkle of sea salt
1 1/2 teaspoons extra virgin olive oil

Using a vegetable peeler or paring knife, remove the papery-thin peel of the jicama root.

When you have cleanly removed all of the peel, slice the jicama into flat rounds about 1/2 inch thick, and then cut them up into strips resembling steak fries.

Lay your jicama strips out in one layer on a non-stick baking sheet, and prepare your seasonings.

Mix the seasonings in a small bowl and sprinkle them over the jicama strips as evenly as possible. Using an oil mister, apply a thin coat of olive oil. If you don’t have a mister, just drizzle the olive oil over the jicama. If need be, toss the fries around on the baking sheet to even out the seasonings and oil.

Bake the seasoned jicama fries in the oven at 375 degrees for 15-20 minutes, toss fries (or take the time to flip them all over) and bake for an additional 15-20 minutes, until they are golden-brown and crisp. Enjoy!

Serves 4.

Nutritional Information (Per Serving)
Calories:  77.6
Protein:  1.2g
Carbs:  14.5g
Fat:  1.9g (0.3g = Sat.)
Fiber:  8.1g
Sugars:  3g

Slow Cooker Orange Chicken

Slow Cooker Orange Chicken - Mimi's Fit Foods

Come on, now.  Who doesn’t love Orange Chicken?  I love this healthier version of it for a few reasons.  1 – It’s not deep fried and is made in the slow cooker.  This is fabulous because now that I’m a mom I’m kind of super tired by the time dinner time comes and goes and I really hate doing the dishes.  Throwing this meal in the slow cooker means I get to do it earlier in the day when I have more energy and when my baby is less fussy.  Plus, I always think it’s so nice to walk into the kitchen at dinner time and have a meal waiting for me.  2 – The orange flavor is awesome!  It really shines through.  The orange is not subtle, but takes a front seat.  3 – The chicken is nice and tender.  There are more reasons I love this dish, but those are my top three.

I made this fabulous Orange Chicken for some friends and one of them said, “I’ve never had Orange Chicken anywhere that tasted this good.”  That was music to my ears.  I was happy my guests loved it.  In the same breath, I was a little sad I didn’t have more leftovers.  I guess I’ll just have to make it again soon.

I served it over Soft and Fluffy Baked Brown Rice and we couldn’t have been happier.  (If you’re closely watching carbs and calories, a half serving of rice would be advisable here.  You’ll get some of your carbs and calories in the orange sauce, so decreasing your rice portion would make sense.)

Slow Cooker Orange Chicken
Adapted by Team T Adventures

2 teaspoons coconut oil
2 lbs. boneless, skinless chicken breastes, cubed
3 tablespoons whole wheat flour
4 large oranges
1 1/2 teaspoons balsamic vinegar
3 tablespoons ketchup
1/4 cup honey
1 1/2 teaspoons Sriracha

Heat coconut oil in a large pan over medium-high heat.  Place chicken in a large shallow bowl.  Sprinkle flour over chicken and toss to coat.  Transfer to cooking pan.  Brown chicken, then remove from heat and place in slow cooker.  Don’t worry about fully cooking chicken (it will finish in the slow cooker).

In a medium bowl, zest 2 oranges, then juice all 4.  Add vinegar, ketchup, honey, and Sriracha.  Whisk together to combine.  Pour sauce over chicken in the slow cooker.

Cook on low for 4 1/2 to 5 hours.

Serves 8.

Nutritional Information (Per Serving Without Rice)
Calories:  179.7
Protein:  23.7g
Carbs:  17.1g
Fat:  2.3g
Fiber:  0.4g
Sugars:  10.4g

Cantaloupe and Avocado Salad with Agave-Lime Dressing

Cantaloupe and Avocado Salad - Mimi's Fit Foods

Ok. Ok.  So, this might seem like a weird combination.  However, let me be the one to convince you that it is a mightily GREAT combination.  We like both cantaloupe and avocado in our house.  We like it a lot.  We also love lime.  Thus, I knew I had to give this a whirl to see if the flavors would meld well together.  Oh man!  We love cantaloupe, avocado, and lime EVEN more now.  This salad was screaming SUMMER and it tasted fresh, with a hint of sweetness, as well as a hint of tartness.  It was a perfect side dish to our dinner.  My cute little baby even GOBBLED this right up.  I seriously put a good portion size on her serving tray, turned around to do something, turned back around to check on her, and it was all gone and she was begging for more.  I kind of wish I could act like a baby sometimes and cry and grunt for more too . . . even when I know I’ve had way over my portion allotment.

I’m SUPER glad I found this recipe and had the curiosity to try it because it’s going to make several more appearances at our lunch/dinner table (and probably others too when we are asked to bring fruit to the next BBQ) this summer.  It’s not only unique, but so, so, so, SO good.

Cantaloupe and Avocado Salad2 - Mimi's Fit Foods

Cantaloupe and Avocado Salad with Agave-Lime Dressing
Adapted from Whole Living

3 tablespoons fresh lime juice
1 tablespoon Agave Nectar
1 tablespoon extra virgin olive oil
1/2 teaspoon coarse (kosher) salt
1 cantaloupe (3 pounds), quartered and seeded
1 avocado, halved, pitted, and skinned

In a large bowl, whisk together lime juice, Agave, oil, and salt; set aside.

Cut each cantaloupe quarter in half lengthwise.  Run a knife between the flesh and the sin of the melon; discard skin.  Cut each wedge into 1/2-inch pieces.

Cut each avocado half again length-wise and then into 1/2-inch-thick chunks.  Add cantaloupe, avocado to bowl with dressing and toss to coat.  Divide among 6 plates.

Serves 6.

Nutritional Information (Per Serving = 1/6 the Recipe)
Calories:  142
Protein:  1.9g
Carbs:  18.9g
Fat:  7.5g (0.4g = Sat.)
Fiber:  2.2g
Sugars:  14.6g

*Note:  If looking to cut calories, you can cut the dressing in half.  There is PLENTY of dressing, so that wouldn’t be much of a sacrifice in flavor and will cut about 20 calories.  You can also eliminate the avocado which will save an additional 45 calories.  (So, if you eat this with half the dressing and no avocado your calorie count will be closer to 82.)

Grilled Lime Coconut Curry Chicken

Grilled Lime Coconut Curry Chicken - Mimi's Fit Foods

You guys!  This is chicken is sooooo good!  I mean, the flavors are so tasty and the combination of flavors definitely give this dish the “wow” factor!  We’re talking lime, coconut, curry, and a few other awesome ingredients that make the marinade out-of-this-world.  The marinade is super easy to throw together and I was SUPER happy when dinner time rolled around because all of the prep. work was done and all I had to do was throw the chicken on the grill.  The marinade not only made the chicken YUMMY, but it also made it TENDER.  

Oh, and did I mention you get to use the leftover marinade as a sauce.  Well, you do!  And, it makes this dish even THAT much yummier.  

I like to cut my chicken into smaller pieces (rather than use the entire chicken breast as a whole).  I also slice any pieces that may be extra thick (I usually slice them in half . . . like a hamburger bun).  This helps the chicken to soak up the marinade better, which offers a more intense overall flavor.  It also helps give all my pieces a more uniform size so that they all cook for about the same amount of time.

I served this with a side of Baked Coconut Brown Rice (you want the recipe for that too, don’t you?).  We were all VERY happy with dinner and even happier that we have leftovers.  Add this to your summer grilling menu . . . NOW!  (I’m really not that bossy.  But, seriously!  Now would be the best time!)

Grilled Lime Coconut Curry Chicken
Slightly Adapted from Mel’s Kitchen Cafe

3 tablespoons canola oil
zest and juice of 1 lime
1 teaspoon ground cumin
1 1/2 teaspoons ground coriander
2 tablespoons low-sodium soy sauce
1 1/2 teaspoons salt
2 tablespoons sugar
2 teaspoons curry powder
1/2 cup canned light coconut milk
pinch cayenne pepper
2 pounds boneless, skinless chicken breasts (see note above)
1/4 cup chopped fresh cilantro
fresh limes, cut into wedges

In a large liquid measuring cup or medium bowl, whisk together the oil, lime zest, lime juice, cumin, coriander, soy sauce, salt, sugar, curry powder, coconut milk, and cayenne pepper. Place the chicken in a large ziploc bag and pour the marinade over the chicken. Seal the bag and refrigerate for at least 2 hours and up to 8 hours.

Preheat a charcoal or gas grill to medium-high heat. Grill the chicken for 6-7 minutes per side (actual time will depend on the thickness of the chicken). While the chicken is cooking, pour the marinade into a small or medium saucepan. Bring the mixture to a rolling boil and boil for 10 minutes, stirring occasionally.

Place the grilled chicken on a serving platter or plate. Drizzle with sauce (reserve the remaining sauce to serve separately) and sprinkle fresh cilantro over the top. Serve with lime wedges and additional sauce.

Serves 8.

 
Nutritional Information (Per 4-Oz. Serving & Approx. 1 Tab. Sauce)
Calories: 174
Protein:  23,3g
Carbs:  4.3g
Fat:  7.2g (1.3g = Sat.)
Fiber:  0.2g
Sugars:  3.5g

Basic Grilled Potatoes

Grilled Potatoes - Mimi's Fit Foods

Yep!  I’m still grilling like a mad woman.  Ha, ha!  I just love how fast, easy, and delicious the grill can be.  We’ve been having burgers, pizza, chicken, steak, and lots of grilled sides too.  I realized I hadn’t ever posted Grilled Potatoes and that is a shame.  These are so easy and pair so well with many grilled main dishes.

The grill gives these a nice roasted and slightly smokey taste.  Seriously so yummy!  I love how the grilling helps to give the outsides a slightly crispy texture, but the insides are still soft (kind of like steak fries).  I like to make mine with a combination of red potatoes and Yukon Gold potatoes.  They come in nice portion sizes and are delicious.

You’ll see that I microwave my taters before I grill them.  This helps to expedite the grilling/cooking process.  It’s not necessary, but if you decide to nix the microwave you’ll want to grill your potatoes on a low heat (to avoid burning the surfaces) and it could take up to 30-45 minutes before they are soft.

I am giving you the basic variation of just salt and pepper.  However, we have added herbs and other seasonings (depending on what we’re eating alongside these babies) and have had fabulous success!

We love these at our house.  I’m betting you’ll love them at your house too!

Basic Grilled Potatoes

3 medium red potatoes
3 medium Yukon Gold potatoes
1 tablespoon extra virgin olive oil
salt & pepper to taste

Scrub potatoes and slice into 1/4-inch slices.  Place in a large microwave-safe bowl.  Drizzle olive oil over potatoes and then sprinkle with salt and pepper.  Toss well so that each slice gets coated in olive oil.

Cover bowl (with lid or plastic wrap) and microwave for 2 minutes.  Remove, toss potatoes, and place back in the microwave (covered) for an additional 2-3 minutes or until almost completely fork-tender.  (You want them to be about 90% soft/tender.)

Meanwhile, preheat grill to a medium heat.  Place potatoes on grill and cook for about 4 to 5 minutes per side or until you have golden brown grill marks.

Serve Immediately.

Serves 6 (1 full medium potato per serving).

Nutritional Information (Per Serving)
Calories:  119
Protein:  2.7g
Carbs:  23.4g
Fat:  2.3g (0.3g = Sat.)
Fiber:  1.8g
Sugars:   0.9g

Grilled Asparagus

Grilled Asparagus - Mimi's Fit Foods

Oh, how I love beautiful side dishes to go with my main meal.  I also love it when the vegetable is one of the best parts of the meal!  Our little family LOVES grilled asparagus.  The grill really helps to bring out the beautiful, unique flavor of the asparagus making it taste so incredibly fresh with LOADS of flavor.  We’ve been having this quite regularly around my house.  It’s tasty, but also SUPER easy and SUPER fast!  We’re talking a total of 6-8 minutes from start to finish.  Usually I just toss it on the grill while our meat is cooking and it’s all ready at the same time.  It’s FABULOUS!

Grilled Asparagus
Slightly Adapted from allrecipes.com

1 pound fresh asparagus spears, trimmed
1/2 tablespoon extra virgin olive oil
salt and pepper to taste
fresh lemon wedges

Preheat grill for high heat.

Lightly coat the asparagus spears with olive oil.  Season with salt and pepper to taste (I usually do this on a plate or in a shallow pan and I toss the spears all around to ensure they get evenly coated).

Place spears on hot grill and grill over high heat for about 2 to 3 minutes, rotate, and then grill for an additional 2 to 3 minutes, or to your desired tenderness.  Just before serving, squeeze fresh lemon wedges over asparagus.

Serves 4.

Nutritional Information (Per Serving = 1/4 of the Spears)
Calories:  41
Protein:  2.6g
Carbs:  5.1g
Fat:  2g (0.3g = Sat.)
Fiber:  2.4g
Sugars:  0g

Watermelon, Strawberry, and Feta Salad With Balsamic Reduction

Watermelon, Strawberry, and Feta Salad With a Balsamic Reduction - Mimi's Fit Foods

Those of you who have had tried a balsamic reduction over your fruit know exactly where I’m coming from on this post.  Those of you who have not tried such a thing . . . well, it’s time you jumped on the wagon because you’re seriously missing out.  I know, I know.  It sounds completely weird and it’s hard to even imagine that such a concoction would taste so awesome.  But, I’m here to tell you that it is seriously awesome!

My sister-in-law reminded me of this beautiful combination when we had lunch a couple of weeks ago.  I was then asked to bring fruit to a family party and I didn’t even think twice about what I would take.  I put the fruit in a big bowl and then allowed everyone to add their desired amount of balsamic reduction and feta cheese to their own portions.  This worked out perfectly because most of the kids just had plain fruit while several of the adults had the more “sophisticated” salad.  I’ve been eating this for a snack or side dish almost every day since (because the balsamic reduction goes a LONG way).  It’s sweet and savory all at the same time.  If you haven’t tried this, you just have to give it a whirl.  If you have tried it, may this be your mouth-watering reminder to make it again.

Have I mentioned how much I love summer?

Watermelon, Strawberry, and Feta Salad With Balsamic Reduction

1 cup balsamic vinegar
1 tablespoon sugar
watermelon, cubed
strawberries, sliced
reduced fat feta cheese, crumbled

Place balsamic vinegar and sugar in a small saucepan over medium heat.  Bring just to a boil, and then turn down the heat so that the boil reduces to a simmer.  Stir occasionally and allow to simmer until the vinegar has reduced by at least half (for a thinner reduction) or to about 1/4 cup (for a more syrupy consistency – which is what I prefer).  This can take up to 20 minutes.  Allow to cool and transfer to an airtight container.  You can store the balsamic reduction in the refrigerator until ready to use.

For each serving, place about a cup of mixed fruit (watermelon/strawberries) on a plate.  Drizzle with balsamic reduction and 1 tablespoon feta cheese.

Nutritional Information (Per Serving)
Calories:  66.3
Protein:  2.4g
Carbs:  12.8g
Fat:  1.3g (0.6g = Sat.)
Fiber:  2.3g
Sugars:  9.4g

Fresh Raspberry Freezer Jam With Agave

Fresh Raspberry Freezer Jam With Agave Nectar - Mimi's Fit Foods

I grew up on homemade jam.  I have a HUGE preference for the stuff over store-bought jams.  There’s just something about the freshness and the quality of doing it yourself.  Most homemade jams are loaded with sugar (no wonder I’m in love with the stuff, right!?), which is still usually healthier than buying what you find on the grocery store shelf.  At least you don’t have all the preservatives and such.  This year I decided to try making jam with an alternative sweetener.  I’m not a lover of large amounts of Splenda, so I decided to go with a more natural sweetener . . . Agave.

Agave is a sweet nectar that is plant-based.  It actually is a product of the agave cactus.  It most closely resembles honey in both texture and taste (although I think Agave is a little sweeter, which means we can use less of it as compared to honey).

The only tricky part about making this jam was finding a pectin that would respond to Agave so that I would still have that nice, jam consistency.  After doing my research, I decided to buy Pamona’s Pectin.  It’s not sold everywhere, but I’ve found that it is sold in most health food stores.  I bought mine at Good Earth without any problems.

One other issue I encountered was that I was slightly nervous about the consistency of the jam when I was done making it.  I was worried it wouldn’t set up and resemble the jam texture I am used to.  Thus, I put my jam in a large pot, brought it to a boil, and then immediately took it off the stove.  I put the jam into jars and as soon as it cooled, the consistency was perfect.  If you like your jam a little runnier, this step can be completely omitted.

The jam turned out beautifully, you guys!  It tastes so yummy and it still holds that freshness that I adore about freezer jam.  I will fully admit that it doesn’t taste as sweet as the traditional, sugar-loaded stuff.  But, it’s not far off.  And, for the calorie and sugar savings that my body will appreciate, I’m MORE than happy with the trade-off.

I’ve had several people ask me about how to make low-sugar jam, so I am now happy to offer a solution that I completely love.

Fresh Raspberry Freezer Jam with Agave
Slightly adapted from the Pamona Pectin Recipe

8 cups mashed raspberries
1/2 cup fresh lemon juice
1 1/2 cups Agave
1 1/2 cups water
2 tablespoons Pamona Pectin powder
5 tablespoons calcium water (comes in Pamona Pectin packet)

Wash and rinse jam containers (I used pint jars).

Prepare calcium water in a jar (as per Pamona instructions which is adding the entire calcium packet to about 3/4 cup water).  Set aside.

Prepare fruit.  Measure fruit into large bowl and add lemon juice and agave.  Sir well.

Bring water to a boil.  Put in food processor and add pectin powder.  Vent lid and blend 2 minutes until all powder is dissolved.

Add hot liquid pectin to suit; stir until well mixed.

Add calcium water from jar; stir well.

If jam does not seem to jell well, but runny jam in pan, bring to boil, and immediately remove from heat.  It jells when cool.  (Omit this step if you are satisfied with the consistency of your jam.)

Fill containers to within 1/2″ of top.  Put on lids.  Store in freezer immediately.  Keep in refrigerator to eat and after thawing.  Lasts about 1 week in refrigerator.

Makes approximately 5 1/2 – 6 pints.

Nutritional Information (Per Serving = 1 Tablespoon)
Calories:  11
Protein:  0.1g
Carbs:  2.8g
Fat:  0g
Fiber:  0.4g
Sugars:  2g

*For the record – Smucker’s Red Raspberry Jam contains 50 calories per tablespoon.  I’m feeling pretty good about my jam right about now.  🙂