Cheddar and Avocado Turkey Burgers

Cheddar and Avocado Turkey Burgers - Mimi's Fit Foods

It’s summer and grilling is in full-force, right!?  When summer hits I immediately have intense cravings for burgers (along with a myriad of other things!).  This is definitely one of my go-to burgers because I almost always have the ingredients, it’s easy, and it tastes fancier than a run-of-the-mill burger (although I like those too).  Turkey and avocado go so well together and the cheese gives it that punch of flavor (and fat) to make it filling and oh-so-yummy. And, it probably goes without saying, but avocado is a MUCH healthier spread than mayo.  For calorie control, I used sandwich thins for my bun (only 100 calories each), but I usually like to make my own buns because they are SO much better and only a few more calories.

So, this is a keeper in my book and I think you all should add it to your grill line-up this summer (maybe even more than once)!

Happy Grilling . . . and Happy Summer!

Cheddar and Avocado Turkey Burgers
Adapted from Real Simple

canola oil, for the grate
1 avocado, chopped
1 tablespoon fresh lime juice (about 1/2 lime)
kosher salt and ground pepper
1 pound ground turkey
1/2 cup reduced fat Cheddar, grated
1/2 small red onion, thinly sliced
4 whole-wheat buns (Sandwich Thins)

Heat grill to medium-high. Once it is hot, clean the grill grate with a wire brush.  Just before grilling, oil the grill grate.

Mix together the avocado, lime juice, and ¼ teaspoon each salt and pepper in a small bowl until combined.

Gently mix together the turkey, Cheddar, grated onion, ¾ teaspoon salt, and ¼ teaspoon pepper with your hands in a medium bowl until just combined. Form the turkey mixture into five patties. Use your fingers to make a shallow well in the top of each patty (this will prevent overplumping during cooking).

Grill the burgers until cooked through and an instant-read thermometer inserted in the center registers 165° F, 6 to 8 minutes per side. Grill the buns, split-side down, until toasted, 5 to 10 seconds per side.

Stack the burgers, sliced onion, and avocado mixture between the buns.

Serves 5.

Nutritional Information (Per Serving = 1 Full Burger)
Calories:  301
Protein:  24.1g
Carbs:  24.9g
Fat:  15.2g (3.6g = Sat.)
Fiber:  5.2g
Sugars:  2.4g

Fit and Creamy Baked Spaghetti

Healthy Baked Spaghetti - Mimi's Fit Foods

Here is another way to make spaghetti.  I’ve said it before, but my cute husband doesn’t really like traditional spaghetti.  However, he’ll eat this.  I’m sure the addition of cream cheese helps, but hey . . . I’ll take it . . . and so should you.  Think pasta, cream cheese, rich marinara sauce, and more cheese.  Uh huh . . . dreamy, right?  I’ve seen versions of this meal floating around blogs and Pinterest with raving reviews so I just had to give it a whirl.  I trimmed the recipe up a bit and we absolutely adore this meal.  It’s hard to not go back for seconds!  My little baby gobbles it up right along with us.  It’s made in a casserole dish, so it makes a great family-style meal.  Since we are a small family we always have leftovers.  And, well, since it’s summer I am completely in love with leftovers because we are so busy playing these days that sometimes we don’t want to take a break to make dinner (or maybe mom is simply too tired from all the play  – let’s be honest!).  If you want a delicious spin on traditional spaghetti, add this to your lineup.  It’s so yummy (and easy, mind you!).

Fit and Creamy Baked Spaghetti
Adapted from The Blonde Can Cook

6 ounces multi-grain angel hair pasta, dry
2 cups spaghetti sauce
 (I used Prego Heart Smart)
1 pound lean ground turkey
1 teaspoon garlic salt
salt and pepper, to taste
1 teaspoon Italian seasoning
4 ounces light cream cheese
(1/3 less fat), room temperature
1/2 cup parmesan cheese, grated

Cook pasta according to directions on package, only to al dente.

Meanwhile, heat a large skillet over medium heat. Add ground turkey, garlic salt, salt and pepper.  Brown the ground turkey until cooked through.  Stir in your spaghetti sauce.

Drain and place cooked pasta back into your pan. Add in the cream cheese and Italian seasoning. Stir until cream cheese is melted (this is easier if your cream cheese is at room temperature, but it will still work if it isn’t).

Lightly grease a 2-quart casserole dish (a 9×13 baking dish would work too). Spread a small amount of meat sauce in the bottom of the dish.

Put spaghetti on top of sauce and top with remaining meat sauce. Sprinkle Parmesan cheese on top.

Bake for 30 minutes on 350 or until bubbly.

Serve and enjoy!

Serves 8.

Nutritional Information (Per Serving = 1/8 the Recipe)
Calories:  311
Protein:  20g
Carbs:  14.5g
Fat:  7.2g (3.7g = Sat.)
Fiber:  1.5g
Sugars:  0.4g

Chicken and Soba Spring Rolls With Peanut Dipping Sauce

Chicken and Soba Spring Rolls - Mimi's Fit Foods

So, I totally went searching for new and refreshing lunch options and knew I just had to try these out.  I’m SUPER glad I did because they are SUPER delish!  The spring rolls have flavor, crunch, and plenty of freshness.  The Peanut Dipping Sauce is so perfect for these and has all those Thai flavors that I absolutely love.  This is definitely one of my new favorite lunch items.  They just taste light, healthy and fresh without sacrificing flavor.  I’m glad I found these in time for summer because they will definitely become a summer favorite.  Perfect!  Perfect!  Perfect!  Beau and I both had them two days in a row and we are already wanting to make more.  I’m not even kidding when I tell you that I think they are restaurant worthy and I will have a very hard time ordering spring rolls when dining out in the future.  It’s just hard to justify spending money on something that I know I can make better at home.  We obviously love them!

P.S.  If you want a little cooking tip on the chicken, I will share with you what I learned from a Chinese chef.  She taught me to always marinate my chicken in approximately 1 teaspoon each of soy sauce, rice cooking wine, and cornstarch.  This makes the chicken incredibly moist and adds a touch of flavor.  It doesn’t even have to marinate for long . . . at least 15 minutes, but can marinate overnight.  Thus, I do this nearly EVERY time I put chicken into Asian meals.  I adjust the proportion of the marinade depending on the amount of chicken I cook, but I know that it is always equal in parts.  I truly believe this is a difference maker in my Asian meals.  Per Chef’s instruction, I had to go to an Asian market to buy the Rice Cooking Wine (which really isn’t wine in the alcoholic sense), but it’s totally been worth it!

Chicken and Soba Spring Rolls2 - Mimi's Fit Foods

Chicken and Soba Spring Rolls With Peanut Dipping Sauce
Adapted from Nutritionist in the Kitch

Rolls:
10 sheets rice paper
3 oz soba noodles (dry)
12 oz. chicken breast, cooked and sliced
3/4 cup shredded carrots
1 bell pepper, julienned
2 green onions, cut into strips
small bunch cilantro
small bunch lettuce
1 1/2 teaspoons low sodium soy sauce
1/2 teaspoon sesame oil

Peanut Sauce:
1/4 cup creamy peanut butter
1/2 lime, juice
1 teaspoon sesame oil
1 teaspoon rice vinegar
1 tablespoon low sodium soy sauce
1 tablespoon honey
1 clove garlic, minced
1 tablespoon fresh ginger
1/4 cup water

For Rolls: In a large pot heat about 2 cups of water to boil and cook noodles according to package instructions. Run cooked noodles under cold water and drain. Mix in soy sauce and sesame oil with noodles. Set noodles aside.

Fill a shallow dish with warm water (I used a pie plate). Place one sheet of rice paper in dish until it is submerged, soak for 1 minute or so until it becomes soft, carefully set on a clean surface, such as a cutting board, and make sure the sheet does not bend or fold.

Place about 1-2 tablespoons of cooked soba noodles in the middle of the rice paper sheet, top with chicken, shredded carrot (about 1 tablespoon per roll), pepper, onion, a few sprigs of cilantro, and a couple leafs of lettuce.

Fold the top of the rice paper sheet over the filling, then fold in each side, then roll until the opposite end has closed the roll, put on a plate and repeat the process until you have ten spring rolls! (It’s like folding a burrito.  Learning this process may take a little patience, but after the first couple rolls you will get the hang of it!)

For Sauce: Combine all ingredients in a food processor and blend until smooth.  Serve with cold rolls.  Enjoy!

Serves 5.

Nutritional Information (Per Serving = 2 Rolls with 2 T. of Sauce)
Calories:  333.4
Protein:  24.4g
Carbs:  41.5g
Fat:  8.8g (1.2g = Sat.)
Fiber:  3.9g
Sugars:  7.6g

Peanut Butter and Banana Oat Breakfast Cookies

Peanut Butter and Banana Breakfast Cookies Stacked - Mimi's Fit Foods

If you’re getting a little bored with breakfast, perhaps something like this might increase the excitement level in the morning.  I mean, who doesn’t want the chance to eat cookies for breakfast?

These little breakfast bites are pretty darn tasty.  I have to giggle a little bit about the name.  I mean, they certainly look like cookies, but they don’t exactly taste like cookies.  They kind of taste like a mix between a protein bar and a muffin.  The oats offer a nice chewy texture and I am the last one to complain about eating something that contains both bananas and peanut putter.  The chocolate chips are optional.  I will say, that while I like chocolate, I actually preferred these cookies without.

These are particularly handy because you can make up a batch ahead of time and then just grab a couple of cookies in the mornings for breakfast.  They are a great on-the-go breakfast (or snack).  They still don’t offer quite enough protein to be considered for a meal, so I would still make an egg to eat alongside these little morsels.

I’ve been pretty stoked about eating “cookies” for breakfast this week!  You ought to try it.  It’s fun.

Peanut Butter and Banana Breakfast Cookies - Mimi's Fit Foods

Peanut Butter and Banana Oat Breakfast Cookies
Slightly Adapted from Harvest Moon By Hand

2 ripe bananas, mashed until smooth and creamy
1/3 cup peanut butter ~ creamy or chunky
2/3 cup unsweetened applesauce (I used homemade applesauce)
1 scoop vanilla protein powder
1 tsp vanilla extract
1 1/2 cups rolled oats
1/8 cup carob or dark chocolate chips (optional)

Preheat heat oven to 350 degrees.

In a large bowl, mix mashed banana and peanut butter until completely combined.  Add the applesauce, vanilla protein powder, and the extract. Mix again until all are completely combined.

Add in the oatmeal to the banana mixture and combine.

Let dough rest for 10 minutes.

Drop cookie dough, by spoonfuls (I used a 1 1/2 Tablespoon cookie scoop), onto a parchment paper-lined cookie sheet and flatten cookies into rounds. (If you are using e carob/chocolate chips, top the cookies you desire with 3-5 chips each.)

Bake cookies about 20 minutes, or until golden brown and done. (Note: the cookies were done at 25 minutes in my oven.)

Remove from oven and let rest on cookie sheet for 5 minutes. Move to a cooling rack.

When cookies are completely cool, store in a covered container. Enjoy!  (Makes 2 dozen cookies.)

Nutritional Information (Per Breakfast Cookie with Chocolate Chips)
Calories:  63.4
Protein:  2.1g
Carbs:  8.1g
Fat:  2.6g (0.5g = Sat.)
Fiber:  1.2g
Sugars:  2.8g

Nutritional Information (Per Breakfast Cookie – No Chocolate Chips)
Calories:  57.6
Protein:  2.1g
Carbs:  7.3g
Fat:  2.2g (0.3g = Sat.)
Fiber:  1.2g
Sugars:  2.1g

(Somewhat) Spicy Thai Noodles With Chicken

Spicy Thai Noodles with Chicken - Mimi's Fit Foods

This meal was so fast to throw together and it was YUMMY!  It tasted so flavorful and fresh.  You hardly even cook the veggies so they offer a fresh, crisp taste.  Plus, the green onions and the cilantro really add a fantastic punch to help finish everything off.  My cute sister-in-law tried the recipe first and then told me that I MUST try it too because it was so tasty.  She was absolutely right!

I added a few tweaks to make it a smidge healthier than the original version.  I also added some extra veggies to the mix because I like to be healthy like that.  Ha, ha!

There’s a little trick with the red pepper flakes.  This is where the (somewhat) spicy comes in.  You can really make this dish as spicy as you wish.  The original recipe calls for at-least-double what I used (and put in the recipe below).  I’m a spicy gal, so I prefer a little more spice but was VERY leery on giving that spicy factor to my one-year-old.  So, I went very easy on the red pepper flakes and think that the amount of spice I got was perfect for all (kids and adults alike).  There was a little bit of spice, but nothing crazy.  (Me myself, I would prefer more spice.)  So, make this as spicy as you desire . . . or as your guests/family desire.

Whatever you do, you should totally add this to your menu.  It’s a great meal year-round, but I think it fits particularly well in the spring/summer because it’s fast, fresh, and doesn’t require the oven.

(Somewhat) Spicy Thai Noodles With Chicken
Adapted from Mel’s Kitchen Cafe

6 ounces whole wheat linguine
1/2 tablespoon crushed red pepper flakes
1/4 cup regular sesame oil
1 tablespoon rice vinegar
2 tablespoons honey
3 tablespoons low-sodium soy sauce
16 ounces chicken breast, chopped in 1/2-inch pieces
1/2 red bell pepper, chopped
1 cup shredded carrots
chopped green onions, chopped cilantro,  fresh lime juice for topping

In a large pot of boiling, salted water, cook the linguine according to package directions. Drain the noodles and return them to the pot or to a large bowl.

Meanwhile, in a medium skillet, heat the sesame oil and red pepper flakes on low heat for 10-15 minutes. Pour the oil through a fine strainer into a liquid measuring cup and discard the pepper flakes. To the warm oil, whisk in the or vinegar, honey and soy sauce. Set aside.

Return skillet to the stove, turn heat up to medium and add chopped chicken.  Sauté and cook until no longer pink (5 to 8 minutes).  Add the bell pepper and carrots to the skillet.  Sauté until vegetables are barely warmed through, about 45 to 60 seconds.

Add oil dressing and chicken mixture to the noodles.  Toss to coat.

Serve the noodles warm, room temperature or cold with the desired toppings sprinkled on top.

Serves 6.

Nutritional Information (Per Serving = 1/6 the Recipe – About 1 Cup)
Calories:  284
Protein:  19.5g
Carbs:  28.5g
Fat:  10.3g (1.3g = Sat.)
Fiber:  2.9g
Sugars:  7.5g

Baby’s First Birthday Cake

Baby's 1st Birthday Cake-Mimi's Fit Foods

Okay guys!  I’m just going to do one more post related to my baby’s birthday and then I’ll get back to all the other healthy recipes.  I debated on whether I should share this, but as my little baby’s birthday approached I desperately wanted to make her something that was healthy, but still yummy.  I mean, I wanted her to dig in and go back for more (and more and more).    I figured that there might be some moms out there that are (or will be) in the same boat, so I’m sharing a baby recipe for all you moms out there.

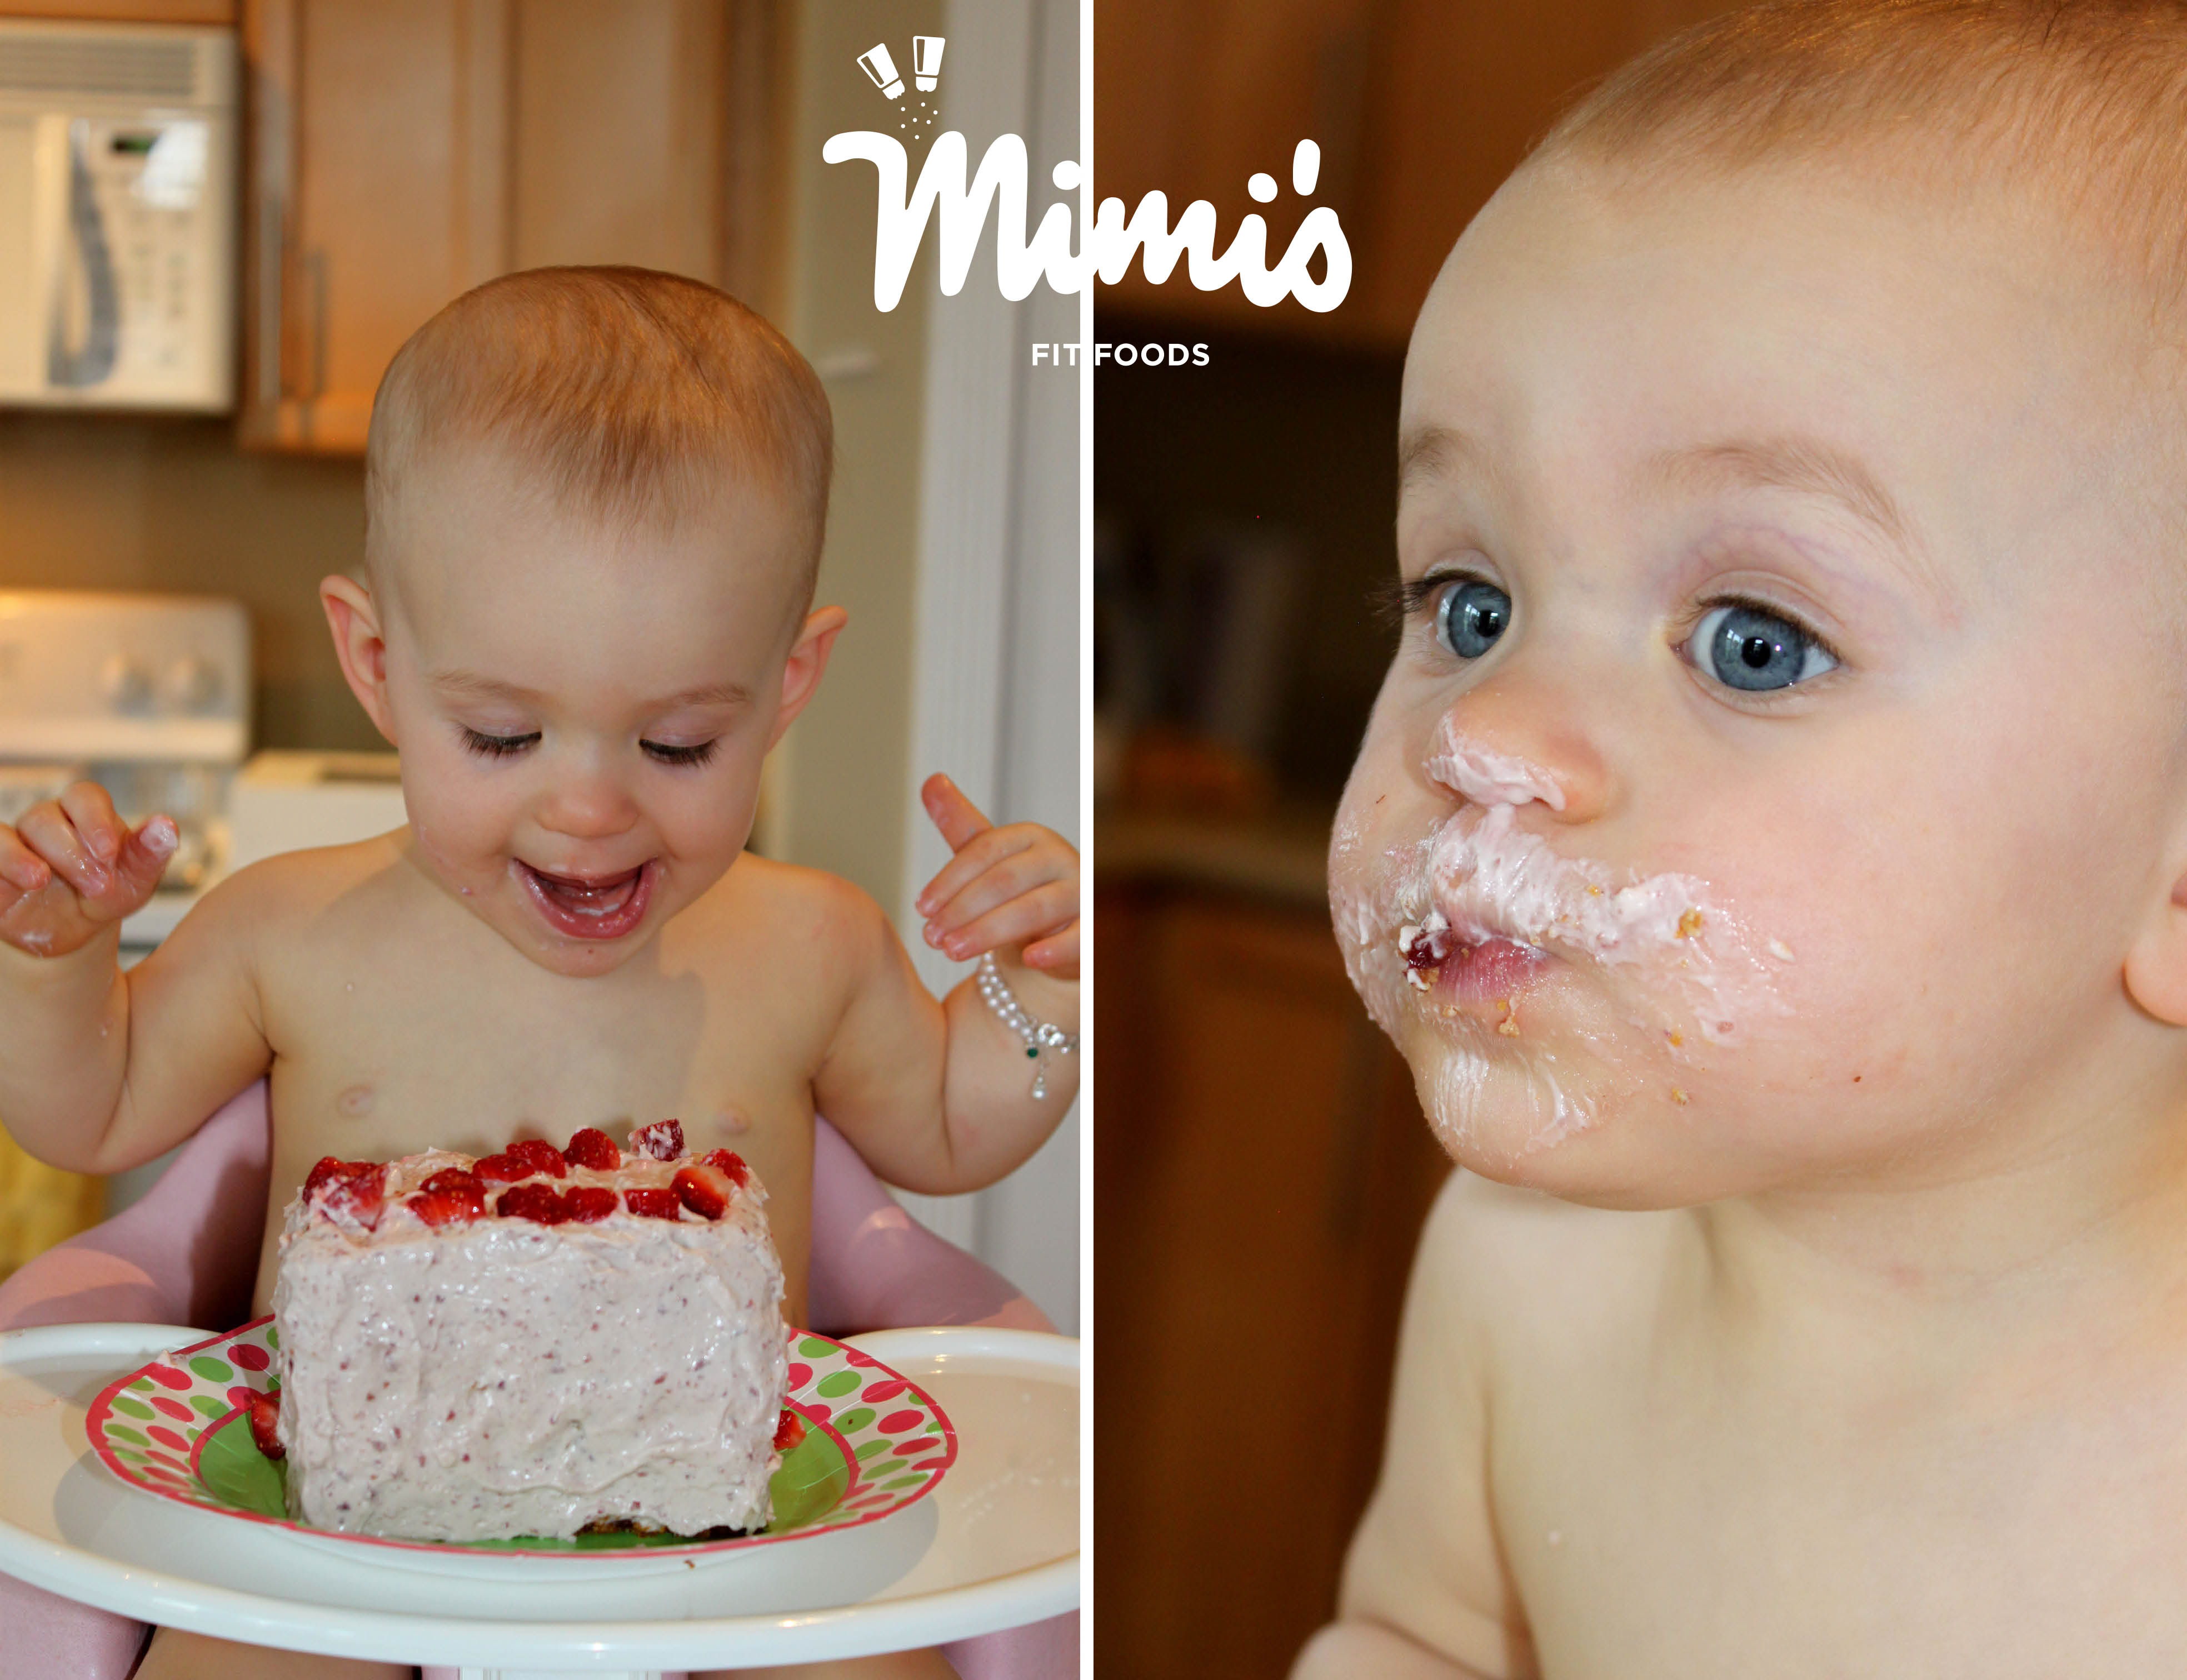
This cake is seriously a keeper!  The great part about it, besides that it actually tastes good, is that it is made with whole wheat flour and has no sugar.  It’s sweetened with apple juice and applesauce.  The outcome tastes a lot like a healthy carrot muffin.  It’s TOTALLY edible.  Beau and I have secretly been eating the leftovers for breakfast (I guess it’s no secret anymore . . . ha, ha!).  My little baby doll has been eating the leftovers after her lunch most days.  In fact, she saw me take it out of the fridge to take a picture of it and totally cried when I put it away without giving her some.  So, her wish was granted and she got to eat her leftover cake for lunch AND dinner (and, I may have had a little bite right along with her)!

And, if that doesn’t convince you that she liked it, maybe this will!

Baby's First Birthday Cake Eat-Mimi's Fit Foods

It is baked in a 9×9 pan.  This gives you the liberty to assemble it as you wish.  I decided I wanted to make a layered cake, so I cut the finished cake in half, and then I trimmed it down to two small-ish rectangles.  I put a layer of frosting between my two rectangles/layers, frosted the entire outside, and topped it with strawberries (she LOVES strawberries and that was also the theme of her birthday party).  That all being said, you can simply cut a small piece and frost that.  Or, you can frost the entire 9×9 cake just as it is.  Or, you can get as creative as you want in any other way.

So, if you’re kind of like me and you’re trying to spare your baby from sugar as long as possible and you like to make your own baby food (I try to make my own as much as possible because I know EXACTLY what is in it . . . and it tastes way better), add this baby cake to your files.  You’ll be pleased with the tasty results as well as the pleasure your baby will get from it.

As I quick little side note:  If you haven’t introduced your baby to egg whites and wheat yet, you may want to check with your doctor to verify if it’s okay to feed this cake to your baby.  If it’s not, then you might want to save this recipe for the second birthday (or another occasion).  This is more of a precaution for allergies and such.  I will say that I didn’t get my doctor’s “official” verification, but I had tried eggs and wheat on my baby before her birthday and she didn’t show any signs of an allergic reaction.  Thus, this cake treated her just fine.

Baby’s First Birthday Cake
Adapted from “What To Expect The First Year”

1 1/4 cups shredded carrots
1 1/4 cups apple juice concentrate
1 cup dried cranberries
1 cup whole wheat flour
1/4 cup wheat germ (found near the hot cereal in grocer store)
1 tablespoon baking powder
1 1/2 teaspoons ground cinnamon
2 tablespoons canola oil
1 whole egg
2 egg whites
1 1/2 teaspoons vanilla extract
1/3 cup unsweetened applesauce
Baby’s Cream Cheese Frosting (recipe follows)

Preheat the oven to 350 degrees.  Line a 9×9 cake pan with parchment paper and spray the paper with cooking spray.  Set aside.

Combine the carrots with 1/2 cup plus 1 tablespoon of the juice concentrate in a medium-size saucepan.  Bring to a boil over high heat, then lower the heat to medium and simmer, covered, until the carrots are tender, about 15 minutes.  Transfer the carrot mixture to a blender or food processor and puree until smooth.  Add the dried cranberries and process until finely chopped.  Set the mixture aside to cool.

Combine the flour, wheat germ, baking powder, and cinnamon in a large mixing bowl.  Add 1/2 cup plus 3 tablespoons of the remaining juice concentrate, oil, whole egg, egg whites, and vanilla and beat just until well mixed.  Fold in the carrot puree and applesauce.  Pour batter into prepared cake pan, smoothing out the top with a rubber spatula.

Bake until a knife inserted in the center of the cake comes out clean, 25 to 40 minutes.  Place on wire rack and let cool briefly in the pan, then turn out onto the rack to cool completely.

When cool, frost as desired with the Cream Cheese Frosting (see recipe below).

Store any leftovers, loosely covered, in the refrigerator for up to 2 days.

Baby’s Cream Cheese Frosting
Adapted from “What To Expect The First Year”

4 tablespoons apple juice concentrate
8 ounces cream cheese, at room temperature
1 teaspoon vanilla extract
1/4 cup dried cranberries
3/4 teaspoon unflavored gelatin

Set aside 1 tablespoon of the juice concentrate.  Process the remaining juice concentrate, cream cheese, vanilla, and dried cranberries in a blender or food processor until smooth.  Transfer to a mixing bowl.  Set aside.

Stir the gelatin into the reserved tablespoon of juice concentrate in a small saucepan; let stand to soften, 1 minute.  Then, heat to boiling over medium heat, stirring to dissolve the gelatin.

Beat the gelatin mixture into the cream cheese mixture until well blended.  Cover and refrigerate just until the frosting begins to set, 30 to 60 minutes.  Then frost the cake as desired.

Makes enough to frost one 9-inch-square cake.

Lighter Cake Pops

Lighter Cake Pops - Mimi's Fit Foods

Who would have thought I would have put a post on this blog for something like Cake Pops?  Well, here’s the thing.  My sweet, baby girl just had her first birthday.  (Where on earth does the time go!?)  So, I made these cake pops for her birthday party and they were loved by all.  I share these with you because they  are a slightly healthier version than the more popular one.  With theses, you don’t make a cake, crumble it, add that fattening, sugary cream cheese frosting and then roll them into balls.  Instead, you make a light cake batter (which has no oil or yolk in it . . . brilliant!) and actually bake the batter into balls.  This saves a ton of calories and they are still super delicious!  Keep in mind that they are still dipped in white chocolate which can add up if you eat a lot of these babies (there’s not really a great way to save calories on this step).

I snagged the recipe and idea from Gina’s Skinny Recipes.  I didn’t alter it one bit and they turned out perfectly (she has fabulous step-by-step pictures if you want to click on the link).  In order to bake these pops, you’ll need a cake pop baking pan.  I followed Gina’s advice and bought one from Target.  It turned out some beautiful, golden cake pops . . . just like she said.  She also has 48 ounces of white chocolate listed in her recipe, although you’ll never use all of that to coat your cake pops.  She mentioned this and found that she actually only used about 20 ounces of it (which is what is used to calculate the nutritional information).  That being said, I still opted to melt more than 20 ounces so that there would be room to actually dip the cake pop in the bowl/cup.

So, if you have a special occasion where you might want to make something that is sweet, trendy, and cute . . . without loading too many extra calories, I think these are a great idea.  I mean, I obviously think so because I made them for my baby’s birthday party.

I can’t believe she’s 1 year old already!  While the cake pops are delicious, I think I’ll take an extra snuggle with my darling girlie before I have one more cake pop.  She melts my heart (way more than any cake pop . . . or any treat for that matter ) ever could.

www.mimisfitfoods.com

Lighter/Skinny Cake Pops
Recipe Source:  Gina’s Skinny Recipes

1 (16.5-ounce) packaged cake mix (I used white, Gina used yellow)
6 ounces plain fat-free Greek yogurt (I used Oikos)
1 cup water
2 large egg whites
1 teaspoon vanilla extract
baking spray
48 ounces Baker’s white chocolate (20 oz. calculated in n.i.)
sprinkles (optional)
48 lollipop sticks (I used paper straws)
styrofoam block

Preheat oven to 350 degrees.  Lightly spray the cake pop pan with baking spray.

Combine all the cake ingredients in a large mixing bowl and beat until combined.Place the batter into a pastry bag or large ziplock bag with the tip cut off.

Pipe the batter into the prepared cake pop pan and bake about 18 minutes (I rotated the pan after 10 minutes to be sure they baked evenly). Let it rest 5 minutes before opening the pan.

Place cake balls on a wire rack and repeat with remaining batter. Using a scissor, cutthe seam off the balls.

Refrigerate the cake balls for about 45 minutes, this helps the chocolate stick to the cake.

Melt some of the chocolate in the microwave according to package directions, careful not to burn the chocolate. Insert the tip of the stick into the melted chocolate, then into the cake ball (this helps hold the stick in place).

In batches, melt remaining chocolate. Dip the cake pops into the chocolate, let the excess drip off then place stick on a styrofoam block about a minute, then add sprinkles on top if using.

Makes 48-50 balls.

Nutritional Information (Per Cake Pop)
Calories:  102.5
Protein:  1.4g
Carbs:  15g
Fat:  4g
Fiber:  0g
Sugars:  7g

Cucumber Sandwiches

Cucumber Sandwiches - Mimi's Fit Foods

Cucumber Sandwiches!  What an easy snack idea.  It probably goes without saying that these are a breeze to put together.  I mean, it’s hardly a recipe at all, but rather an idea.  I say that because you can be a little versatile with this.  You can use different varieties of cheese and sandwich meats.  I also think these are good dipped in mustard, as well as sprinkled with spices (cracked black pepper, Montreal Steak Seasoning, etc.).  There are a variety of options that still help to keep these babies low in calorie count, high in protein, and low in carbs.  Whoohooo!

For calorie counting purposes, I’m giving you the quantities for one serving.  However, you can easily punch out a bunch of these . . . . . say, for after-school snacks or any other purpose you may find a need to sneak these into your household.

Cucumber Sandwiches

8 slices of peeled cucumber, 1/4-inch thick
1 ounce part-skim mozzarella cheese, sliced into 4 slices
1 ounce deli roast beef (at least 96% lean)

Take one slice of cucumber and top with a slice of cheese and 1/4 ounce of roast beef.  Top with another cucumber slice.
Repeat with remaining cucumber slices, cheese, and roast beef.

Serves 1.

Nutritional Information Per Serving
Calories:  123.7
Protein:  14.7g
Carbs:  2.5g
Fat:  5.1g (3.4g = Sat.)
Fiber:  0.4g
Sugars:  0.8g

Roasted Pizza Broccoli

Roasted Pizza Broccoli - Mimi's Fit Foods

This is such a great way to cook broccoli.  I love the addition of the spices and the Parmesan cheese.  I love broccoli anyways, but this was fabulous.  It totally resembled a pizza flavor.  I imagine kids would love it too (but you may want to add less of the chile flakes).  And, just so you know, the chile flakes weren’t super spicy/hot, but they added lots of flavor!

Here’s to another twist on your regular vegetable side dishes.  Enjoy!

Roasted “Pizza” Broccoli
Adapted from Relish by Daphne Oz

1 large head of broccoli
1 tablespoon extra virgin olive oil
1/4 cup grated Parmesan cheese
1/2 – 1 teaspoon dried chile flakes
1 teaspoon dried oregano
juice of 1/2 lemon
salt and pepper, to taste

Break or cut broccoli into bite-sized florets. Steam the broccoli until you can easily insert a knife into the center of the broccoli (about 5 to 6 minutes).

Preheat the broiler. Drain the broccoli (and lightly pat dry with a paper towel) and place it on a baking sheet. Drizzle it with the oil, and sprinkle it with chile flakes and oregano. Toss to coat.  Sprinkle with cheese and broil the broccoli until the cheese is golden brown, 2-3 minutes. Squeeze lemon juice onto the broccoli, season with salt and pepper to taste, and serve.

Serves 4.

Nutritional Information Per Serving
Calories:  89
Protein:  5.8g
Carbs:  6.3g
Fat:  5.7g (1.7g = Sat.)
Fiber:  3.2g
Sugars:  0.1g

Spinach, Sun-Dried Tomato and Feta Egg Wrap

Spinach, Sun-Dried Tomato and Feta Egg Wrap1 - Mimi's Fit Foods

Here is a fabulous breakfast option for you!  While I don’t mind a boring egg burrito, I certainly won’t turn down one that isn’t boring!  If you don’t know by now, I really L.O.V.E. sun-dried tomato.  It’s packed with so much flavor and I love how it adds a little sweetness to whatever it gets put with.  This little egg wrap is amped up with flavor thanks to those tasty sun-dried tomatoes and the spinach and feta cheese really round it out.  I love the nutritional benefits of all components.  Plus, it really only took me five minutes to make.  This is becoming a “regular” around here.

I wrote the recipe for one wrap, but this can EASILY be doubled or tripled or quadrupled (you get the idea).

Spinach, Sun-Dried Tomato and Feta Egg Wrap
Inspired by Starbucks and Shape Magazine

1/2 cup raw spinach, roughly chopped
2 tablespoons sun-dried tomatoes, chopped
1 tablespoon milk, 1% low fat
1 whole egg
1 egg white
salt and pepper, to taste
1 tablespoon reduced fat feta cheese
1 (100-calorie) whole wheat wrap, such as Flat-Out

Heat a small skillet over medium heat.  Spray with non-fat cooking spray (I use canola).  Add chopped spinach and sun-dried tomatoes to skillet and sauté until spinach is slightly wilted.  Remove from skillet and place on wrap.

Meanwhile whisk milk, egg and additional egg white together in a small bowl.  Once spinach and sun-dried tomatoes have been removed from the skillet, add eggs.  Cook and stir until eggs are completely set.

Place scrambled eggs on wrap (over your spinach and sun-dried tomatoes), top with feta cheese.  Fold bottom and sides of wrap over filling and roll.  Serve immediately.

Serves 1.

Nutritional Information (Per Wrap)
Calories:  231
Protein:  22.3g
Carbs:  22.7g
Fat:  8.9g (2.3g = Sat.)
Fiber:  9.2g
Sugars:  4.8g