Cream Cheese Stuffed Chicken

Cream Cheese Stuffed Chicken - Mimi's Fit Foods

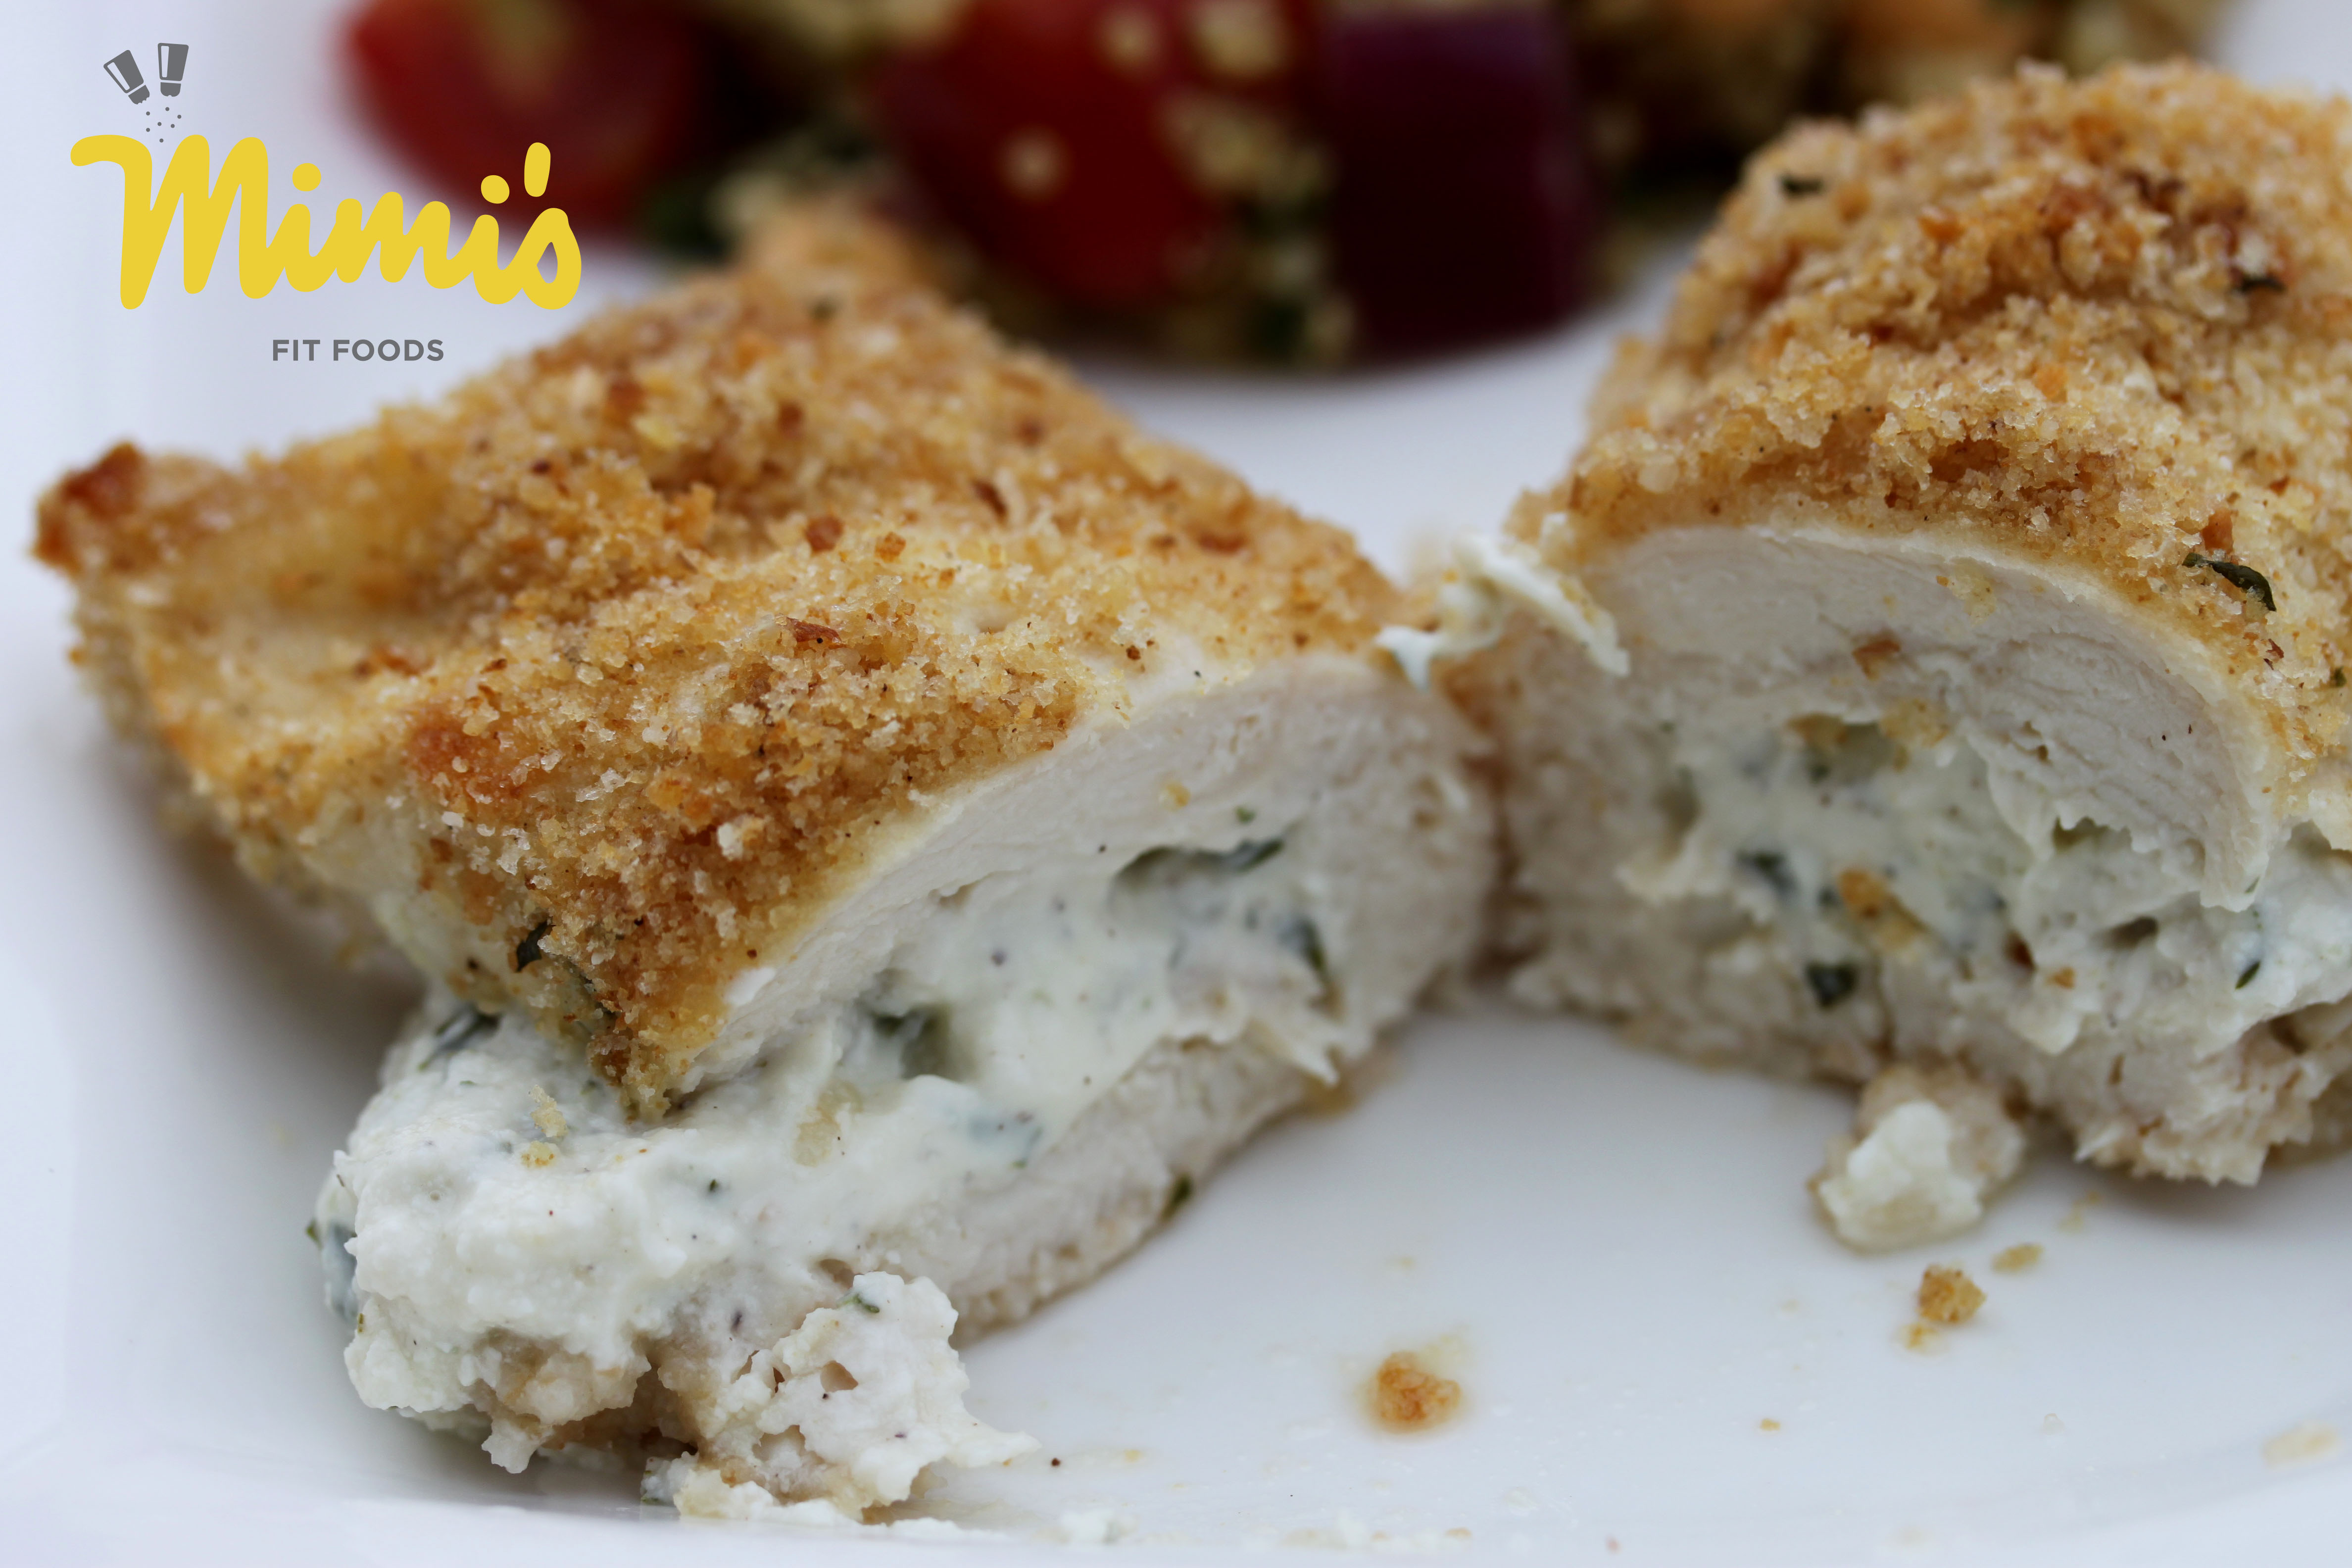
I saw this recipe floating around Pinterest and I just knew I had to remake it in a healthier way.  So, I went right to work and I gotta say . . . I think the remake is pretty darn goooooood!  Seriously . . . a breaded chicken breast with cream cheese in it?  Yeah, it’s even better than it seems.  That cream cheese filling has onion, fresh parsley, and garlic in it . . . talk about awesome flavor!  The slight crispiness from the bread crumbs just helps to top this little chicken roll right off.

I ended up using 4 large chicken breasts (the size you get in those big bags of chicken from Costco), which allowed me to cut them all in half.  I started with about 2 1/2 pounds of chicken and that yielded me 8 fabulous chicken rolls.  There was plenty of enough filling for each and the serving size was just perfect!

Hurry!  Add these to your “MUST TRY” list.  You won’t regret it!

Cream Cheese Stuffed Chicken2 - Mimi's Fit Foods

Cream Cheese Stuffed Chicken
Adapted from the Happy Lil’ Homemaker

4 large boneless, skinless chicken breasts
4 ounces light cream cheese (1/3 less fat), room temperature
1 tablespoon of chopped parsley
1 tablespoon of onion, minced
2 teaspoons of lemon juice
1/2 teaspoon garlic salt
1/8 teaspoon pepper
1/2 cup Italian style bread crumbs
canola cooking spray

Pre-heat oven to 350.  Prepare a baking sheet by lining a jelly roll pan with aluminum foil (this helps make clean-up a cinch) and then placing an oven-safe cooling rack on the foil.  (You can also cook the chicken in a baking dish if you prefer.  You will just end up with a less crispy bottom on the chicken.)

Place chicken breasts between sheets of plastic wrap. Use a meat mallet (or a rolling pin works if you don’t have a meat mallet) to flatten around 1/4 inch thick.  Cut each breast in half.  In a bowl, beat cream cheese, parsley, onion, garlic salt and pepper and lemon juice until blended. Dividing the mixture between the 8 pieces of chicken breasts, spoon the cream cheese mixture on each piece of chicken and spread it over the chicken (but no need to go right up to the edges). Roll chicken. Coat rolls with canola cooking spray then roll in bread crumbs. Place chicken rolls on prepared baking sheet. Lightly spray the coated chicken breasts with more canola cooking spray. Bake for 35-40 minutes or until chicken is fork tender and juices run clear (or, if using a thermometer, when chicken reaches 165 degrees).

Serves 8.

Nutritional Information (Per Serving = 1 Stuffed Chicken Roll)
Calories:  189
Protein:  30.8g
Carbs:  6.2g
Fat:  4.6g (2g = Sat.)
Fiber:  0.4g
Sugars:  1.1g

Hearty Spring Time Quinoa Salad

Hearty Spring Time Quinoa Salad - Mimi's Fit Foods

We ate this as a side dish to dinner and it was sooooo tasty!  I had to throw “Spring Time” in the title because it screams spring and it screams fresh!  I love the asparagus, fresh tomatoes, tangy onion, and buttery chickpeas.  It all comes together with a blend of pesto, balsamic vinegar and freshly cut parsley.  Seriously, folks!  It’s deeeeelish!  I’m loving the fact that I have leftovers.  Speaking of leftovers, this could easily be made into a main dish by adding some chicken to it.  I think I’ll have that for lunch tomorrow!  Yum, Yum!

Hearty Spring Time Quinoa Salad
Adapted from the greatist.com

1/2 cup uncooked quinoa
1 cup low sodium chicken stock (or water!)
12 thin stalks asparagus, sliced diagonally into bite-sized pieces
1/4 cup diced red onion
1/2 cup halved cherry tomatoes
1 tablespoon chopped parsley (plus additional to garnish, if desired)
1 (15-ounce) can chickpeas, rinsed and drained
1 tablespoon pesto
1 tablespoon balsamic vinegar
sea salt and black pepper, to taste

Rinse quinoa.  In a small saucepan, cook the quinoa in the chicken stock over medium-low heat, covered, for 15 minutes, or until liquid is absorbed.

Immediately after removing the saucepan from the stove, add the chopped asparagus and cover. Allow the asparagus to steam lightly inside the pot with the quinoa for 5 minutes

Meanwhile, prepare all other veggies and herbs. Toss them together in a large bowl.

In a smaller bowl, combine the balsamic vinegar with pesto until smooth. Pour it into the large bowl of veggies, along with the chickpeas, quinoa, and asparagus. Stir to coat and season with sea salt and black pepper, to taste.

Serve the salad warm or cold. Enjoy it immediately, or store it in an airtight container in the fridge for up to 5 days.

Serves 8.

Nutritional Information (Per Serving = Approx. 1/2 Cup)
Calories:  119
Protein:  5.1g
Carbs:  20.7g
Fat:  2g (0.2g = Sat.)
Fiber:  3.5g
Sugars:  1.6g

Avocado and Egg Over Toast

Avocado and Egg Over Toast - Mimi's Fit Foods

This is hardly a recipe, but I always have people asking me for easy and quick meal ideas.  Well, this is VERY easy and VERY quick and it’s been my favorite breakfast as of late, so I thought I would share it with you all.

All I do is toast a piece of whole wheat bread, smash 1/4 of an avocado over the toast, put a little salsa over the avocado, and then top it with a fried egg.  It’s seriously so good and I love how fast and easy it is.  I also love the health benefits of getting a healthy complex carbohydrate (bread), a good amount of healthy fats (avocado and egg), a little veggie from the salsa, and then I get protein from the egg.  I simply love it and perhaps you’ll love it too for the same reasons too!

Avocado and Egg Over Toast

1 slice whole wheat bread, toasted  (100 Calories)
1/4 of an avocado
1 tablespoon salsa
1 egg, cooked any style (I prefer a fried egg cooked over-medium)

Smash and spread avocado over toast.  Top with salsa and egg.

Serves 1.

Nutritional Information:
Calories:  247.5
Protein:  11.8g
Carbs:  21.8g
Fat:  13.5g (3g = Sat.)
Fiber:  6.5g
Sugars:  4.5g

Green Chile Verde Enchiladas

Green Chile Verde Enchiladas1 - Mimi's Fit Foods

One of my good friends (and a client too) introduced these to me and boy, am I glad!  They are soooo good that it’s hard to believe that they qualify as healthy.  They are packed with an intense flavor due to the salsa verde and cilantro.  Plus, they have a nice heartiness and creaminess due to the cream cheese (yeah . . . cream cheese!!) and Mexican cheese blend.  Besides all of that, they are easy to throw together and are FAST (so long as you’ve cooked and shredded your chicken beforehand, and even if you haven’t . . . the process is still pretty quick).  We’ve eaten these twice in the last two weeks, which is saying something because the leftovers last us for a couple of days.

I totally think you should try these . . . TONIGHT!

Green Chile Verde Enchiladas - Mimi's Fit Foods

Green Chile Verde Enchiladas
Adapted from Dinner to the Rescue

1 pound cooked chicken breast, shredded
2 green onions, chopped
3 tablespoons light cream cheese, room temperature
1 cup reduced fat Mexican cheese blend, divided
14 ounces salsa verde (green salsa)
2 tablespoons chopped green chiles (I used canned)
1/2 cup fresh cilantro, chopped
1/3 cup nonfat half and half
12 corn tortillas (I used Mission Thin)

Preheat oven to 350 degrees.  In a medium bowl, thoroughly combine the meat, green onions, cream cheese, and 1/2 cup cheese.  Set aside.

In a blender or food processor, combine salsa verde, chiles, cilantro, and half and half.  Blend until smooth.

Soften tortillas before filling them so they’ll roll nicely for you without breaking to pieces.  (I do this in the microwave in batches.  I place two damp paper towels in the microwave, put 2-3 tortillas between the towels, and heat for 30-40 seconds.)

Place a heaping 1/4 cup of the chicken mixture in the center of each tortilla.  Roll tightly and place, seam side down, in a baking dish.  Pour the salsa verde sauce over the enchiladas and sprinkle the reaming 1/2 cup cheese over the top.

Bake until heated through and bubbly, about 20-25 minutes.  Serve immediately.

Serves 6.

Nutritional Information (Per Serving = 2 Enchiladas)
Calories:  261
Protein:  24.9g
Carbs:  20.4g
Fat:  9g (4.1g = Sat.)
Fiber:  2.4g
Sugars:  3.8g

Southwest Turkey Burgers Made Easy

Southwest Turkey Burgers - Mimi's Fit Foods

This is a VERY easy, yet a delicious way to make turkey burgers.  All you do is add an egg white and salsa to your ground turkey, shape into patties, and grill (or broil).  I mean, really!  Does it get a whole lot easier than that?  I love to whip these up when I don’t have much energy to make dinner because I know that we can still eat something tasty, but it only takes a few minutes from start to finish!  You don’t have to worry about pulling out spices or teaspoons or anything of the sort.  It’s awesome and they taste awesome too!

Southwest Turkey Burgers Made Easy

1 pound ground turkey breast (I used 93% lean)
1/3 cup black bean and corn salsa, from jar (I used Great Value brand)
1 egg white
optional toppings (tomato, avocado, lettuce, etc.)

In a medium bowl, combine the turkey, salsa and egg white.  Mix well and then form into 4 patties.  Grill patties for about 5-6 minutes per side, or until cooked throughout (you can also broil on each side for 5-6 minutes if you prefer not to grill).  If desired, serve with a few slices of tomato and avocado.

Serves 4.

Nutritional Information (Per Turkey Burger, No toppings)
Calories:  177.5
Protein:  23.6g
Carbs:  3.4g
Fat:  8g
Fiber:  1.3g
Sugars:  0.7g

Roasted Carrots

Roasted Carrots - Mimi's Fit Foods

Easy peasy, folks!  You need another vegetable side dish that is tasty?  Well, these fit the bill.  Roasting the carrots bring out such a delicious sweetness!  The hardest part about these is not eating too many!

Roasted Carrots

2 cups baby carrots, halved
1 teaspoon extra virgin olive oil
kosher salt, to taste
black pepper, to taste

Preheat oven to 400 degrees.  Toss baby carrots with olive oil, salt and pepper.  Place on a baking sheet and roast for 20-25 minutes, or until tender.

Serves 4.

Nutritional Information (Per Serving = Approx. 1/2 Cup)
Calories:  45
Protein:  1g
Carbs:  9g
Fat:  1.2g (0.2g = Sat.)
Fiber:  2g
Sugars:  6g

Turkey Taco Roll-Ups

Turkey Taco Roll-Ups-Mimi's Fit Foods

This is a fun twist on a traditional taco.  It’s very flavorful, but baking the taco gives it a little crunch without deep frying it.  This came together in a cinch and I was WAY happy with the results.  If you’re looking for a yummy, healthy, crunchy taco . . . well, I just found you one (or two).

Turkey Taco Roll-Ups
Adapted from Du Su Mama

1 teaspoon extra-virgin olive oil
1 medium onion, diced
3 garlic cloves, minced
1 lb. ground turkey (93% lean)
salt and pepper, to taste
1 tablespoon taco seasoning
1 teaspoon cumin
1 (15-ounce) can fire-roasted tomatoes, drained
1/2 cup cilantro, chopped
1/2 cup reduced fat cheese (I used Mexican blend)
10 corn tortillas (I used Mission Thins)
non-stick cooking spray (I used Canola)
kosher salt, optional

Heat a medium skillet over medium heat.  Add olive oil.  Add chopped onion and cook until broken down and translucent, about 5-8 minutes.  Add garlic and sauté until fragrant, about 30 seconds.  Add ground turkey, season with salt and pepper, taco seasoning, and cumin.  Cook until no longer pink, crumbling the meat into small pieces.  Add tomatoes and cook until warmed through.  Remove from heat; allow mixture to cool slightly.  Add cilantro and cheese and stir to combine.

Preheat oven to 350 degrees and prepare a baking sheet by spraying it lightly with cooking spray (or by using a Silpat linter)

Warm tortillas before placing filling inside.  (I do this in the microwave in batches.  I place two damp paper towels in the microwave, put 2-3 tortillas between the towels, and heat for 30-40 seconds.)  Put about 1/4 cup of filling inside a warmed tortilla, roll tortilla, and place on baking sheet with seam-side down.  Repeat with remaining tortillas.  Lightly spray each of the rolled tacos with cooking spray.  If desired, sprinkle with kosher salt.

Cook for 15-18 minutes, or until rolled tacos are golden brown.  If desired, serve with salsa.

Serves 5.

Nutritional Information (Per Serving = 2 Rolled Tacos)
Calories:  275.6
Protein:  23.9g
Carbs:  22.5g
Fat:  10.8g (3.3g = Sat.)
Fiber:  3.3g
Sugars:  5.3g

Spinach and Grape Pasta Salad

Spinach and Grape Pasta Salad - Mimi's Fit Foods

I was introduced to this salad about one year ago.  Thanks to my friend Valerie (Thanks Valerie!), it has now become one of my most favorite pasta salads.  It’s so tasty!  All the veggies help to make this filling, there is just the right amount of pasta, the peas make it taste so fresh (and springy), and the grapes and dressing offer a little sweetness. Everything comes together so well and, for me, it’s the perfect pasta salad for spring!

You can TOTALLY add chicken to this salad if you want to make it a main course.  Valerie said she prefers to cook her chicken with McCormick’s Zesty Herb Marinate (dry package) when she puts the chicken in this salad.  I usually make it as a side dish (and have taken it to several pot-luck functions and have had many compliments), but I’ve tried the salad with the chicken and it’s deeeelish!

I hope you plan to add this to your spring/summer menus because it’s yummy and fresh!

Spinach and Grape Pasta Salad
Adapted from my friend, Valerie

For the Salad:
3 cups spinach, roughly chopped (or torn)
2 cups Veggie Pasta, dry (I used Wacky Mac)
2 celery stalks, chopped
1 cup grapes
1 cup frozen peas, defrosted
2 tomatoes, chopped
2 green onions, chopped

For the Dressing:
1/4 cup canola oil
2 tablespoons sugar
1 tablespoons white vinegar
1 tablespoon fresh parsley, chopped
1/2 teaspoon salt
1 teaspoon lemon juice
1/4 teaspoon onion powder

Cook pasta according to package directions (for al dente).  Drain and rinse with cold water.  Add pasta to other salad ingredients in a large bowl.

In a separate bowl, combine all the dressing ingredients and whisk until combined (I like to whisk until the sugar is mostly dissolved).

Toss salad with dressing shortly before serving.

Serves 10.

Nutritional Information (Per Serving = Approx. 1 Cup)
Calories:  124.6
Protein:  3g
Carbs:  16.3g
Fat:  5.9g
Fiber:  1.6g
Sugars:  4.8g

Turkey Cheeseburger Casserole

Turkey Cheeseburger Casserole1 - Mimi's Fit Foods

The other night for dinner I was at a loss at what to make.  I wasn’t in the mood to make anything gourmet and I was tired and didn’t want to be in the kitchen all night.  So, I went through my “recipes to try” file and came across this recipe.  I had all the ingredients, looked like it would come together in a snap, and I was SUPER curious to know if it really would taste like a cheeseburger.  Thus, this was the winning recipe for the night.

Sure enough; it came together in a snap and was super easy.  And, even more amazing was the fact that it truly did taste like a cheeseburger.  I mean, it has all the elements (burger, cheese, tomato, onion, mustard, and pickle) so I guess I shouldn’t be all that surprised.  I was a bit weary of putting chopped pickles on the casserole after it had baked, but it was seriously awesome.  I was definitely a fan.

This will definitely go in my file of recipes to make when I want something fast and delicious.  Enjoy!

Turkey Cheeseburger Casserole - Mimi's Fit Foods

Turkey Cheeseburger Casserole
Adapted from SkinnyTaste.com

6 ounce whole wheat rotini pasta (dry)
2 teaspoons extra virgin olive oil
1 large onion, finely chopped (about 1 1/2 cups)
2 garlic cloves, minced
1 pound ground turkey
1 teaspoon salt
1/2 teaspoon pepper
2 tablespoons tomato paste
28 ounces diced tomatoes
2 tablespoons Dijon mustard
1 1/4 cups reduced fat shredded cheese (I used Mexican blend)
1/4 cup dill pickles, chopped

Preheat the oven to 350 degrees.  Spray a 2-quart casserole dish (or a 9×13 baking dish) with cooking spray.  In a large pot of boiling salted water, cook the pasta according to the package directions for al dente and drain well.

In a large skillet, heat the oil over medium-low heat.  Add the onions and cook until soft, about 5 minutes.  Stir in the garlic and cook for 30 seconds.  Stir in the ground turkey, season with salt and pepper, and cook until browned.  Stir in the tomato paste, then add the tomatoes and mustard.  Let the mixture bubble gently until it is slightly thickened, about 2-5 minutes.

Toss the meat mixture with the pasta and spread it into the prepared baking dish. Top with the cheese and bake until the cheese is melted, about 15 minutes.  Sprinkle the chopped pickles over the top and serve.

Serves 6.

Nutritional Information (Per Serving = Approximately 1 1/2 Cups)
Calories:  334
Protein:  26.9g
Carbs:  33g
Fat:  12.4g (4.4g = Sat.)
Fiber:  6.2g
Sugars:  6.6g

If desired, you can go with a smaller serving size of 1 cup.  That would mean the casserole would feed approximately 9 people.  The nutritional information would then calculate as follows:

Nutritional Information (Per Serving = Approximately 1 Cup)
Calories:  222.8
Protein:  17.9g
Carbs:  22g
Fat:  8.3g (2.9g = Sat.)
Fiber:  4.1g
Sugars:  4.4g

Thai Peanut and Chicken Salad

Thai Peanut and Chicken Salad - Mimi's Fit Foods

You guys!  This is such a delicious salad!  Surprisingly enough, I’m not a HUGE salad lover when it comes to the main dish (I do however, love them on on the side . . . weird, I know).  The salad has to be unique enough, filling enough, and tasty enough to ever count for the main attraction.  Well, this one fits the bill!

It has fresh greens that include romaine and nappa cabbage, a fabulous array of fresh vegetables, and noodles.  Yeah, noodles!  Man, they are so good in this salad.  All of the textures mixed together are magical.  And, don’t even get me started on the salad dressing.  It is sooooooo awesome!  I love peanut flavored stuff, and this was NO exception.  The dressing is made primarily with peanut butter and then a bunch of Thai flavors get mixed in which gives the dressing a nice zing and powers up the flavors.  I’m not going to lie; when I’m on maintenance I totally add more than 1 tablespoon of the dressing to my salad because I could probably drink the stuff.  The cashews on top really help to finish the salad off.  (Unfortunately the cashews didn’t make it in the photo.  Oops!)

I am seriously in love with this salad!  When I made it I doubled everything (salad ingredients and dressing) so I could eat leftovers for my lunch for days.  I mean, cutting up the veggies takes the most time so I just dedicated one lunch time to cut everything up.  This meant that the following days included NO preparation and all I had to do was put my salad on a plate and drizzle on the dressing.  The veggies and greens stay good for days so in my humble opinion it was SO WORTH THE TIME!

Make this TODAY for your lunch!  You won’t regret it.  Well, unless you’re allergic to nuts.  But, that’s the only reason I can ever imagine why someone wouldn’t fall in love with this salad.

Thai Peanut and Chicken Salad - Mimi's Fit Foods

Thai Peanut Salad
Adapted from Studio 5 and the Unconventional Kitchen

Salad Ingredients:
4 ounce whole wheat pasta
(spaghetti, angel hair, linguine, or brown rice noodles all work great)
3 cups romaine, chopped
3 cups nappa cabbage, chopped
2 cups thinly sliced purple cabbage
1 red bell pepper, thinly sliced
1 medium carrot, cut in little matchsticks
1 medium cucumber, halved and sliced
3 green onions
12 ounces cooked chicken breast, chopped
1/4 cup cashews, chopped (or cashew pieces)

Dressing Ingredients:
1/4 cup peanut butter, natural no hydrogenated oils and sugar added
1/2 lime, juiced and zested
1 teaspoons sesame oil
1 1/2 tablespoons seasoned rice wine vinegar
1 tablespoons soy sauce, reduced sodium (or Lite)
1 1/2 tablespoons honey
1 cloves garlic, roughly chopped
1 1/2 teaspoons fresh ginger, minced
1/4 cup roughly chopped cilantro (stems and all)
1/8 teaspoon sea salt
1-2 teaspoons Sriracha chili sauce (depends on your spice tolerance)
1 tablespoons water

For the Salad:
Cook noodles according to package directions (be sure to add salt to your boiling water, which should be included in package directions). 

While you are waiting for your noodles to cook, chop all of your veggies. 

When the noodles are done run cold water over them. When the noodles are cool, drain. Toss all of the salad ingredients together and serve with Thai Peanut Salad Dressing.

For the Dressing:
Put all of the ingredients in a blender and blend until smooth. 

If you want the dressing spicier add more Sriracha, if you aren’t into spice, start out with 1 teaspoon and add to taste from there.  The dressing makes approximately 3/4 cup (or 12 tablespoons).

Serves 4.

Nutritional Information (Per Serving = 1/4 the Salad Recipe – No Dressing)
Calories:  245.7
Protein:  23.5g
Carbs:  33.1g
Fat:  5.3g (0.5g = Sat.)
Fiber:  7.2g
Sugars:  4.2g

Nutritional Information – Dressing Only (Per Serving = 1 Tablespoon)
Calories:  47.7
Protein:  1.4g
Carbs:  3.4g
Fat:  3g (0.5g = Sat)
Fiber:  0.3g
Sugars:  2.4g

Nutritional Information (Per Serving = 1/4 the Salad Recipe plus 1 Tablespoon Dressing)
Calories:  293.4
Protein:  24.9g
Carbs:  36.5g
Fat:  8.3g (1g = Sat.)
Fiber:  7.6g
Sugars:  6.6g