Sweet Mustard and Rosemary Chicken

Sweet Mustard and Rosemary Chicken - Mimi's Fit Foods

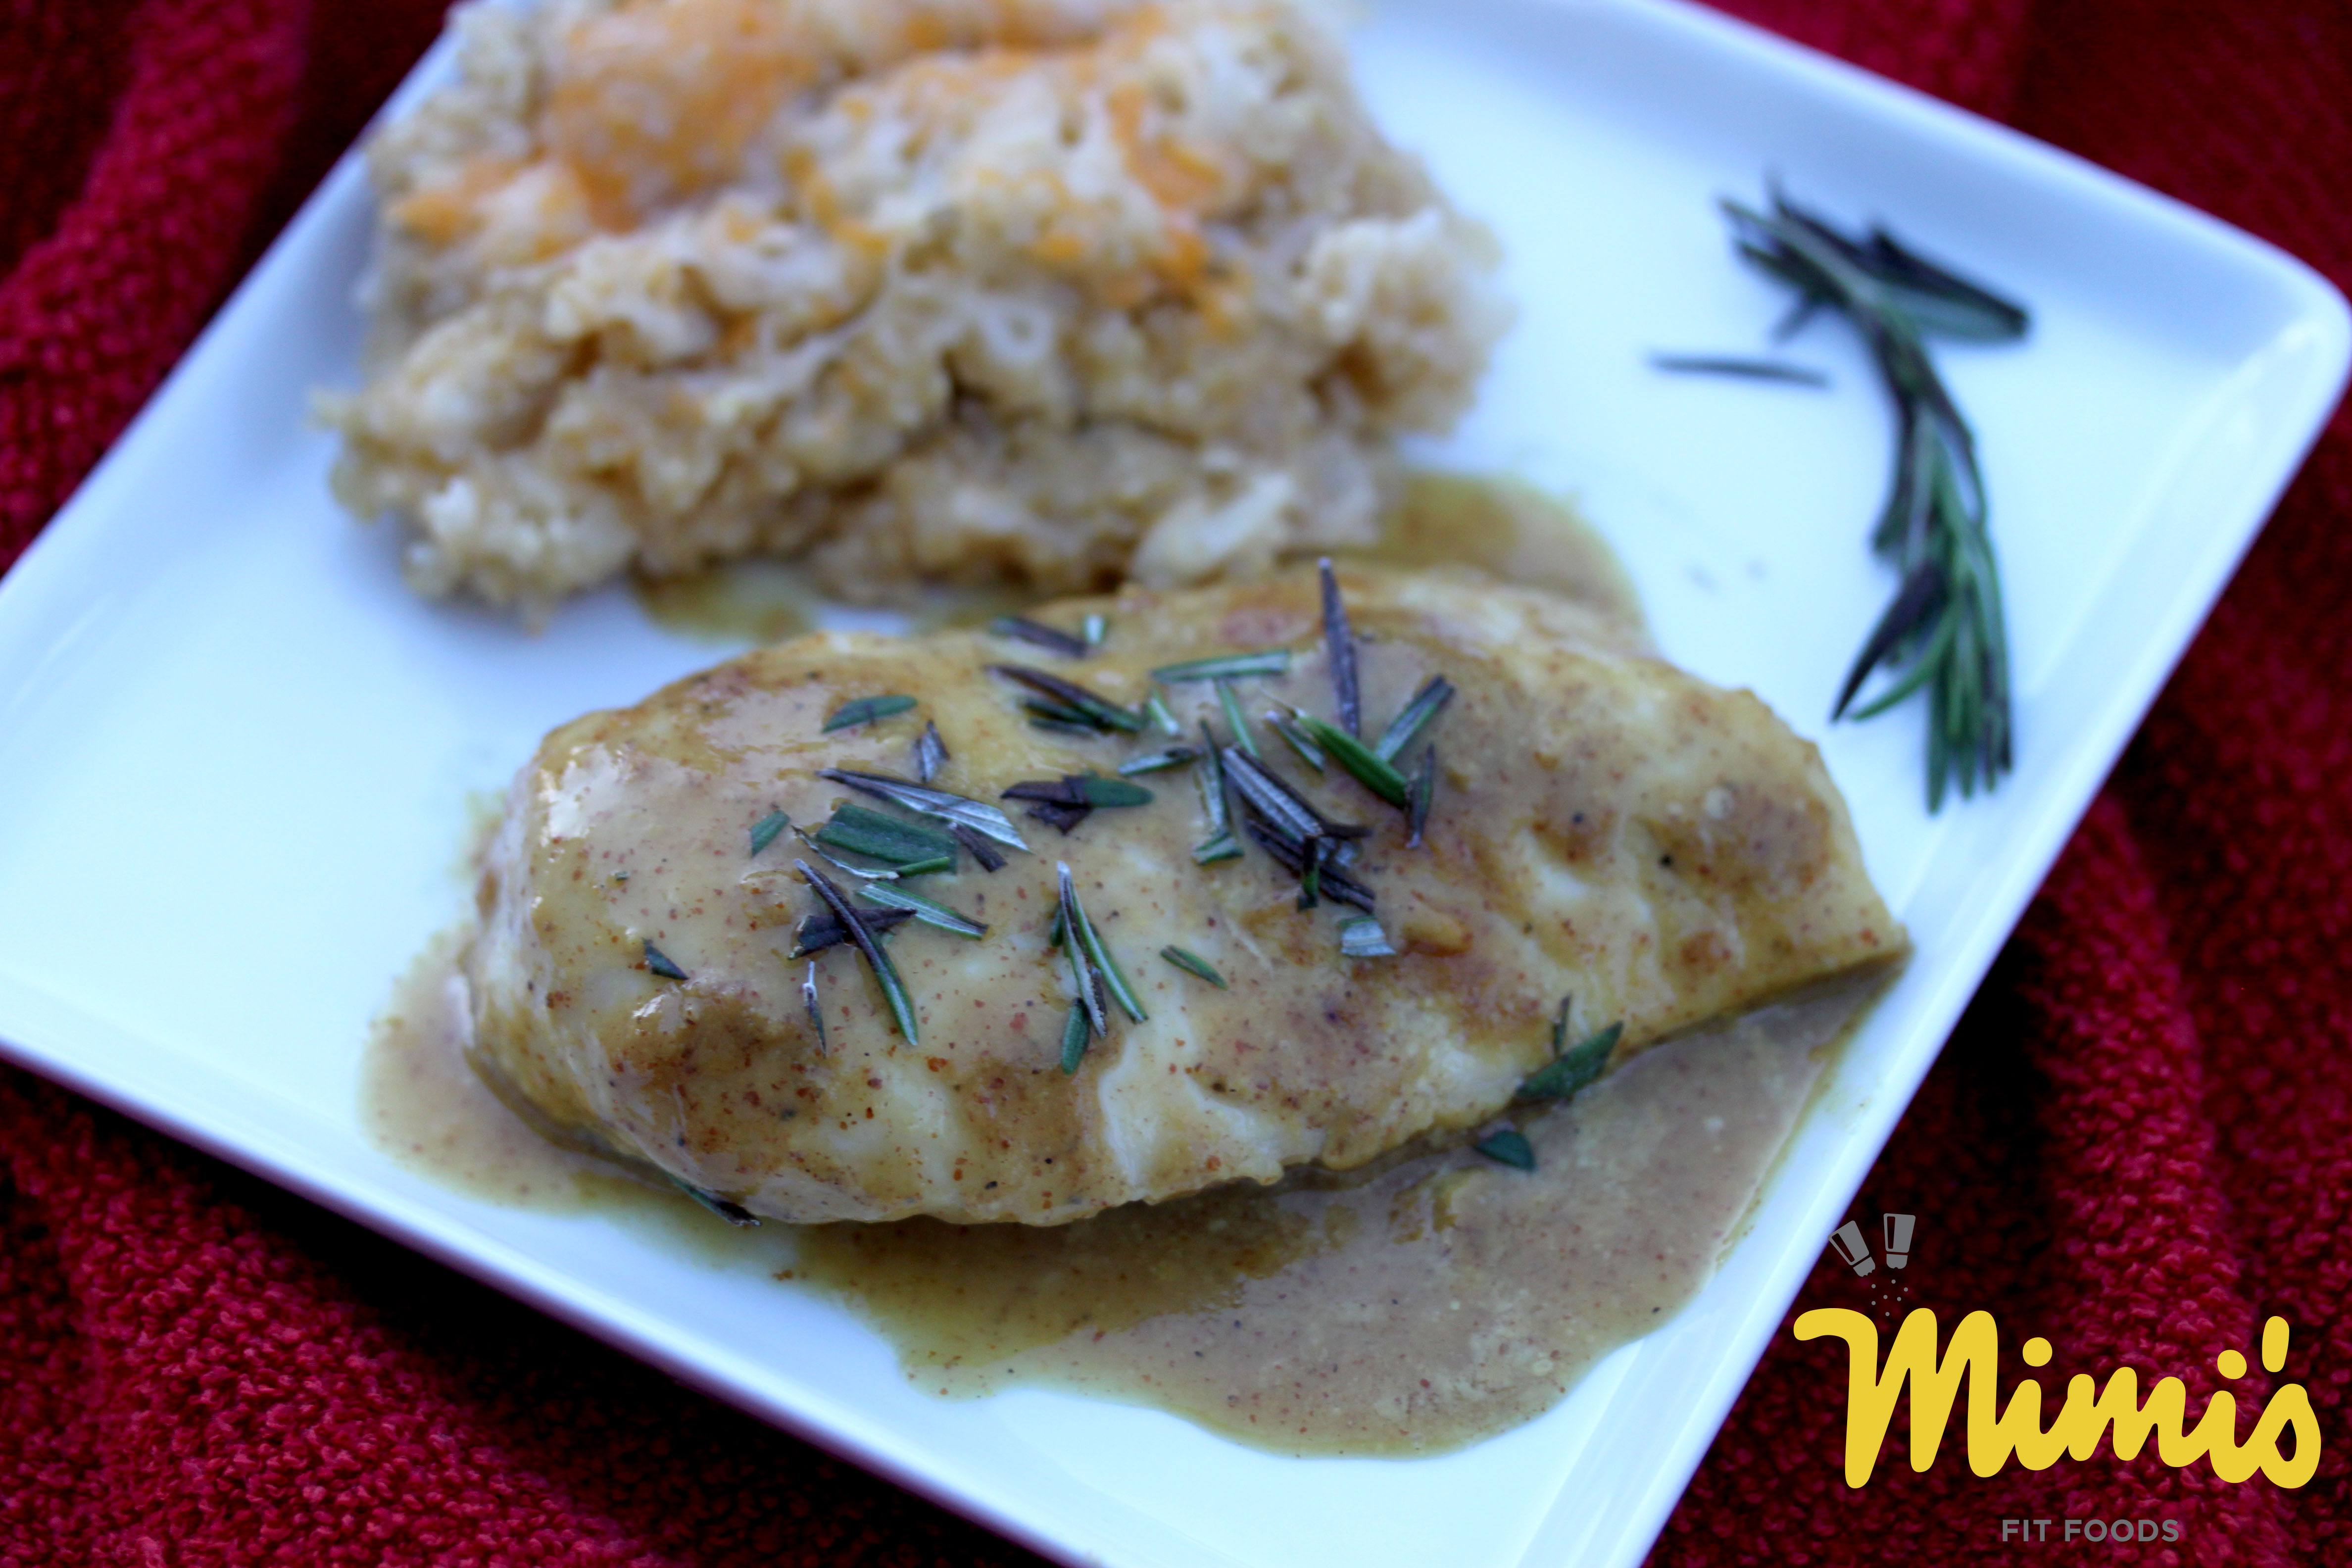
Mmmmmmm!  This recipe is yummy to have any time, but it was so perfect for an Autumn dinner.  It’s that combination of sweet and spicy and then topped with fresh herbs.  This chicken definitely has a mustard flavor, but I dare say that it’s perfectly balanced (and toned down) with the aid of maple syrup and brown sugar.  It cooks for less than 30 minutes and then you top it with the magical power of fresh rosemary!  Yeah, I said magical!  The rosemary makes ALL the difference in this recipe and it’s a MUST!  It brings the chicken to an entirely different level . . . . a magical level.

When I first saw the recipe I knew I had to try it.  Not only were the reviews awesome, but mustard is such a low-calorie condiment.  I knew that if I was going to make chicken with a sauce that wouldn’t pack on the extra calories, this was going to be a good one!

We ate this alongside Cheesy Cauliflower Quinoa, but it’s simple enough to be eaten with any typical side dish (baked potatoes, rice, etc.).  I loved how quickly this came together and I’m guessing we’ll be eating a lot more Sweet Mustard and Rosemary Chicken in the weeks/years to come!

Sweet Mustard and Rosemary Chicken
Slightly Adapted from Mel’s Kitchen Cafe

3/4 cup spicy brown mustard (I used French’s)
1/4 cup pure maple syrup (I used Grade B)
2 tablespoons packed light brown sugar
1 tablespoon plus 2 teaspoons red wine vinegar
2 pounds skinless chicken breasts (4-8 depending on size)
salt and pepper
fresh rosemary for garnish

Preheat oven to 425 degrees F.  Lightly coat a 9×13-inch pan with cooking spray.

In a small bowl or liquid measuring cup, whisk together the mustard, maple syrup, brown sugar and red wine vinegar.  Set aside.

Arrange the chicken in the prepared baking dish with the chicken pieces not touching – just a little space between each.  Liberally salt and pepper both sides of each chicken breast.

Pour the sauce mixture over the chicken, lifting the chicken here and there to allow the sauce to spread underneath the chicken.  Bake for 15 minutes.  Remove the pan from teh oven and carefully spoon some of the sauce from the bottom of the pan onto each chicken breast.  Cook for 8-12 minutes more until the sauce is bubbly and the chicken is cooked through (will register 165 on an instant read thermometer).  Don’t over bake!  Just get that chicken perfectly nice and juicy.

Remove from the oven and sprinkle with freshly chopped rosemary.  Serve immediately.

Serves 8.

Nutritional Information (Per 4-Oz. Serving)
Calories:  171.3
Protein:  25.9g
Carbs:  9.6g
Fat:  1.1g (0g = Sat.)
Fiber:  0g
Sugars:  9.6g

Cheesy Cauliflower Quinoa

Cheesy Cauliflower Quinoa - Mimi's Fit Foods

You guys!  This is such a yummy side dish.  We all loved it at first bite!  If you love quinoa, it’s a no-brainer.  If you don’t love quinoa, well this might just be the recipe to change your mind.  You’re probably thinking, “Come on.  How awesome can quinoa get with the addition of cauliflower and cheese?”  Well, let me tell you!  It gets pretty darn awesome!  Think cheesy cauliflower with the creamy texture of quinoa thrown in.  I guess I just needed a good excuse to find cheesy cauliflower legit in a healthy way.  I totally feel 100% okay with getting my cheesy cauliflower fix with this yummy dish.  We’re totally addicted and we might end up having this more than once or twice a week now.

Cheesy Cauliflower Quinoa
Adapted from Mom, What’s For Dinner?

1 cup quinoa, well rinsed
1 3/4 cup low-sodium chicken broth
2 cups cauliflower, chopped
1 cup reduced fat cheese (I used a Mexican 4-cheese blend)
salt and pepper to taste

Add quinoa and broth to a medium pot.

Cover and bring the quinoa and broth to a boil over medium heat. Add Cauliflower and reduce the heat and simmer covered until the broth has been absorbed and the quinoa is tender,about 15-20 minutes.

Mix in the cheese, let it melt and season with salt and pepper. Serve hot! This easily reheats. Keep in an airtight container in the fridge for up to 3 days.

Serves 6.

Nutritional Information (Per Serving = 1/6 of the Recipe)
Calories:  180.7
Protein:  10.6g
Carbs:  22.7g
Fat:  5.9g (2g = Sat.)
Fiber:  2.8g
Sugars:  2g

DIY Microwave Popcorn with Coconut Oil

DIY Microwave Popcorn - Mimi's Fit Foods

Popcorn is one of our most favorite low-calorie treats.  We love the flavor and the crunch.  That all being said, I hate to get out the air-popper all the time and sometimes the store-bought microwaved stuff doesn’t really pop all that well (I swear I burn it more than I don’t!).  Besides that, it isn’t all natural . . . just look at your label next time.

I ran across this option to microwave my own popcorn and just had to try it!  It works so well and now we pop our popcorn like this 99% of the time. It’s fast, easy, and all natural.  I opt to use Coconut Oil rather than any other oils because the health benefits of this oil outweigh all the others.  I also find the results are a little better when I use the bigger lunch bag (Approx. 13″ tall by 8″ wide), but have also made it in a traditional lunch bag (Approx. 10″ tall by 5″ wide) with okay results.

Along with my love of popcorn, my little baby also LOVES popcorn and constantly asks for “pop pop” when it’s snack time (she couldn’t even wait 2 seconds for me to take a picture before she stuck her cute, little hand in for a taste).  I am always happy to oblige to her request!  Give it a whirl! You’ll love it too!

DIY Microwave Popcorn With Coconut Oil - Mimi's Fit Foods

DIY Microwave Popcorn with Coconut Oil
Adapted from Mostly Homemade Mom

1 teaspoon coconut oil
1 teaspoon salt
1/4 cup corn kernels

Melt coconut oil in a small bowl (takes about 1 minute on 1/3 power in the microwave).  Add salt and kernels to the oil and stir to coat kernels.  Drop kernels into a paper lunch bag, fold over twice and microwave for 1 1/2 – 2 minutes.  (Cooking time will vary based on your microwave.  I like to cook mine for 1 1/2 minutes.  I still end up with a few extra un-popped kernals, but I never burn my popcorn.)  Add additional salt if desired.

Serves 2.

Nutritional Information (Per Serving = Approximately 3 Heaping Cups)
Calories:  106
Protein:  2.7g
Carbs:  16.7g
Fat:  3.3g (1.9g = Sat.)
Fiber:  3.3g
Sugars:  0g

Baked Corn Dogs

Baked Corn Dogs - Mimi's Fit Foods

Oh my word!  Sorry for my absence the past week!  I was traveling, but had still hoped to get my recipes posted and it just didn’t happen.  So, why not apologize for my delay with corn dogs!  Yes, I love corn dogs.  (Have you ever tried one at Disneyland?  They are INCREDIBLE!)  I rarely eat them though because they come fried like 99.9% of the time.  Unless . . . . we make them ourselves at home.  I stumbled across this recipe a couple summers ago and gave them a whirl.  I’m not gonna lie.  I think these are SO much better than the typical, fried corn dogs.  They’re worth the extra amount of work, which really isn’t much, and they are WAY healthier for us.  I’ve taken them to family BBQ’s (reheating them on the grill) and they are a gobbled up in no time.  Definitely a crowd pleaser among adults and children alike.

I usually buy Turkey Franks.  I’ve bought the Jennie-O brand (70 calories per dog) and the Ball Park-All White Turkey brand (only 45 calories per dog).   Both yield tasty results.  (If you’re not trying to be super-duper healthy I will tell you that the Nathan’s All-Beef Hot Dogs are the yummiest, but you’ll pay for it with extra calories as they come in at 170 calories per dog.)

The dough is a cinch to pull together.  The only trick is to make sure you allow enough time for it to rise, so plan accordingly.  Once the dough is risen it takes maybe ten minutes to roll it out and wrap around your hotdogs and then you just bake them.  The dough has a nice, sweat corn taste to compliment the hotdogs and I personally love to dip the finished corn dogs in spicy mustard (it’s high in flavor and low in calories).

Sometimes I cut some of the hotdogs in half (crosswise) before I wrap the dough around them so that there are little ones for the kids.   We eat these at record speed every time I make them.  I’m pretty sure you will too.

Baked Corn Dogs
Adapted from The Food Network

1 cup reduced-fat milk
2 1/4 teaspoons instant yeast (like SAF)
2 tablespoons extra-virgin olive oil
2 tablespoons packed light brown sugar
1 cup fine yellow cornmeal
3/4 cup whole wheat flour, plus more for dusting and kneading
1/2 cups all-purpose flour
1 teaspoon salt
1/4 teaspoon baking soda
1/4 teaspoon cayenne pepper
12 reduced-fat hot dogs (I used Ball Park Turkey Franks)
1 large egg, beaten

Warm the milk to about 110 degrees; pour into mixing bowl. Sprinkle in the yeast and let soften for about 2 minutes.  Add in the olive oil, brown sugar and cornmeal and mix until it just comes together.   Add the flour, salt, baking soda and cayenne pepper; mix to make a sticky dough.

With a dough hook, knead the dough in the mixer for about 2 minutes, adding more flour if needed, until a smooth but still slightly tacky dough forms.  (Alternately you can turn the dough out onto a lightly floured surface and knead, adding more flour if needed, until smooth but still slightly tacky, about 5 minutes.)  Shape the dough into a ball, place in a lightly oiled bowl and cover with plastic wrap. Let rise in a warm spot until doubled in size, 45 minutes to 1 hour. Meanwhile, insert a wooden stick or small skewer into each hot dog, about 2 inches deep; set aside.

Preheat the oven to 450 degrees and lightly oil a large baking sheet. Turn the dough out onto a lightly floured surface; divide into 12 pieces. With your palms, roll each piece into a 10 to 12-inch length. Wrap each piece around a hot dog, tucking and pressing the edges to seal; place on the baking sheet.

Brush the dough-wrapped dogs with the beaten egg. Bake until golden, 15 minutes.

Serves 6

Nutritional Information (Per Serving = 2 Corn Dogs)
Calories:  335
Protein:  19.3g
Carbs:  51.3g
Fat:  6.7g (1.2g = Sat. Fat)
Fiber:  4g
Sugars:  8.3g

Grilled Peaches With a Raspberry-Lime Marinade

Grilled Peaches With a Raspberry-Lime Marinade - Mimi's Fit Foods

Have you ever had grilled peaches before?  They are delicious and make such a sweet little dessert without loads of calories.  We have them every fall when the peaches are in season.  I tried this new variation of them and they turned out so awesome.  The peaches get to take a 30-60 minute soak in a flavorful marinade made up of brown sugar, lime juice, and raspberries.  Holy moly!  So good, right!?  This marinade just adds an extra fabulous layer of taste to the grilled peaches and we were all smitten at our house.

The grilled peaches are delicious plain (well, topped with a little extra marinade, of course) . . . especially if you’re using them for a side dish.  If you want to take them to an extra dessert-ish level, you can add ice cream.  We totally did this (because, why not!?) and we chose to top our peaches with Dryer’s Slow Churned Frozen Vanilla Yogurt.  YUM!

Grilled Peaches With a Raspberry-Lime Marinade Frozen Yogurt - Mimi's Fit Foods

Grilled Peaches With a Raspberry-Lime Marinade
Adapted from sparkrecipes.com

2 tablespoons brown sugar
2 tablespoons fresh lime juice (usually 1 lime)
1 cup fresh raspberries
5 medium unpeeled peaches, halved and pitted
(vegetable oil to coat the grill)

Comine sugar and lime juice in a shallow dish; mix well.  Add 1/2 of the raspberries and mash.

Add peach halves, turning to coat and marinate at room temperature, cut sides down for 30-60 minutes.

Clean and pre-heat grill to a medium-high heat.  Coat grill rack with oil and place peaches cut sides down (save marinade).  Turn peaches over after two minutes, reduce heat to low-medium, then cook for another 15 minutes or until tender, basting once with half of the reserved marinade.  Remove from grill.

Stir remaining raspberries into reserved marinade and spoon over peach halves.  Serve warm (and top with your choice of ice cream, if desired).

Serves 5.

Nutritional Information (Per Serving = 2 Peach Halves)
Calories:  75.8
Protein:  1g
Carbs:  21.7g
Fat:  0.2g (0g = Sat)
Fiber:  3.7g
Sugars:  7.5g

Nutritional Information
(Per Serving = 2 Peach Halves + 1/4 Cup Dryer’s SC Frozen Yogurt )
Calories:  125.8
Protein:  2g
Carbs:  30.2g
Fat:  1.7g (0g = Sat.)
Fiber:  3.7g
Sugars:  7.5g

Peach and Blue Cheese Chicken Pizza With a Balsamic Reduction

Peach and Blue Cheese Chicken Pizza - Mimi's Fit Foods

Peaches are full-on in-season right now and we’re LOVING them at our house.  We eat them a lot for snacks, but we also like to turn them into meals too.  If you’re looking for a more sophisticated pizza, this is totally for you!  It’s sooooo yummy.  This pizza is topped with chicken, fresh peach slices, and blue cheese.  The drizzle of tangy balsamic reduction makes the most perfect balance to the sweet summer fruit.   And guess what!?  My little baby even ate it (I totally thought the blue cheese would throw her off, but she didn’t even balk at it)!  This makes for a great late-summer or early-fall dinner and is a fabulous way to use those delicious orchard peaches.

I used my easy whole wheat pizza dough for the crust, but the original version of the recipe used a prebaked thin pizza crust (such as Boboli).  I’ve tried it both ways, and I prefer to make my own crust because it is WAY cheaper, tastes fresher, and I know exactly what’s in it.  But, when I’m a little lazier than usual and I’ve remembered to grab it at the store, I resort to Boboli (although the easy pizza dough recipe here is seriously EASY).

Peach and Blue Cheese Chicken Pizza With a Balsamic Reduction
Adapted from Cooking Light

For the Dough:
2 1/2 cups whole wheat flour
2 tablespoons sugar
3/4 teaspoon salt
1 tablespoon instant yeast
1 tablespoon lecithin
1 cup hot water (as hot as you can get it out of your tap)

For the Pizza:
1 1/2 teaspoons extra-virgin olive oil
1 cup shredded part-skim mozzarella cheese, divided
1 pound shredded cooked chicken breast
1/2 cup crumbled reduced-fat Blue Cheese
1 medium unpeeled peach, thinly sliced
1/2 cup balsamic vinegar

For the dough:
Mix dry ingredients.  Add lecithin and water.  Mix in until dough combines, approximately 1 minute and check for consistency (use your dough hook on your mixer).  Dough should be a little sticky.  If dough is too dry, add more water.  Mix for 5 minutes on a medium speed (this will knead your dough).

Using a rolling pin, roll into your desired shape and place on a lightly greased pizza stone (or cookie sheet).   (Lately, I like to roll mine into a rectangle because it fits nicely on my rectangle pizza stone or on a cookie sheet.  However, I sometimes roll into a circle and use my round pizza stone too.)  Your crust is now ready to put all your toppings on.  You do not have to wait for this dough recipe to do any rising.  Awesome!

For the Pizza:
Preheat oven to 400 degrees.  Brush the extra-virgin olive oil evenly over crust.  Top evenly with 1/2 cup shredded mozzarella cheese, chicken, Blue cheese, and peach slices.  Top with remaining 1/2 cup mozzarella.  Bake in 400-degree oven for 12-15 minutes or until crust is golden brown and cheese is melted and bubbly.

While pizza is cooking, place vinegar in a small saucepan over medium-high heat; cook until reduced to about 2-3 tablespoons (about 5-7 minutes).  Drizzle balsamic reduction evenly over pizza.

Cut into 12 equal pieces.

Serves 6.

Nutritional Information (Per Serving = 2 Slices)
Calories:  373.6
Protein:  29.8g
Carbs:  46.7g
Fat:  8.6g (4.0g = Sat.)
Fiber:  6.9g
Sugars:  5.7g

Easy and Simple Cheeseburger Pizza

Easy and Simple Cheeseburger Pizza - Mimi's Fit Foods

You need another easy-peasy (and cheesy) week-night meal, don’t you!?  I think we can NEVER have enough of these recipes.

This recipe is definitely tasty, but it isn’t going to blow-your-socks off.  I debated on sharing it because (A) – the pictures don’t make it look super pretty and (B) – it’s pretty simple in taste.  However, I decided to share it with you because it’s super easy to throw together, the simple taste fits virtually all palettes, and the short ingredient list is all stuff that I always have on hand.  These reasons are truly why this even got put on the menu one night.  I was tired and hadn’t really thought about dinner until, well, it was time to eat.  I scrambled for something easy and fast and this is what came out of it.  My little Evie Doll ate it like it was her new favorite food and Beau and I enjoyed it just fine too.  I gotta be honest and tell you that I was glad there were leftovers because that made lunch the next day a slam dunk!

I used my easy whole wheat pizza dough recipe for the crust.  I love this recipe because it requires no rising time.  And, when I don’t think of making dinner until the last second, this is perfect since I don’t have time to wait hours for dough to rise.  Lately when I make pizza I’ve been rolling it in a rectangular shape to fit my rectangular pizza stone (or a cookie sheet).  I can cut it into equal sections and it seems easier to cut up for my baby.  However, you can totally make it round too.

If you feel up to it and have more energy than I did the night I made this, you can definitely make your pizza more snazzy by adding chopped tomatoes, onions, and maybe even chopped pickles when it comes out of the oven.  But, if you’re like me most nights . . . making it as written will usually win you some smiles without a whole lot of effort.

Easy and Simple Cheeseburger Pizza
Mimi’s Original

For the Dough:
2 1/2 cups whole wheat flour
2 tablespoons sugar
3/4 teaspoon salt
1 tablespoon instant yeast
1 tablespoon lecithin
1 cup hot water (as hot as you can get it out of your tap)

For the Pizza:
3/4 cup Marinara/Tomato Sauce
(you can also us a canned spaghetti sauce like Prego Heart Smart)
1 cup reduced fat shredded cheese  (I used 4 cheese Mexican blend)
1 pound lean ground beef, cooked and drained

For the dough:
Mix dry ingredients.  Add lecithin and water.  Mix in until dough combines, approximately 1 minute and check for consistency (use your dough hook on your mixer).  Dough should be a little sticky.  If dough is too dry, add more water.  Mix for 5 minutes on a medium speed (this will knead your dough).

Using a rolling pin, roll into your desired shape and place on a lightly greased pizza stone (or cookie sheet).   (Lately, I like to roll mine into a rectangle because it fits nicely on my rectangle pizza stone or on a cookie sheet.  However, I sometimes roll into a circle and use my round pizza stone too.)  Your crust is now ready to put all your toppings on.  You do not have to wait for this dough recipe to do any rising.  Awesome!

For the Pizza:
Preheat oven to 400 degrees.  Spread marinara/tomato sauce all over dough, reaching to the sides.  Top with 1/2 cup of cheese, crumbled ground beef, and the remaining 1/2 cup of cheese.

Bake in 400-degree oven for 12-15 minutes or until crust is golden brown and cheese is melted and bubbly.

Cut into 12 equal pieces.

Serves 6.

Nutritional Information (Per Serving = 2 Slices)
Calories:  375
Protein:  28.7g
Carbs:  45g
Fat:  10.1g (4.5g = Sat.)
Fiber:  7.3g
Sugars:  6.7g

Thai Chicken Lettuce Wraps with Sweet Peanut Sauce

Thai Chicken Lettuce Wraps with Sweet Peanut Sauce - Mimi's Fit Foods

I always love a good Asian-inspired meal, and this has seriously jumped to the top of my list of favorites at the moment.  I love this variation of lettuce wraps like I’ve never loved lettuce wraps before (and I kind of seriously love lettuce wraps . . . the proof is here and here).  This variation is, to no surprise, infused with Thai flavors.  We’re talking peanut sauce, lime, cilantro, fresh veggies, and chicken.  The texture is fabulous by offering a little bit of crunch thanks to those water chestnuts and butter lettuce.  These are fresh, flavorful, and left us wishing we had doubled the recipe!  My husband said, “When I think of a Food Network competition, these are what I imagine would come out of it.”  Yeah . . . I guess they are Food Network worthy according to the hubby.

The peanut sauce offers a genuine sweetness because of that yummy honey.  You can make it spicy if you prefer by adding extra Sriracha sauce.  I kept it mild so my little one-year-old wouldn’t complain.  Either way . . . you’re going to loooooove it!  This sauce is what really made these lettuce wraps super duper awesome!

We ate these with a side of brown rice.  The meal was perfect . . . well, better than perfect.

Thai Chicken Lettuce Wraps with Sweet Peanut Sauce
Adapted Heavily from Bake Your Day

for the filling:
1 pound  cooked chicken breast, cubed
1 tablespoon extra virgin olive oil
1/2 cup yellow onion, diced
1 sweet bell pepper, diced (I used a yellow pepper)
4 green onions, sliced
1/2 cup carrots, cut in matchsticks (or shredded works too)
2 cloves garlic, minced
1/2 teaspoon salt
1/2 teaspoon pepper
1 (5-ounce) can sliced water chestnuts
1/2 cup cilantro, chopped
1 teaspoon Sriracha Sauce
1 teaspoon low sodium soy sauce

for the sauce:
1 tablespoon creamy, reduced fat peanut butter
1 tablespoon honey
1 1/2 teaspoon low sodium soy sauce
1/2 teaspoon toasted sesame oil
1/2 teaspoon ginger, freshly grated
1/4 teaspoon Sriracha sauce
2 teaspoons lime juice

for serving:
1 head of freshly washed lettuce leaves (I used butter lettuce)
chopped cilantro
fresh lime wedges (for lime juice)

Heat the olive oil over medium heat in a large non-stick skillet.  Sauté the yellow onion and bell pepper and 1/4 teaspoon of the salt until the vegetables are fragrant and soft, 7-10 minutes.

While the vegetables are cooking, mix the ingredients for the sauce together, cover and refrigerate until serving.

To the veggies, add the green onions, carrots, garlic, chicken, and water chestnuts.  Stir and then add remaining salt, pepper, Sriracha, soy sauce and cilantro.  Stir well.  Allow the mixture to cook for 1-2 minutes more and remove from heat.

Serve the mixture in lettuce cups/leaves and garnish with the Sweet Peanut Sauce, additional chopped cilantro, and fresh lime juice.

Serves 5.

Nutritional Information Per Serving (Serving Size = 1/5 of the recipe)
Calories:  190.7
Protein:  20.9
Carbs:  14.8g
Fat:  5.9g (0.7g = Sat.)
Fiber:  2.3g
Sugars:  6.6g

Sautéed Baby Squash with Basil and Feta

Sautéed Baby Squash with Basil and Feta - Mimi's Fit Foods

I found these cute, little baby squash at Costco and I couldn’t resist buying them.  Because of our move, we didn’t get our garden in this year so we haven’t been feeling that overdose of zucchini yet.  Thus, I plunged and made the purchase knowing we would love eating these cute squashes for dinner.  That being said, you can make this dish with your home-grown summer squash just as easily.  I thought this was a nice way to change up the flavors with the squash.  It comes together super fast (like under 10 minutes) and tastes great.  I think next time I’ll even add a drizzle of balsamic vinegar.  Yum!  This recipe offers another variation of how to use up that summer squash that seems to reproduce like crazy!

Sautéed Baby Squash with Basil and Feta

1/2 tablespoon extra virgin olive oil
4 cups summer squash
1 cup yellow onion, diced
1/2 teaspoon salt
1/4 teaspoon freshly ground black pepper
3 tablespoons crumbled reduced-fat feta cheese
2 tablespoons finely chopped fresh basil

Heat a large nonstick skillet over medium heat.  Add oil to the pan and heat for about 20 seconds.  Add squash and onions to pan; saute 5-8 minutes or until tender, stirring frequently.  Stir in salt and pepper.  Transfer squash mixture to a serving platter.  Sprinkle with cheese and basil.

Serves 4.

Nutritional Information (Per Serving = 1/4 of the Squash)
Calories:  86
Protein:  4.2g
Carbs:  10.9g
Fat:  2.8g (1.3g = Sat.)
Fiber:  3.3g
Sugars:  4.8g

Jalapeño Turkey Cheeseburgers with Guacamole

Jalapeno Turkey Cheeseburgers with Quacamole - Mimi's Fit Foods

You guys!  Labor Day weekend is this weekend and I know you totally need THE burger recipe for your BBQ.  I found it!  I truly did.  These are seriously so yummy!  We’re talking about taking a turkey burger to an elevated level with some simple spices, cheese, and quac.  I don’t know why I didn’t think of this combination for a turkey burger before, but I’m sure glad I found it.  There’s onion, garlic, fresh cilantro, smoky spices (cumin and smoked paprika), lime, and jalapeño in the turkey burger itself.  And then it gets topped with cheese and guacamole.  LOVE!  The jalapeño doesn’t make the burger spicy because you remove the seeds and membranes, but it packs GREAT flavor.

You’ve got to get these in before the grilling season ends.  I think Labor Day is a perfect excuse!  We had these on Fit Burger Buns with Easy Guacamole and we can’t wait to make them again.

Jalapeño Turkey Cheeseburgers with Guacamole
Adapted from Annie’s Eats

1 pound ground turkey
1/2 cup yellow onion, diced small
1/4 cup minced fresh cilantro
2 cloves garlic, mined or pressed
1 jalapeño, seeded, cored and minced
1 teaspoon ground cumin
3/4 teaspoon smoked paprika
juice of 1/2 lime
1/2 teaspoon kosher salt
1/2 teaspoon pepper

To serve:
Sliced Reduced Fat Cheese (I used Sargento’s Colby Jack)
Fit Burger Buns

Easy Guacamole

Directions:
Heat grill to medium-high heat.  Oil the grates to prevent the burgers from sticking.  To make the burgers, combine all ingredients in a large bowl and mix lightly, just until evenly combined.  Form the mixture into 5 patties.

Cook the patties on the heated grill, about 3-4 minutes per side, flipping once.  A few minutes before the burgers are finished cooking, top with sliced cheese.  Cook until an instant-read thermometer inserted in the center registers 160 degrees or until they are no longer pink.  Remove the burgers to a plate and let rest a few minutes before serving.  Assemble with burger buns and 1 tablespoon guacamole (each).

Serves 5.

Nutritional Information (Per Burger)
Calories:  393.6
Protein:  28.6g
Carbs:  33.3g
Fat:  18.9g (7g = Sat.)
Fiber:  6.4g
Sugars:  3.3g